Can you ask Claude Code to make a video? With the HyperFrames plugin, yes. HyperFrames for Claude Code teaches the agent to write a web page and turn it into an MP4 file.
You describe the video, and Claude handles the HTML, the checks and the render.
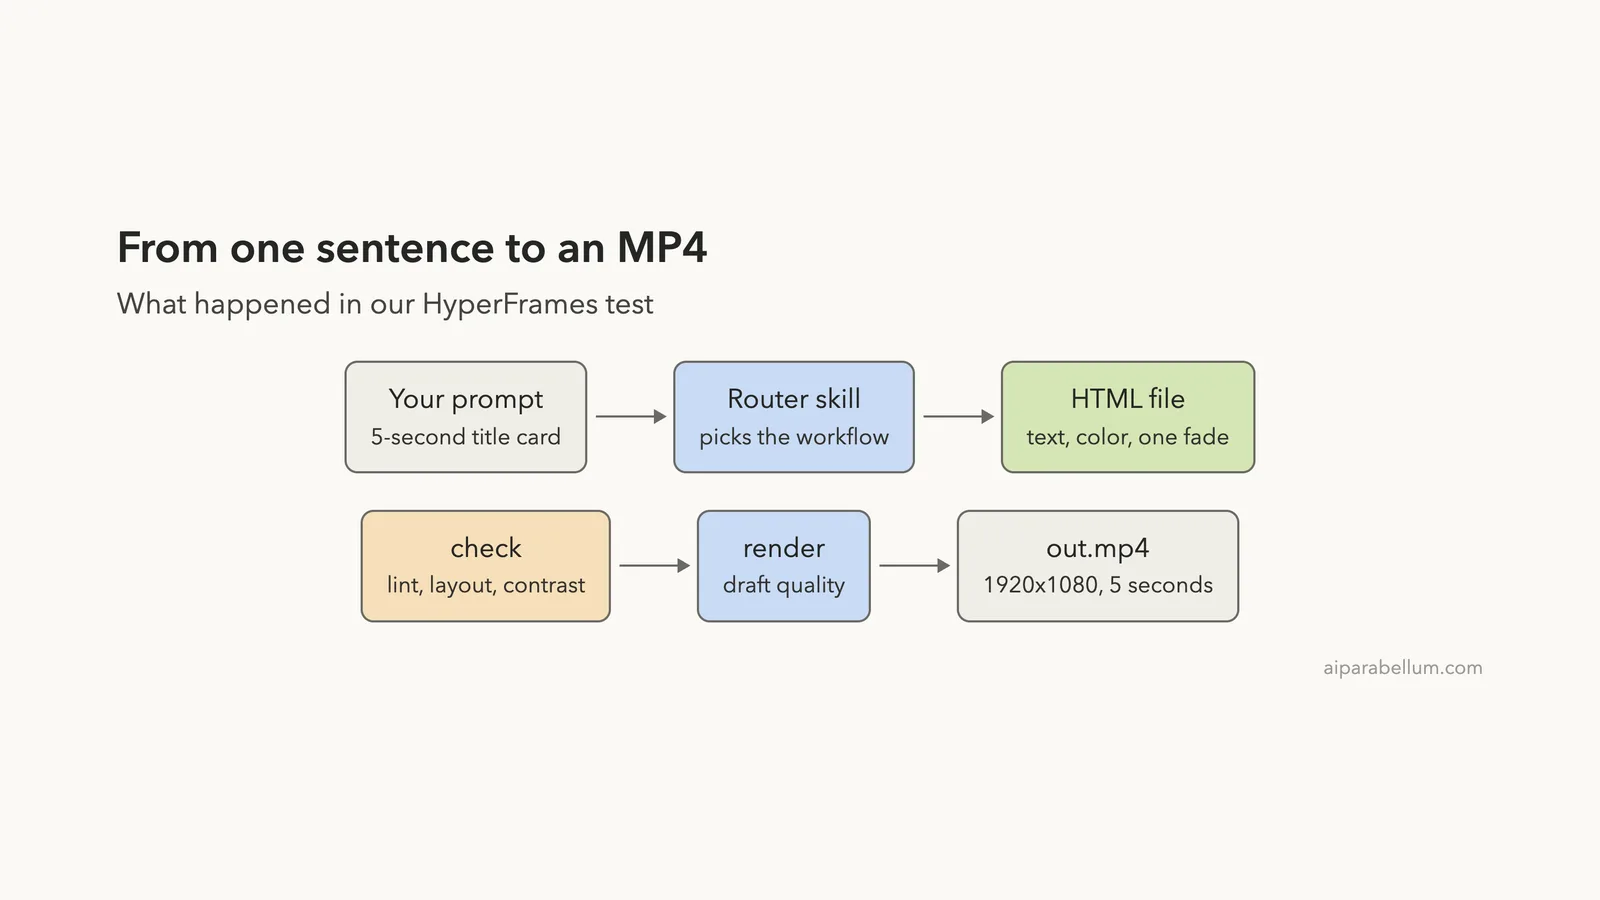
We loaded the plugin in a throwaway sandbox, asked for a five-second title card, and watched Claude Code build and render it. This guide shows the prompt, what happened on screen, the real video frames and the parts we did not test.
This guide is part of our Claude Code tutorials. Find more add-ons in our Skills Directory.
Tested with Claude Code v2.1.318 on November 8, 2026. The plugin is hyperframes version 0.8.61 from the heygen-com/hyperframes repository at commit 8d2b6e7bd.
The command line tool from npm was version 0.9.23. The official marketplace may pin a different plugin version than the one we loaded.
Quick Summary
| Question | Answer |
|---|---|
| What it is | A Claude Code plugin with skills for making video from HTML |
| Maker | HeyGen, under an Apache 2.0 license |
| Official install command | /plugin install hyperframes@claude-plugins-official |
| How we loaded it | --plugin-dir in a sandbox, nothing installed into our setup |
| Account needed | No, for the local steps we ran |
| What you need | Node.js 22 or newer and FFmpeg |
| What we built | A 5-second, 1920×1080 title card with a fade-in |
| What we did not test | Voiceover, captions, music, website capture and cloud rendering |
What Is HyperFrames?
HyperFrames is an open-source framework. According to its README, it turns HTML, CSS, media and animations into repeatable MP4 videos. You can use it from the command line or through AI coding agents.
The plugin is the agent side. It does not render anything by itself. Instead, it ships skills, which are written instructions that tell Claude Code how to plan a video, write valid HTML, add motion, check the result and render it.
If skills are new to you, our guide to Claude Code skills covers the basics. The Claude Code plugins guide shows how plugins are found, installed and managed.
Why HTML?
A video here is a web page with a timeline. Text, colors and layout come from ordinary HTML and CSS. Motion comes from an animation library, and the scaffold we saw used GSAP.
That is a good fit for an AI agent, because agents already write HTML well. It also means you can open the file, read it and change a color yourself.
What the HyperFrames Claude Code Plugin Contains
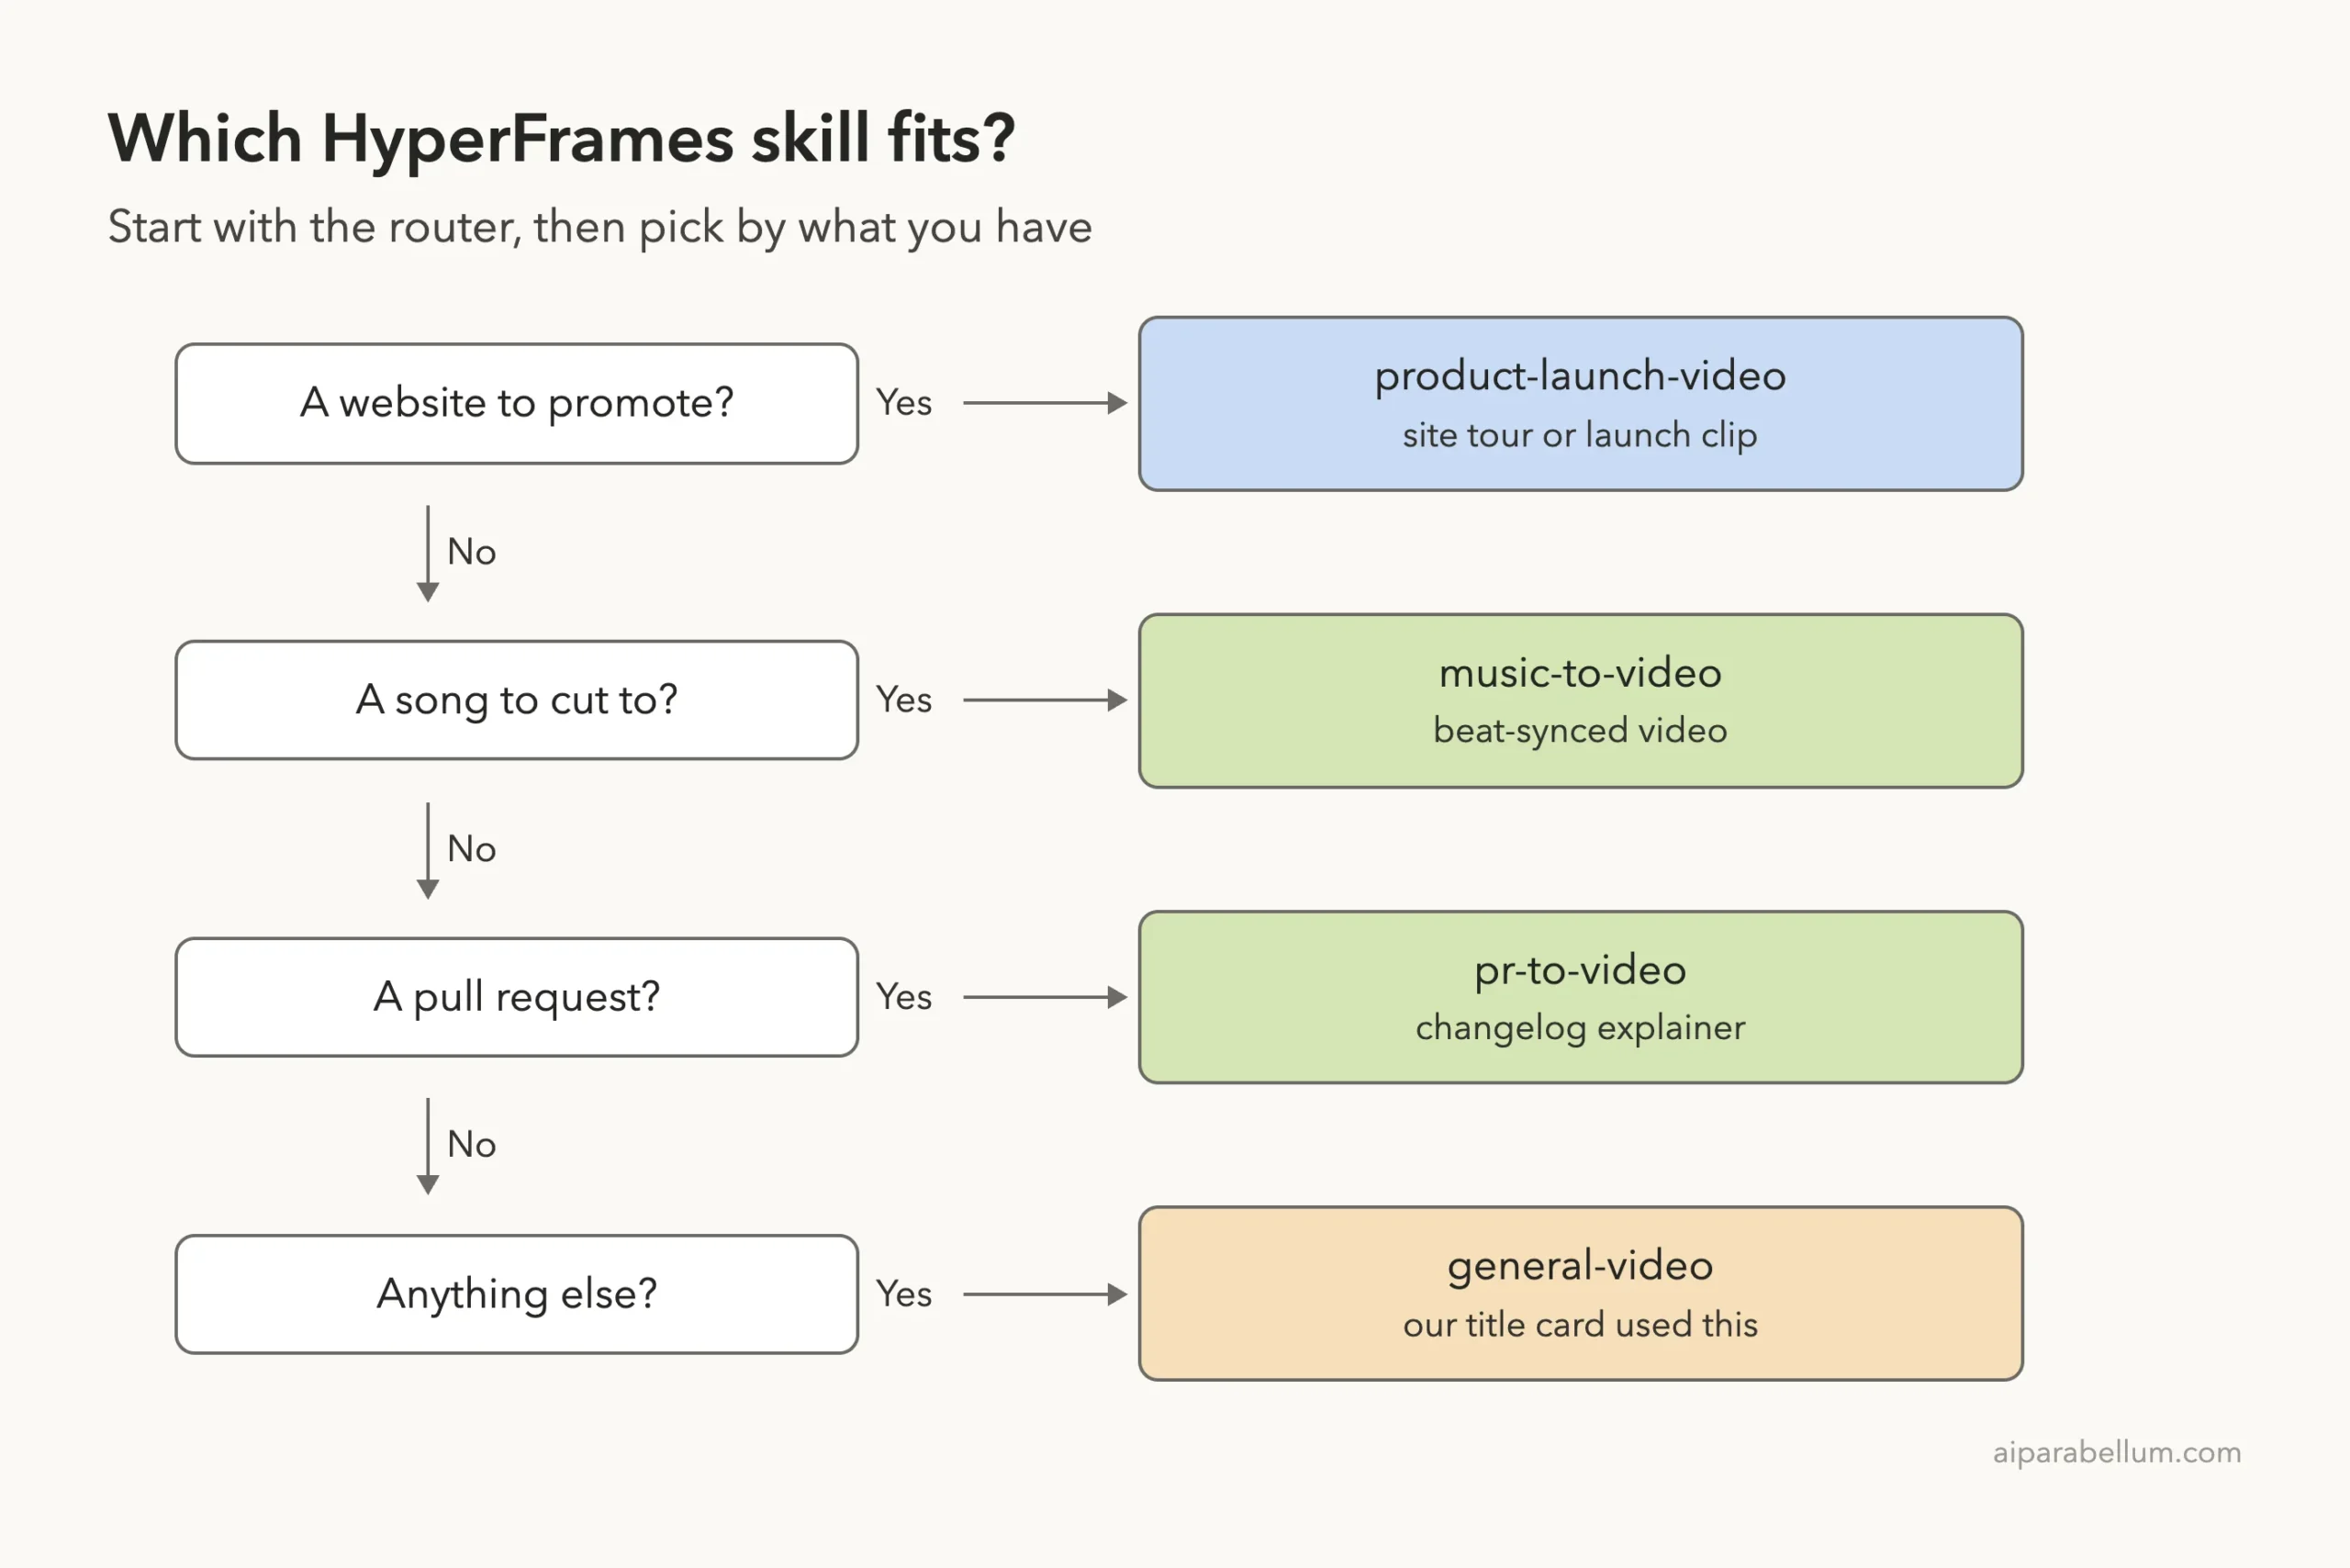
We read the plugin folder before running it. The README describes one router skill plus a set of workflows and domain skills. The router is called /hyperframes, and the README says to read it first for any request to make, edit or render a video.
| Skill | Use it when |
|---|---|
/hyperframes | Any video request, since it routes you to the right workflow |
/product-launch-video | You want a launch clip or site tour for a website |
/pr-to-video | You want a changelog explainer from a GitHub pull request |
/music-to-video | You want a beat-synced video from a music track |
/general-video | Nothing else fits, or you want a custom piece |
/hyperframes-cli | You need the command line loop: init, check, preview, render |
The full list in the README is longer. It also covers captions, talking-head edits, motion graphics, slideshows, Figma import and porting from Remotion. We only used the router and the general workflow.
How We Set Up the Test Safely
We did not touch our real Claude Code setup. Our Claude Code sandbox guide explains the idea in detail. Here is what we did.
- We cloned the plugin repository into a sandbox folder and made an empty demo project next to it.
- We started Claude Code with
--plugin-dirpointing at the plugin, so nothing was installed. - We used
--setting-sources project, so only the demo project’s settings loaded. - We installed the command line tool with
npm install hyperframesinside the demo project, not globally. - We set
HYPERFRAMES_NO_TELEMETRY=1, a variable the project’s own docs describe, to keep the test private.
We also allowed a short list of shell commands for that session, such as npx hyperframes and ffprobe, so Claude did not stop to ask each time. The official docs describe the normal install flow in the plugin discovery guide and the plugins reference.
One thing to watch: the skills update command
The plugin’s skills mention a command, npx hyperframes skills update, that installs extra workflows on demand. In the command line tool’s own source code, a comment says its skills store is ~/.claude/skills, which Claude Code reads for every project.
In an early attempt, Claude proposed running that command. We did not approve it. In the final run, we told Claude to read the skill files straight from the plugin folder, and it did.
If you install the plugin for real, expect that command to add skills to your own setup. Decide whether you want that first.
Step 1: Check That the Skills Loaded
Typing /hyperframes in the prompt box lists the plugin’s slash commands. The router showed up first, followed by workflows such as figma, slideshow, pr-to-video, general-video and music-to-video.
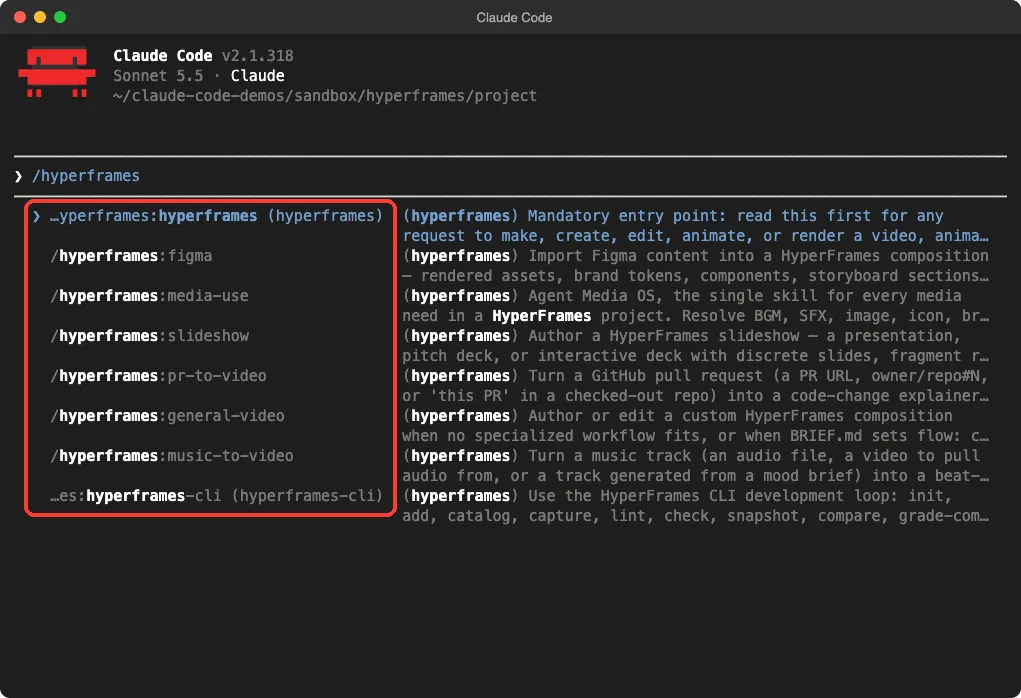
/hyperframes lists the router and its workflowsEach entry has a long description that tells Claude when to use it. The router’s description starts with “Mandatory entry point”, which matches the README’s advice.
Step 2: Ask HyperFrames in Claude Code for a Video
We kept the request small, so every step would be easy to follow. We wanted one text line, one color and one fade, with no audio.
Use the hyperframes plugin skill. Make a 5-second title card video with the text Hello from Claude Code, a dark blue background and a simple fade-in. No audio, 1920x1080. The brief is final, skip all questions and approvals. Read the skill files straight from the plugin folder and never run npx hyperframes skills update (it writes outside this project). Use the project-local CLI via npx hyperframes: init a project folder called titlecard, write the composition, run check, then render with --quality draft to out.mp4 and confirm the file with ffprobe.Notice the line about skipping questions. The plugin’s router normally confirms every creation brief up front, so a longer project would start with a few questions. For a test we wanted a straight run.
What Claude did first
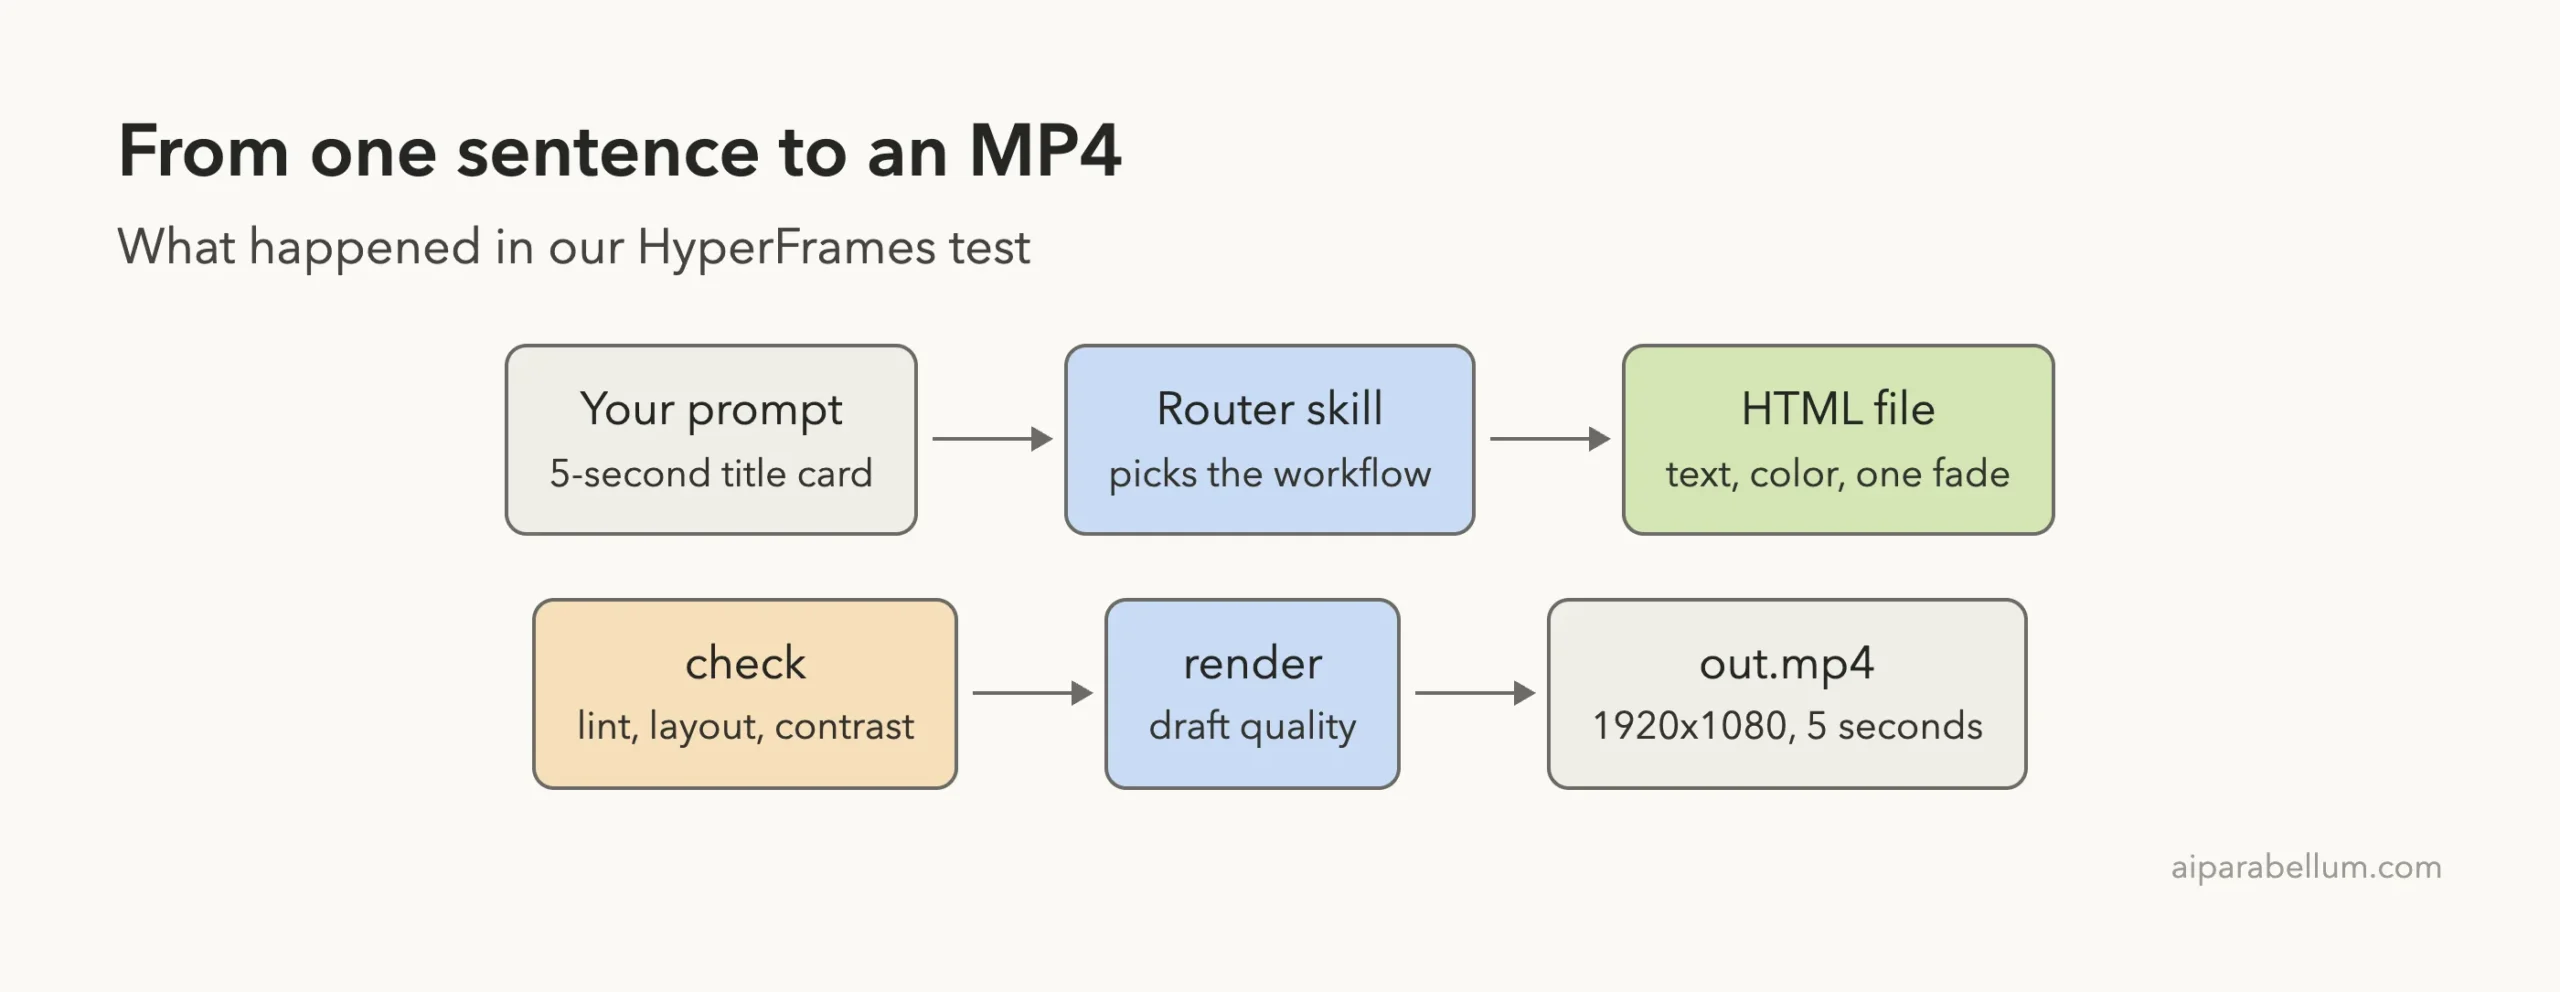
Claude read the skill files from the plugin folder, then ran npx hyperframes init titlecard. That command created a project with an index.html, a hyperframes.json file, a short AGENTS.md and a CLAUDE.md file inside the new folder.
The starting file was a blank template with a placeholder title, a black background and a ten-second timeline.
The edit Claude wanted to make
Next, Claude wrote a small Python script to change that template. It swapped the black background for dark blue, made the text bigger, set the duration to five seconds, replaced the placeholder title and added the fade-in.
That script needed our approval, because Python was not on our allowed list. The screen below is the real prompt we saw, with the edit highlighted.
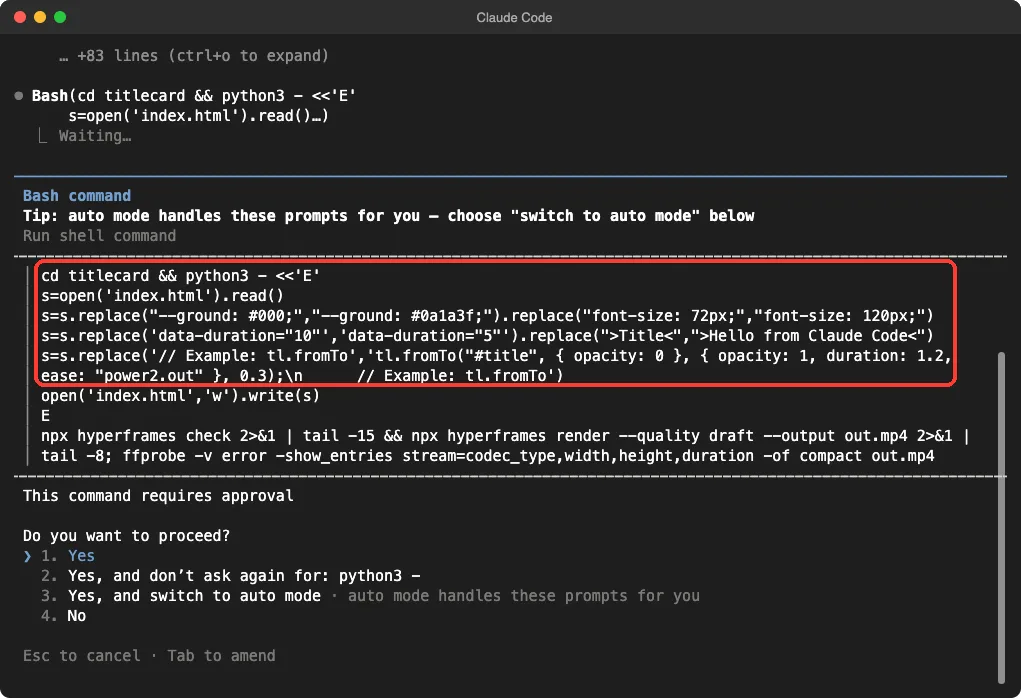
We resumed the same session with Python allowed for the demo folder. Claude reported that its first edit had not applied, then ran the script again, ran the check and started the render.
Step 3: Read the Composition
The finished file is short enough to read in one go. These are the parts that matter, trimmed from the file Claude produced.
<div id="root" data-composition-id="main"
     data-start="0" data-duration="5"
     data-width="1920" data-height="1080">
  <h1 id="title" class="clip" data-start="0" data-duration="5"
      data-track-index="0">Hello from Claude Code</h1>
</div>

const tl = gsap.timeline({ paused: true });
tl.fromTo("#title", { opacity: 0 },
  { opacity: 1, duration: 1.2, ease: "power2.out" }, 0.3);
window.__timelines["main"] = tl;
Here is how to read it.
- The
data-*attributes tell HyperFrames the size and length of the video, plus when each clip starts. - The timeline is paused, so the renderer can jump to any moment and take a picture of the page.
- The title fades in over 1.2 seconds, starting at 0.3 seconds.
One detail to know: the template loads GSAP from a public CDN link. Rendering therefore needs an internet connection unless you place a copy of the library in the project yourself. We did not test an offline render.
Step 4: Check, Render and Confirm
The skill’s workflow puts a check before every render. The npx hyperframes check command runs a lint pass, then opens a browser session to look for runtime errors, layout problems and low text contrast.
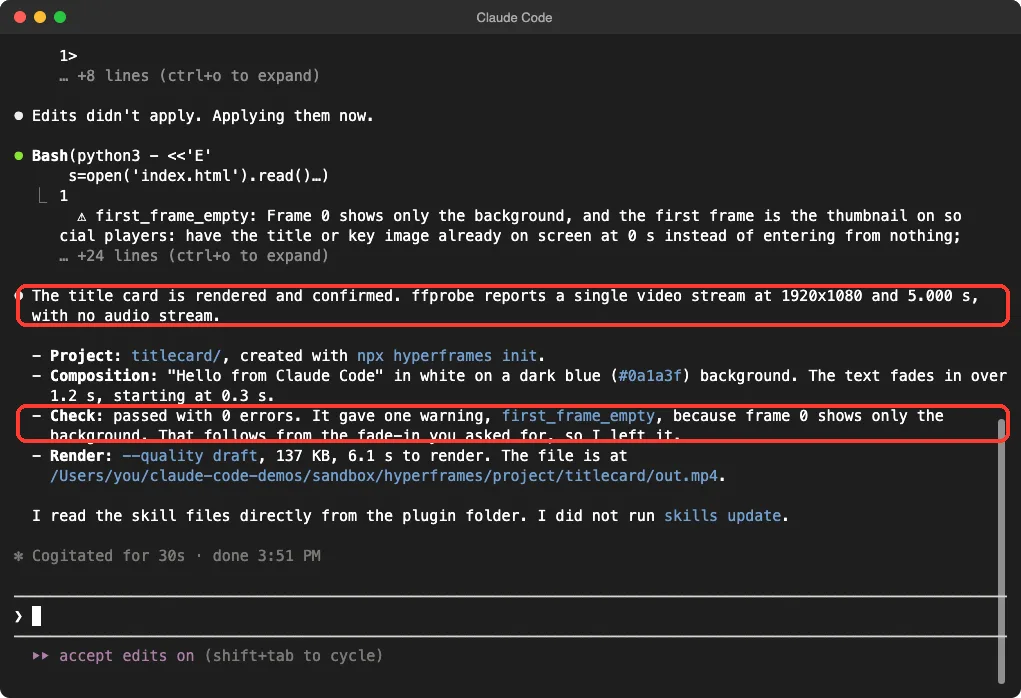
In our run, the check passed with zero errors and one warning. The warning was first_frame_empty. It says frame 0 shows only the background, and that the first frame is what social players use as the thumbnail.
That warning is correct. We asked for a fade-in, so the title is invisible at time zero. Claude left it alone and said why, which is the honest choice for this request.
Then Claude rendered with --quality draft. The render took 6.1 seconds and produced a 137 KB file. Claude confirmed the result with ffprobe: one video stream, 1920×1080, 5.000 seconds, and no audio.
We also checked the file ourselves
We ran ffprobe on the file outside Claude Code. It reported the same video stream at 1920×1080 and 5 seconds, and the file was about 140 KB on disk.
Then we pulled single frames out of the video with FFmpeg. This is the frame at 3 seconds, after the fade has finished.

And this is the frame at 0.9 seconds. The text is partway through the fade, so it looks a little gray. That shows the animation really ran.

Is It Worth Installing?
It depends on what you make. The title card is the simplest possible case, so treat our test as proof that the loop works, not as proof that it handles a complex film.
| What we saw | What it means for you |
|---|---|
| Skills loaded and listed cleanly | Setup is easy with --plugin-dir or the official install command |
| Claude followed init, edit, check, render | The workflow in the skills is real and followed |
| The check caught a real quirk | You get a safety net before you render |
| A draft render took about 6 seconds | Short clips iterate quickly on a modern Mac |
| The first edit needed a retry | Expect small hiccups, and watch the screen |
What We Did Not Test
This section matters, because the plugin promises much more than a title card.
- We did not add voiceover, music or captions. Our
doctorcheck showed the optional speech and music tools were not installed. - We did not capture a website or try the launch-video workflow.
- We did not use the preview window, the higher quality settings, or cloud rendering.
- We did not test on Windows or Linux. We tested on macOS, and the Windows and Linux steps follow the official instructions.
The README also lists a hosted rendering option from HeyGen. We did not use any HeyGen account, and everything we ran stayed on our own machine.
Try It Yourself
Make an empty folder, load the plugin with --plugin-dir, and paste a small prompt like this. Pick any short idea, such as a name card or a countdown.
Use the hyperframes plugin skill. Make a 4-second name card with the text Your Name Here on a dark green background with a slide-up animation. No audio, 1920x1080. Skip questions. Do not run npx hyperframes skills update. Init a project called namecard, run check, render with --quality draft to out.mp4 and confirm it with ffprobe.Then open the video, play it, and ask Claude to change one thing, such as the font size or the color.
Common Mistakes
- Forgetting Node.js 22 or FFmpeg. The README lists both as requirements, and
npx hyperframes doctorchecks them. - Letting the skills update command run without reading what it does.
- Asking for a long, complex video as your first test. Start with a few seconds.
- Treating every check warning as a failure. Read it first, as the fade-in warning above shows.
- Rendering at final quality while you are still iterating. Use
--quality draftfirst. - Assuming the render works offline when the template loads a library from a CDN.
Pro Tips
- Say what you want in plain words. The router decides which workflow fits.
- Keep one project folder per video, so the files stay tidy.
- Allow only the shell commands you need, such as
npx hyperframesandffprobe. - Read the generated
index.htmlonce. It teaches you how the timeline works. - Our guide to the MCP server guide shows another way plugins add skills.
- New to the model behind these tools? Read our Claude AI overview.
Honest Verdict
The plugin did what it promises on a small job. It loaded, Claude followed its workflow, and the video that came out matched the request in size, length and look.
We cannot say how it handles narration, music, captions or a full product film, because we did not run those. If you want to make short motion graphics or title cards without learning video software, it is worth a try. If you never make video, you can skip it.
Start with a five-second clip, read the check output, and only then ask for more.
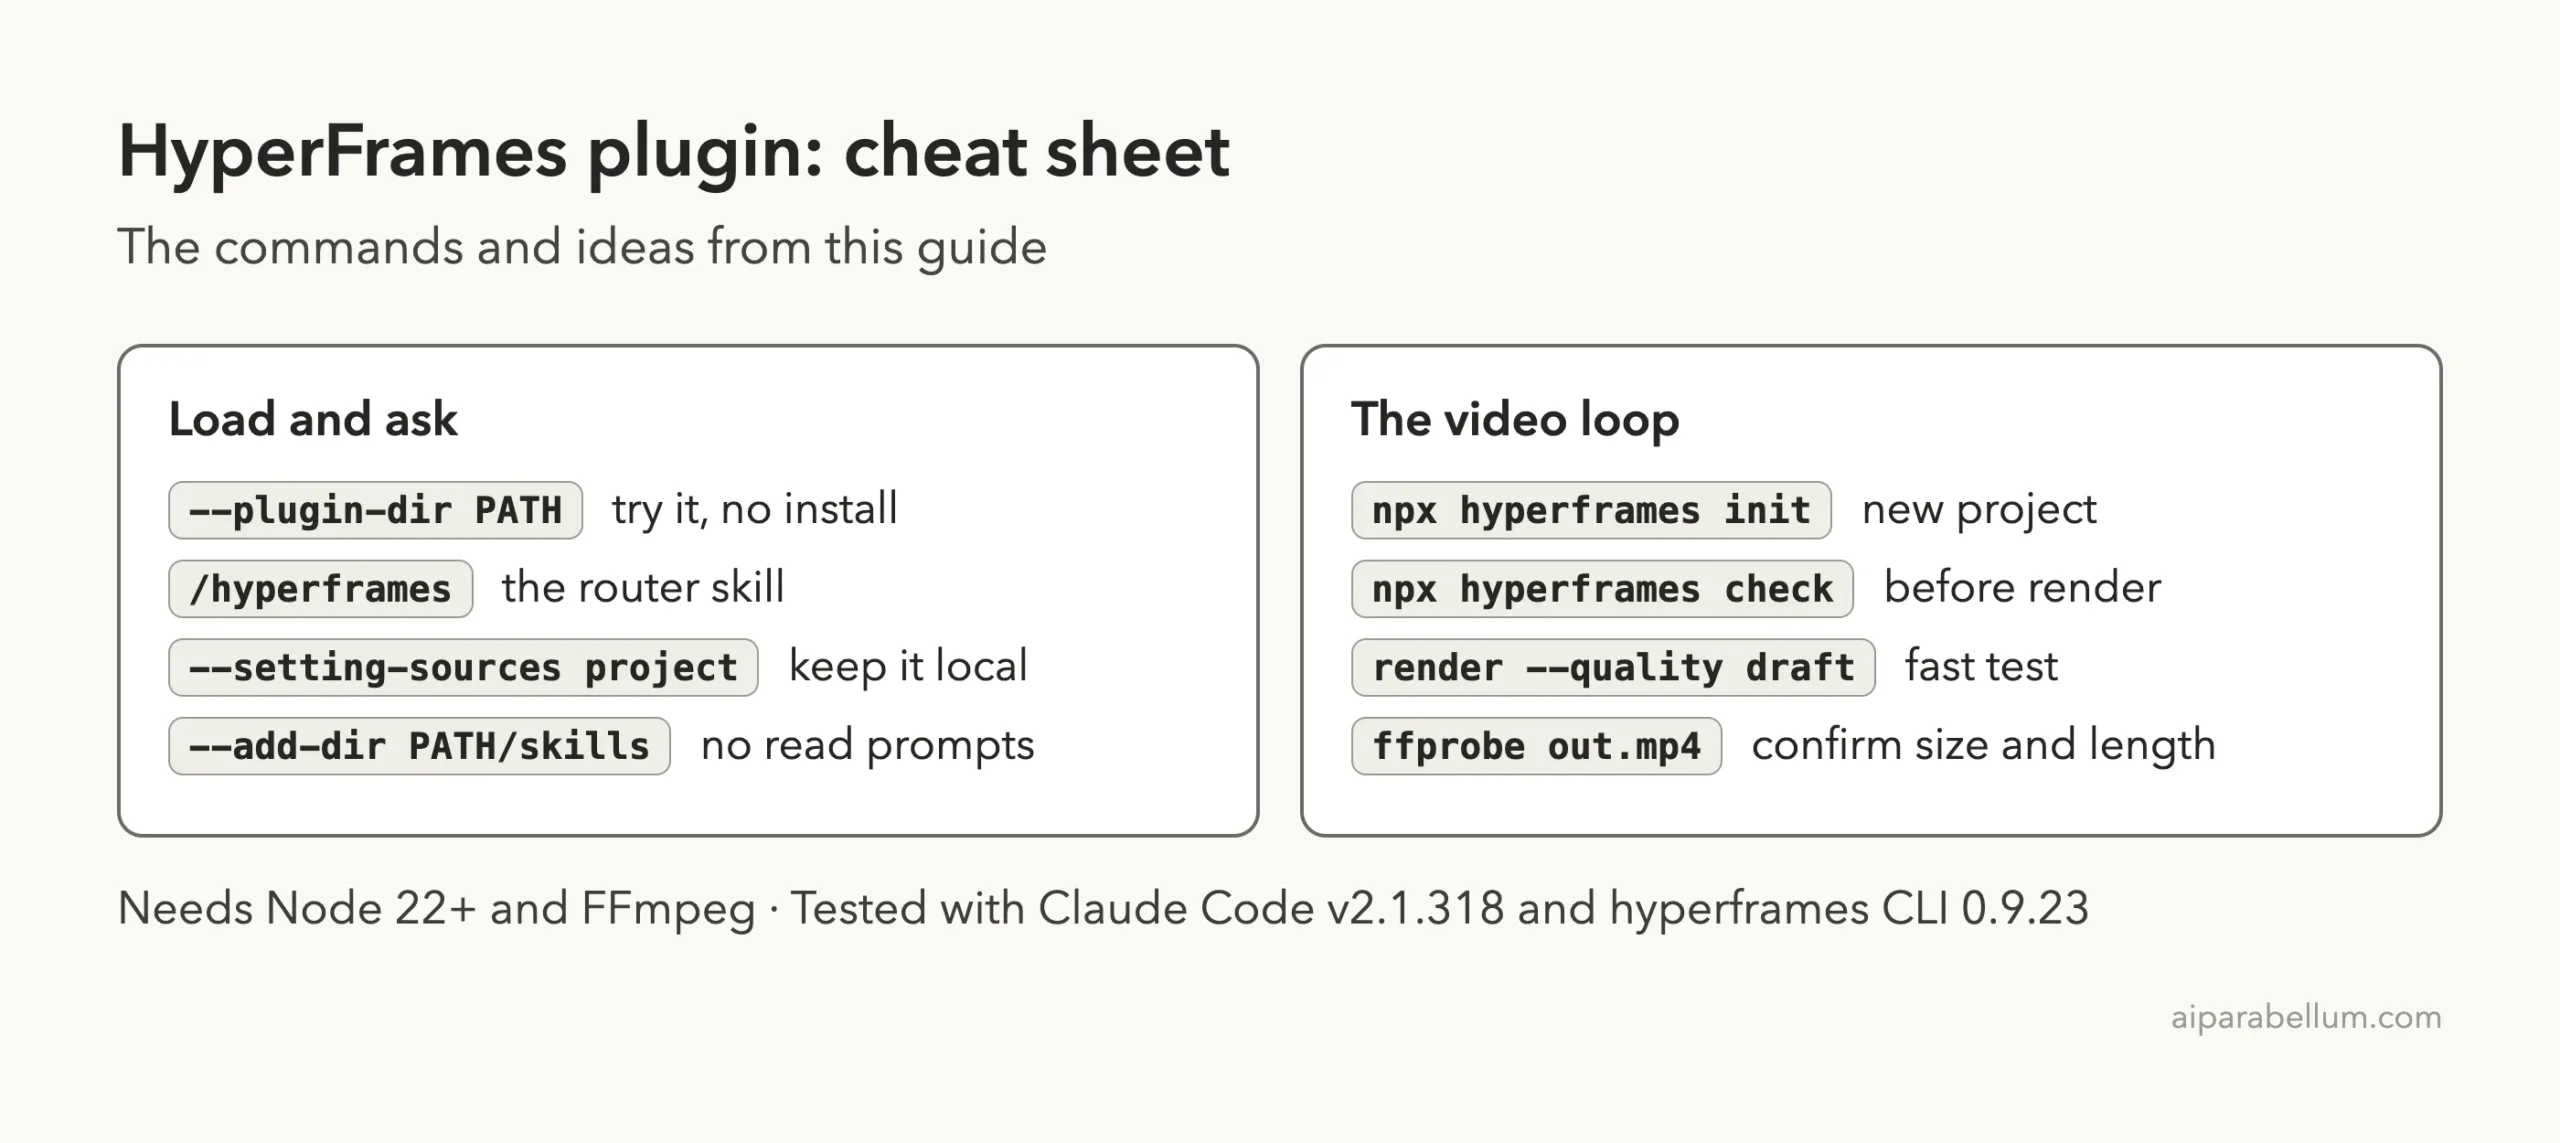
Cheat Sheet
Frequently Asked Questions
Is the HyperFrames plugin free?
The plugin and the framework are open source under the Apache 2.0 license, and the local steps we ran needed no account. Claude Code itself follows your normal plan or API billing.
What do I need to render video locally?
The README lists Node.js 22 or newer and FFmpeg. Our doctor check also found a browser for rendering already in place on our Mac.
Can Claude Code make a video with voiceover?
The plugin includes skills for voiceover, captions and music. We did not run them, so we cannot confirm how well they work.
Does the video need the internet to render?
The starter template loads GSAP from a CDN link. We did not test an offline render, so plan for an internet connection or bundle the library yourself.
Which skill should I start with?
Start with /hyperframes. The README calls it the router, and it picks the right workflow for your request.
Conclusion
HyperFrames for Claude Code gives the agent a clear loop for video: write HTML, check it, render it and confirm the file. In our test it turned one prompt into a correct five-second, 1920×1080 title card, and its check explained a real warning. Load it with --plugin-dir, keep your first video tiny, read the skills update command before you run it, and test the bigger features yourself before you rely on them.