If you write JavaScript or TypeScript, you can now run Claude Code from your own program. The Claude Code SDK for TypeScript is now called the Claude Agent SDK, and a few lines of code are enough to start an agent that reads files, edits code and calls tools you wrote. In this guide you will install the package, build a tiny bug-fixing agent, and then give that agent a custom tool.
This is Part 42 of 45 in our Claude Code Deep Dives, part of our Claude Code tutorials. We built the same agent in Python in Part 41, so this post focuses on what is different in TypeScript.
Tested with Claude Code v2.1.322 on November 13, 2026, using @anthropic-ai/claude-agent-sdk 0.3.322 on macOS.
| Question | Short answer |
|---|---|
| What is it? | A TypeScript library that runs the Claude Code agent inside your own program |
| Install | npm install @anthropic-ai/claude-agent-sdk |
| Node version | 18.14 or newer, according to the quickstart |
| Main function | query(), which streams messages as Claude works |
| Your own tools | tool() plus createSdkMcpServer(), with a Zod schema |
| What we ran | A bug fixer and a custom notes tool, both for real |
What the Claude Agent SDK Is and Why It Exists
An agent is a program that finishes a task by planning its own steps and calling tools. Claude Code already does this in your terminal. The Agent SDK gives you the same tools, the same agent loop and the same context handling as a package you can import.
Anthropic’s reference page explains that the package bundles a native Claude Code binary for your platform as an optional dependency. On our Mac, npm installed a folder named claude-agent-sdk-darwin-arm64 that contained a file called claude. That means most installs need no separate Claude Code install.
The docs also say the SDK version tracks the bundled Claude Code version. Our install was SDK 0.3.322, and it matched the Claude Code 2.1.322 we ran in the terminal. You can read the details in the TypeScript SDK reference.
The overview page also compares the SDK with other options. Use the Agent SDK when you want Claude Code’s agent inside a process you run. Use the command line for daily interactive work, and use the Client SDK when you want to call the Claude API directly and write the tool loop yourself.
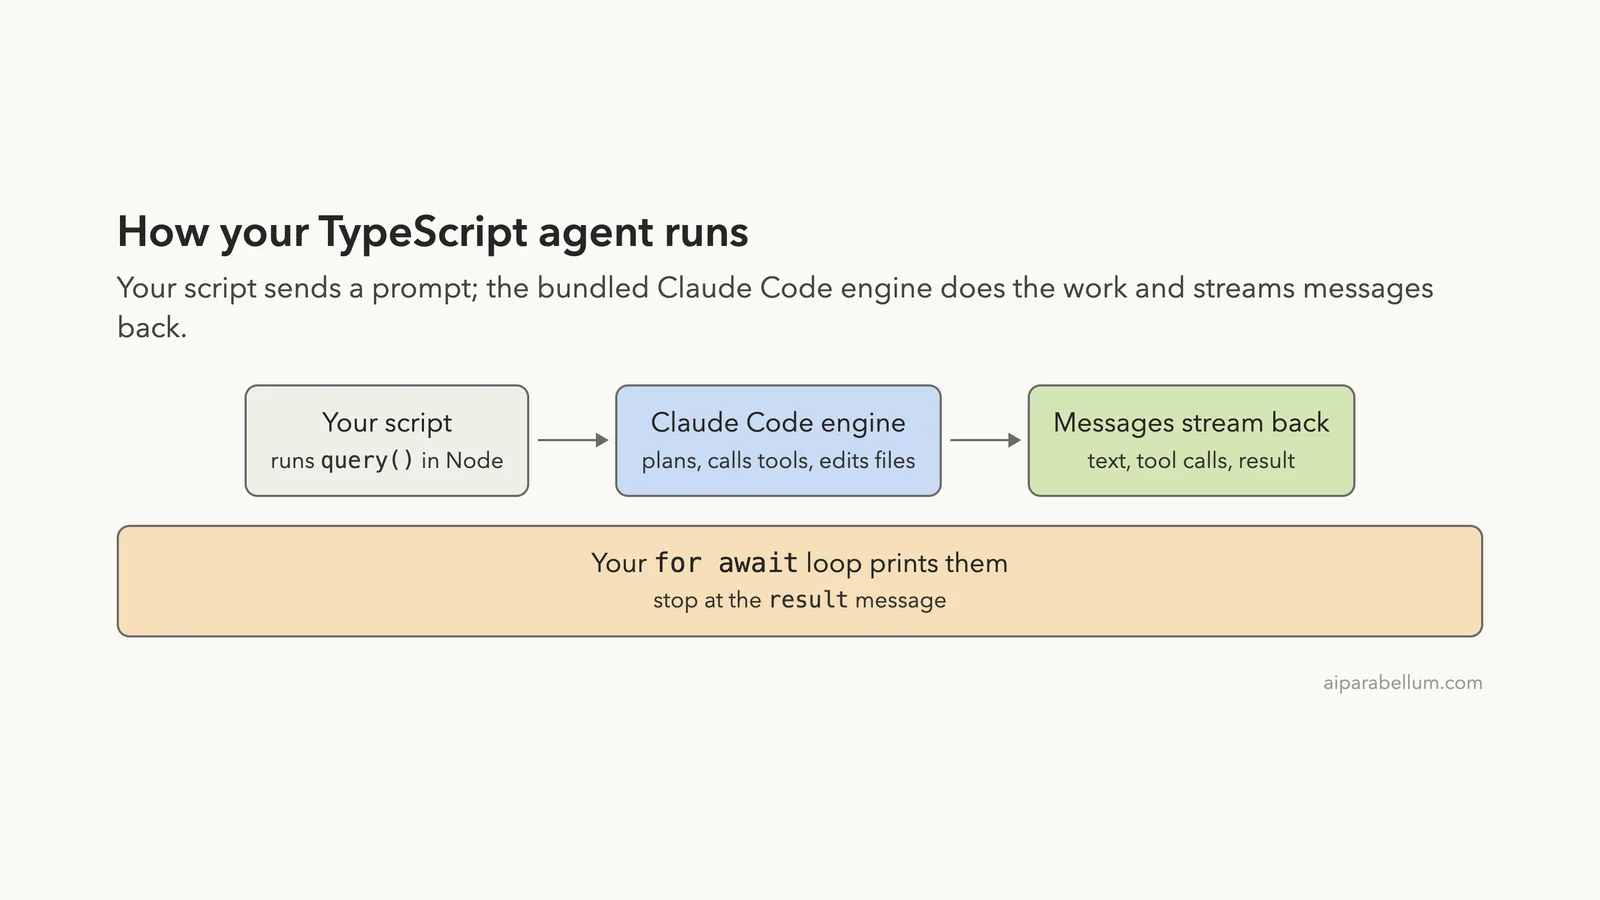
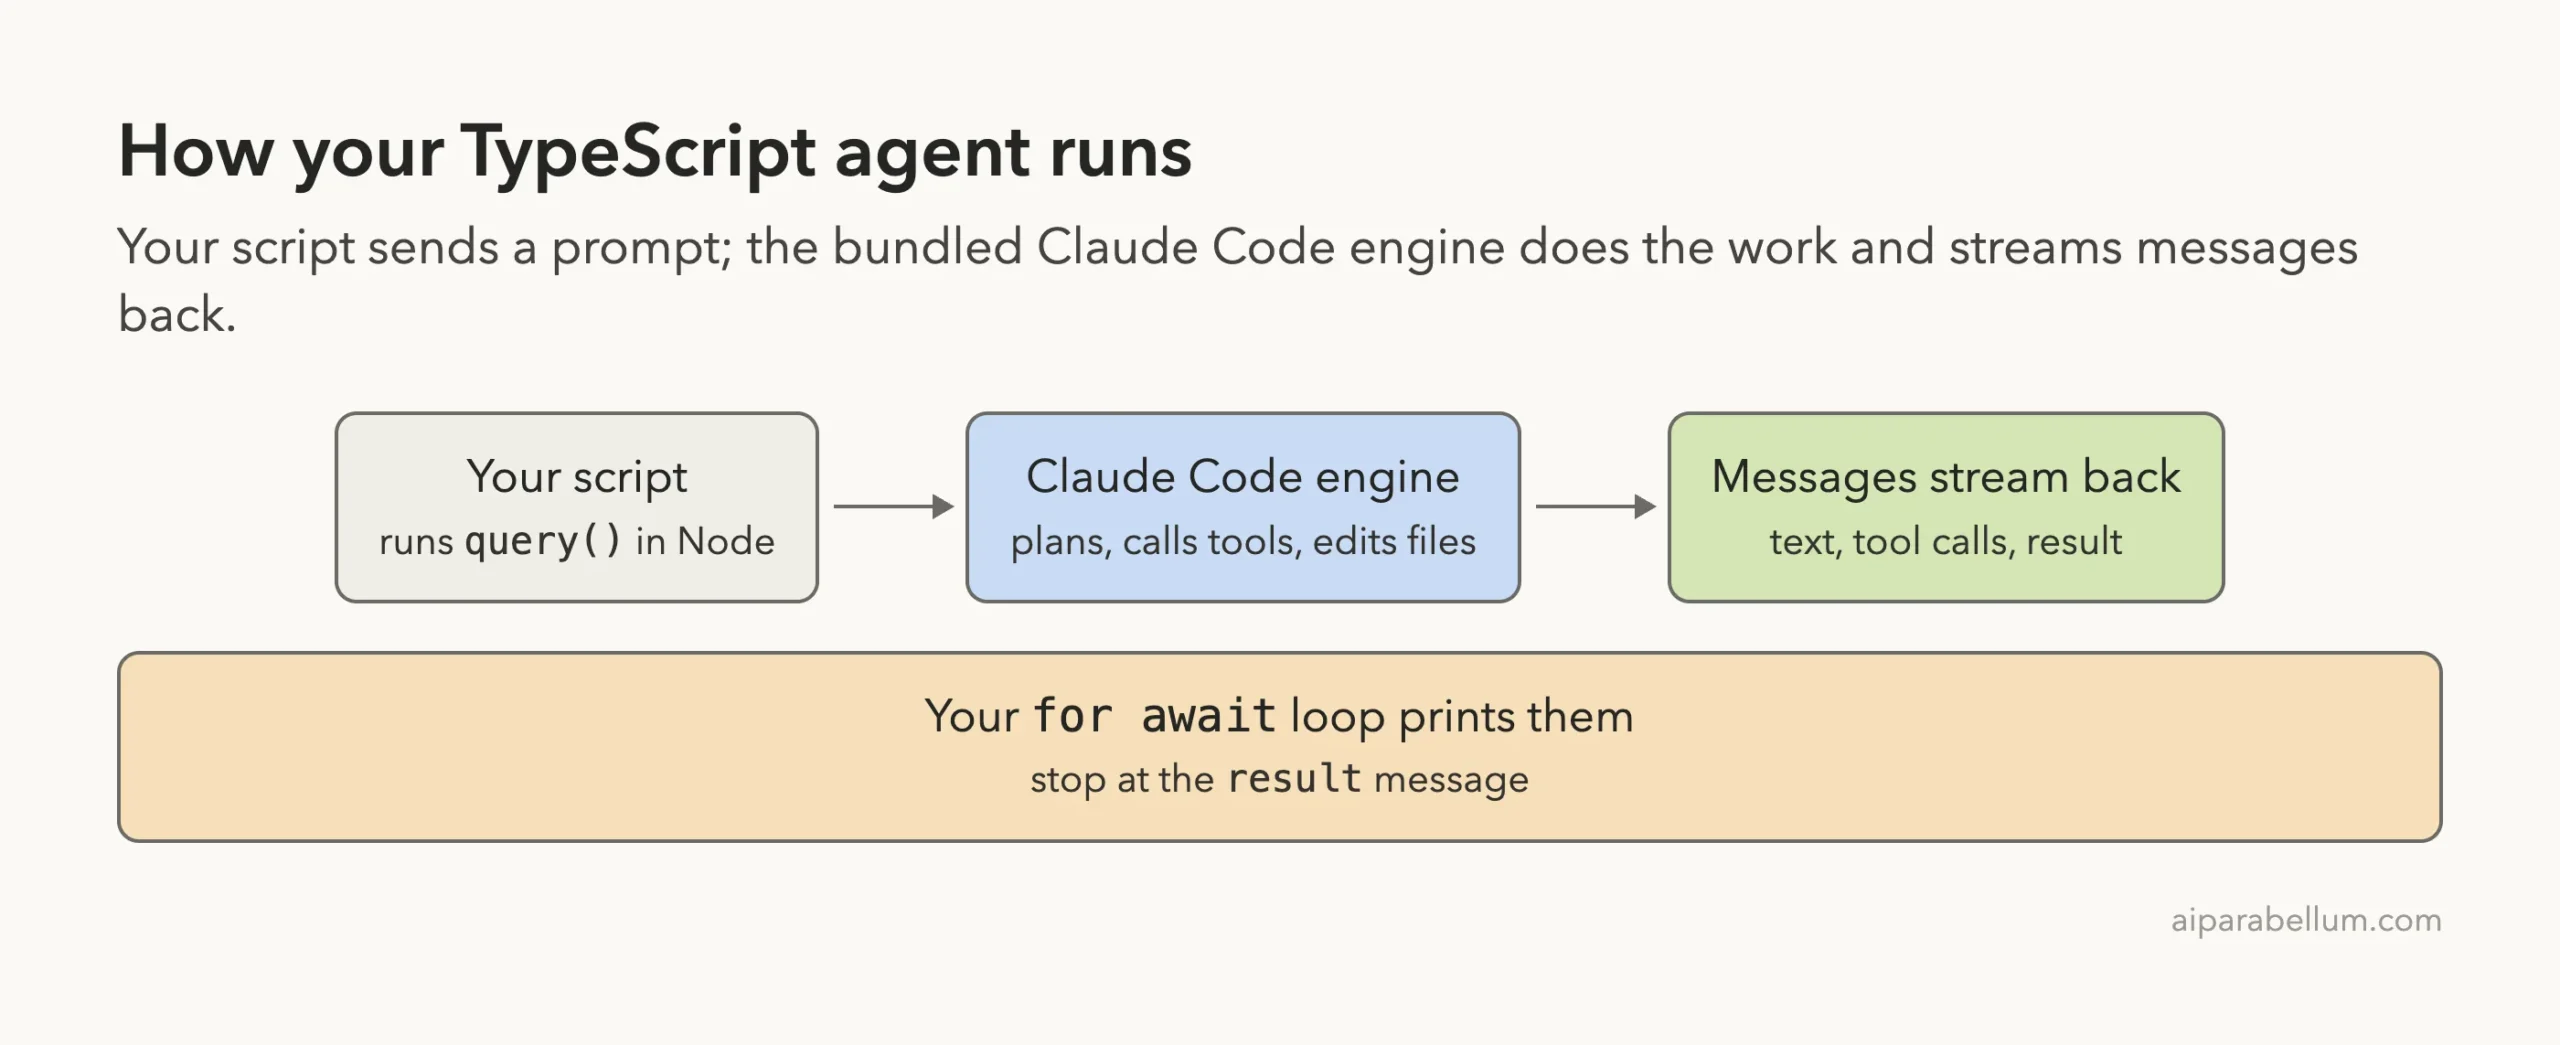
Here is how a run flows through your program.
What You Need Before You Start
The quickstart lists Node.js 18.14 or newer and an Anthropic account. You also need a terminal and a folder where it is safe to let an agent edit files.
- Node.js 18.14 or newer (we used Node 25.6.1 with npm 11.9.0)
- An API key from the Claude Console for anything you plan to ship
- A throwaway demo folder, never a real project
- Do not skip optional dependencies when you install, because the native binary arrives that way
A note on sign-in. Anthropic’s docs say that, unless previously approved, third-party developers may not offer claude.ai login or its rate limits in their products. For products, use an API key or a cloud provider such as Amazon Bedrock or Google Cloud.
Our demo was a personal test on a Mac that was already signed in to Claude Code, and we set no API key. We explain the difference between a subscription and a key in our headless guide.
Step 1: Install the TypeScript Agent SDK
Make a folder and set up a small Node project. The quickstart gives these commands for a new TypeScript project.
mkdir my-agent
cd my-agent
npm init -y
npm pkg set type=module
npm install @anthropic-ai/claude-agent-sdk
npm install --save-dev tsx
Setting "type": "module" lets your script use top-level await, and tsx runs TypeScript files directly, so you need no build step. We also installed zod, because the custom tool later in this guide uses it for its input schema.
For a real project, set your key in the shell that runs the script with export ANTHROPIC_API_KEY=your-api-key. The SDK reads it from the environment and does not load .env files on its own, so use a package such as dotenv if you keep the key in a file.
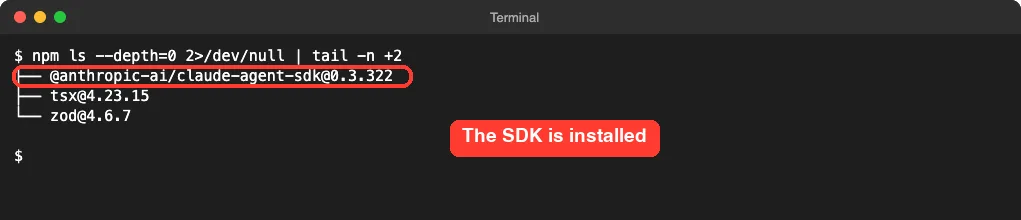
After installing, we listed the top-level packages to confirm the version.
Step 2: Create a Buggy File
The agent needs something to fix. We wrote a small utils.ts with two bugs.
The first returns NaN for an empty list, and the second crashes on a null user because of the ! non-null assertion.
export function calculateAverage(numbers: number[]): number {
  let total = 0;
  for (const num of numbers) {
    total += num;
  }
  return total / numbers.length;
}

export function getUserName(user: { name: string } | null): string {
  return user!.name.toUpperCase();
}
We also saved a copy as utils.ts.orig, so we could compare the files afterward with diff.
Step 3: Write Your First Agent With query()
Create agent.ts. The query() function returns an async generator, so you read it with for await. Each message that arrives is Claude’s reasoning, a tool call, a tool result or the final outcome.
import { query } from "@anthropic-ai/claude-agent-sdk";

for await (const message of query({
  prompt:
    "Review utils.ts for bugs that would cause wrong results or crashes. Fix them. Keep your final answer under 60 words.",
  options: {
    allowedTools: ["Read", "Edit", "Glob"], // auto-approved tools
    permissionMode: "acceptEdits", // auto-approve file edits
    maxTurns: 8, // safety limit
  },
})) {
  if (message.type === "assistant") {
    for (const block of message.message.content) {
      if (block.type === "text") console.log("Claude:", block.text);
      else if (block.type === "tool_use") console.log("Tool call:", block.name);
    }
  } else if (message.type === "result") {
    console.log(
      "Done:", message.subtype,
      "| turns:", message.num_turns,
      "| cost: $" + (message.total_cost_usd ?? 0).toFixed(4),
    );
  }
}
The file has three main parts. The prompt says what you want, and the options object configures the agent.
The loop prints what happens, and it ends when Claude finishes or hits an error.
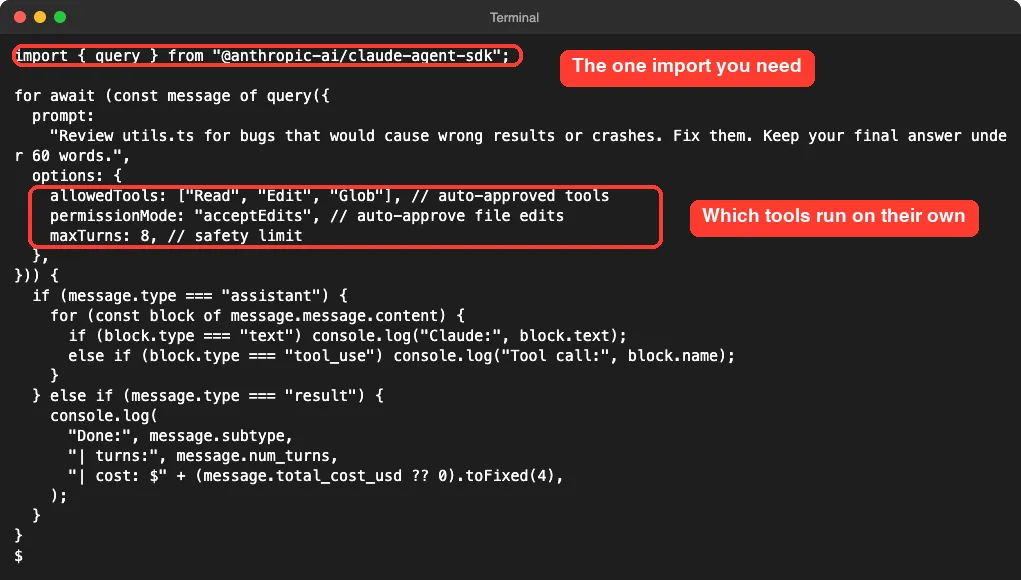
What the three options do
According to the reference, allowedTools lists tools to approve without prompting. It does not limit Claude to only those tools. Other tools fall through to permissionMode and your permission callback.
The option permissionMode: "acceptEdits" approves file edits automatically. The option maxTurns caps the number of agent turns, which protects you from a loop that never ends. If you want to block a tool completely, the docs say to use disallowedTools.
| Option | What it does | Our value |
|---|---|---|
allowedTools | Approves these tools without a prompt | Read, Edit, Glob |
permissionMode | Sets how other actions are approved | acceptEdits |
maxTurns | Limits agent turns | 8 |
disallowedTools | Denies tools outright | Not used |
Step 4: Run the Agent
Run the file with npx tsx agent.ts. Here is what happened on our Mac.
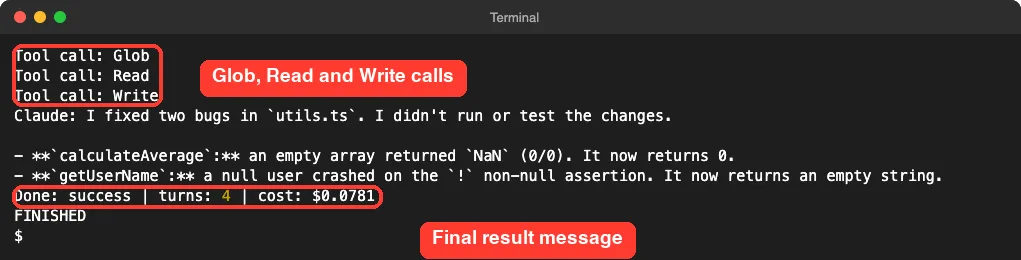
Claude called Glob to find files, Read to open utils.ts, and Write to save the fix. The run ended with Done: success | turns: 4 and a printed cost of $0.0781.
One detail surprised us. We only listed Read, Edit and Glob, yet Claude used Write.
That is consistent with the docs, because allowedTools does not restrict the agent, and acceptEdits approved the file change. If you need a strict list, add the rest to disallowedTools.
Claude also told us, “I didn’t run or test the changes.” That is worth remembering. The agent edited the file, but it did not prove the fix is correct.
Step 5: Check What Changed
Never trust an agent’s summary without reading the diff. We compared the original and the edited file.
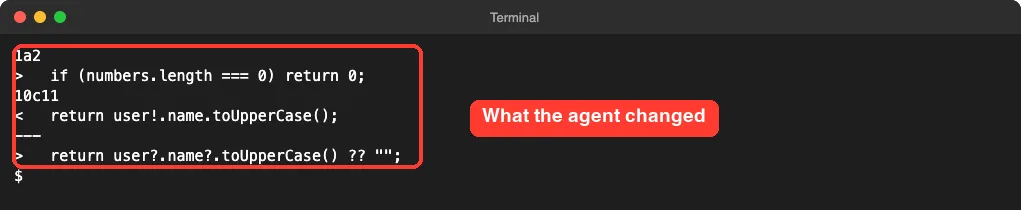
The agent added if (numbers.length === 0) return 0; and changed the user line to user?.name?.toUpperCase() ?? "". Both are reasonable.
Returning 0 for an empty list is a design choice, though, so decide for yourself whether it fits your program.
Step 6: Give Your Agent a Custom Tool
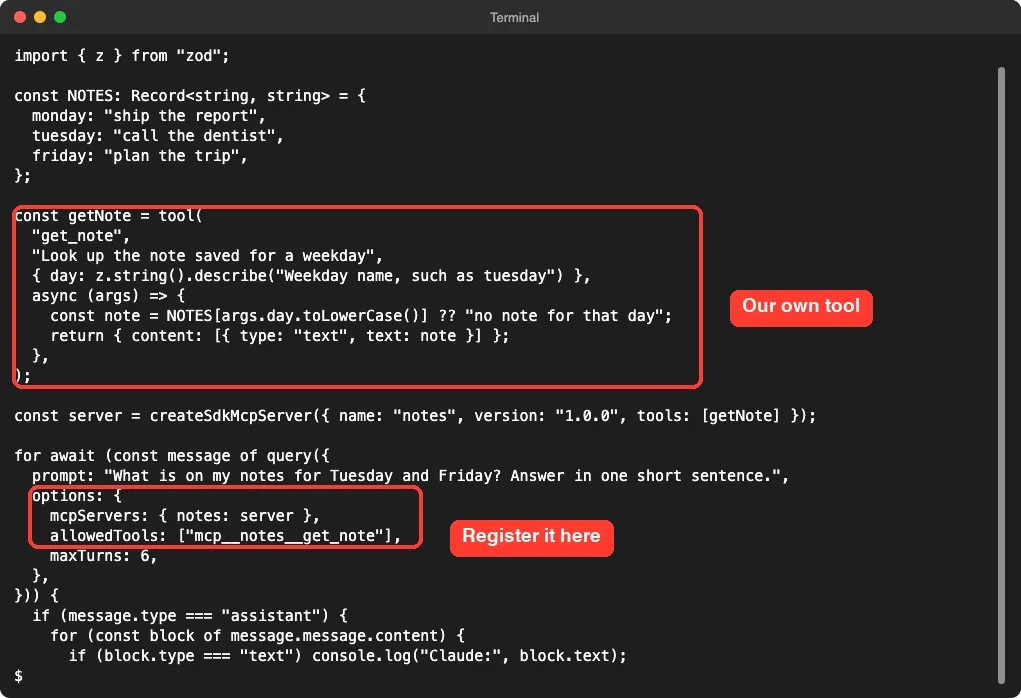
Built-in tools are useful, but the real power is your own code. The SDK lets you define a tool with tool() and wrap it in an in-process server with createSdkMcpServer(). According to Anthropic’s custom tools guide, the server runs inside your application, not as a separate process.
A tool has four parts: a name, a description, an input schema and a handler. In TypeScript the schema is a Zod object, and calling .describe() on a field gives Claude a hint about it.
import { query, tool, createSdkMcpServer } from "@anthropic-ai/claude-agent-sdk";
import { z } from "zod";

const NOTES: Record<string, string> = {
  monday: "ship the report",
  tuesday: "call the dentist",
  friday: "plan the trip",
};

const getNote = tool(
  "get_note",
  "Look up the note saved for a weekday",
  { day: z.string().describe("Weekday name, such as tuesday") },
  async (args) => {
    const note = NOTES[args.day.toLowerCase()] ?? "no note for that day";
    return { content: [{ type: "text", text: note }] };
  },
);

const server = createSdkMcpServer({ name: "notes", version: "1.0.0", tools: [getNote] });
Then pass the server to query() through mcpServers, and approve the tool by its full name. The docs say that name follows the pattern mcp__{server_name}__{tool_name}, so ours is mcp__notes__get_note.
for await (const message of query({
  prompt: "What is on my notes for Tuesday and Friday? Answer in one short sentence.",
  options: {
    mcpServers: { notes: server },
    allowedTools: ["mcp__notes__get_note"],
    maxTurns: 6,
  },
})) {
  // print assistant text, tool calls and the result, as before
}
We ran it with npx tsx notes-agent.ts.
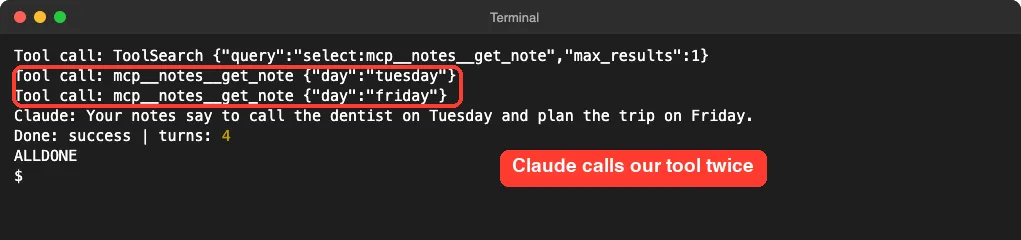
Claude called get_note twice, once for tuesday and once for friday, then answered: “Your notes say to call the dentist on Tuesday and plan the trip on Friday.” The run finished in four turns.
Why a ToolSearch call appears first
Before our tool ran, the output showed a ToolSearch call asking for select:mcp__notes__get_note. We did not write that.
The reference mentions a tool search feature that can defer tool schemas, and both tool() and createSdkMcpServer() accept an alwaysLoad setting to keep schemas in the first prompt. We did not test that setting, so check the tool search page if the extra step matters to you.
Python or TypeScript: Which Should You Pick?
The two SDKs do the same job, so pick the one your team already uses. Here are the differences we saw while building both agents.
| Topic | TypeScript | Python |
|---|---|---|
| Package | @anthropic-ai/claude-agent-sdk | claude-agent-sdk |
| Read the stream | for await over query() | async for inside asyncio.run |
| Message check | message.type === "result" | isinstance(message, ResultMessage) |
| Option names | allowedTools, maxTurns | allowed_tools, max_turns |
| Tool schema | Zod object | Dict of types |
| Run a script | npx tsx agent.ts | python agent.py |
If you want the Python version of this tutorial, read the Python guide. For scheduled runs, see Routines versus /loop.
Try It Yourself
Practice with a new bug. Add a third function to utils.ts and ask the agent to fix only that one.
export function firstWord(text: string): string {
  return text.split(" ")[0].toUpperCase();
}
Then change the prompt in agent.ts to the one below and run it again. Afterward, compare the file with diff to see what changed.
Fix only the firstWord function so it never crashes on an empty string. Do not touch other functions.Start small, cap the turns, and read every diff the agent makes.
Common Mistakes
- Skipping
"type": "module"inpackage.json. Top-levelawaitthen fails, unless you name the fileagent.mts. - Installing with
npm ci --omit=optional. The docs say the native binary comes as an optional dependency, so the SDK cannot start without it. - Forgetting that the SDK does not read
.envfiles. Load your key yourself. - Assuming
allowedToolsis a strict list. It only pre-approves tools. UsedisallowedToolsto block them. - Skipping
maxTurns. A limit protects you from a loop that keeps going. - Pointing the agent at a real project. Start in a copy or a demo folder.
- Assuming the fix is correct. Our agent said it had not run the code, so run your tests.
Pro Tips
- Print
total_cost_usdfrom the result message while you experiment, so you notice expensive prompts early. The docs call it an estimate, not a billing statement. - Check that
subtypeissuccessbefore you trust the result. The reference lists other subtypes for failures. - Keep prompts narrow. Our agent finished in four turns because the task was small.
- Give each field in a Zod schema a
.describe()hint, so Claude knows what to pass. - Set
readOnlyHintin the tool’s annotations for tools with no side effects. The custom tools guide says this lets Claude call such tools in parallel. - If your agent should use helpers of its own, read subagent best practices next.
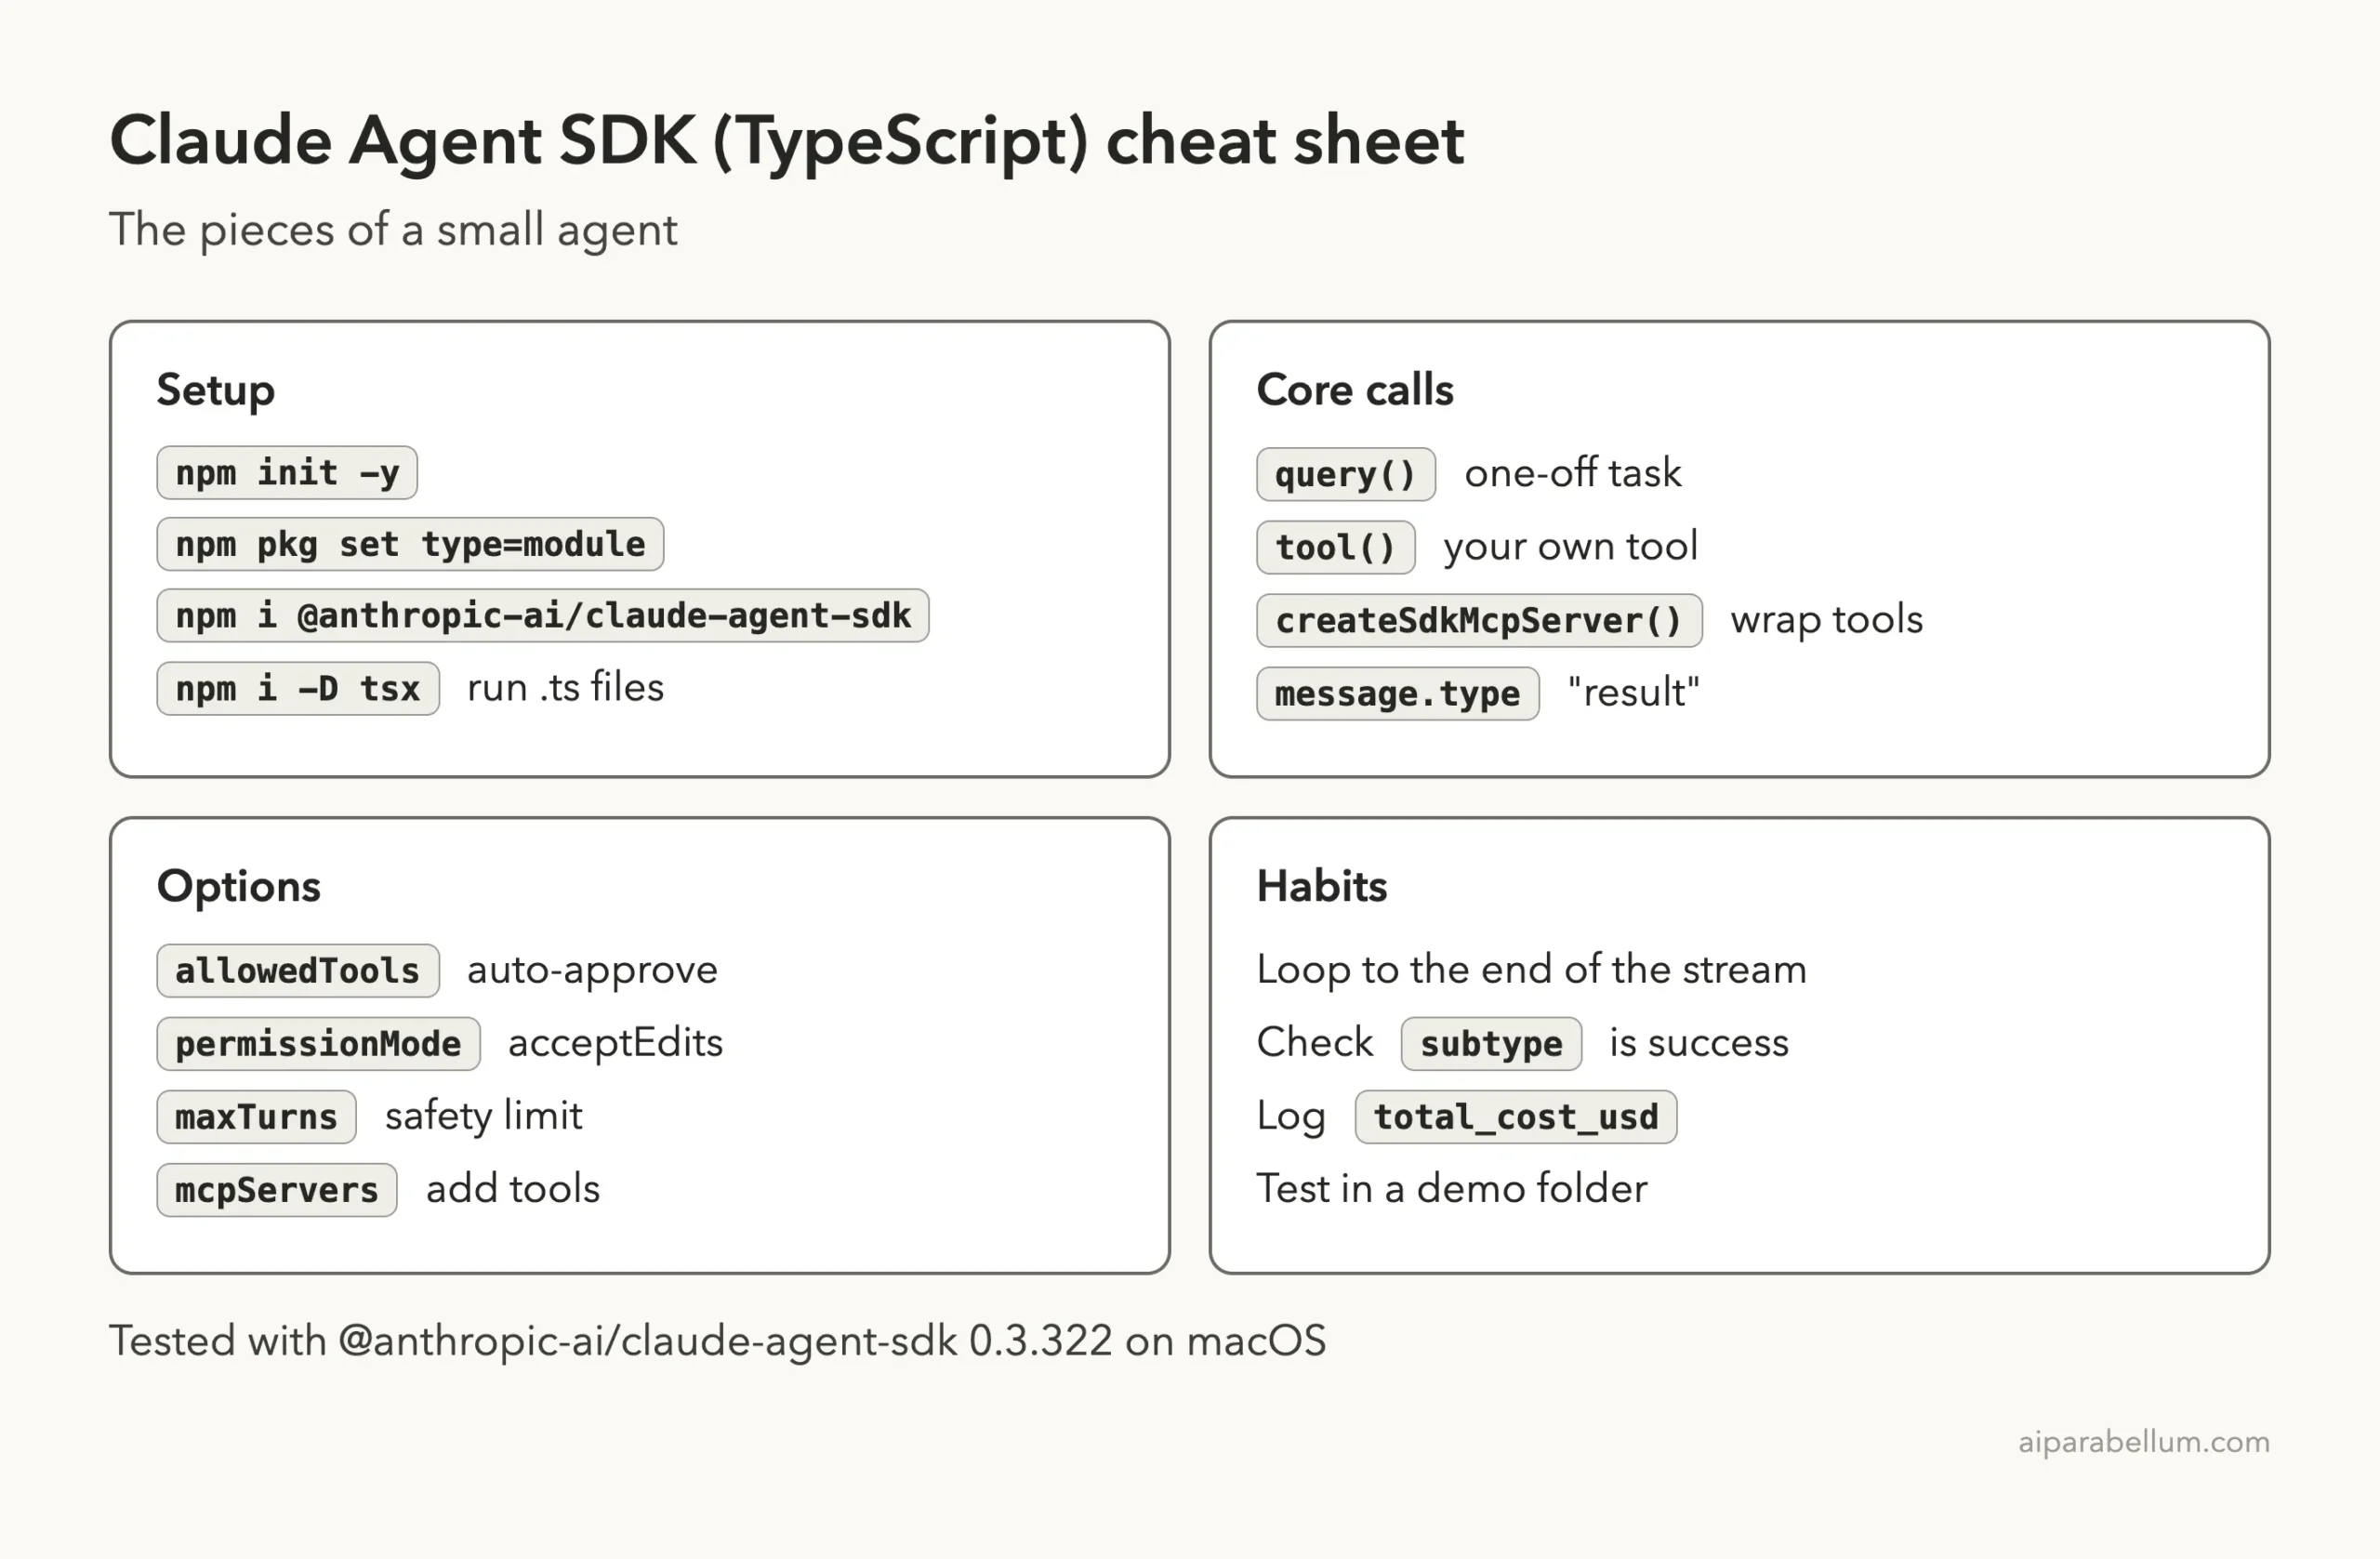
Cheat Sheet
Frequently Asked Questions
Is the Claude Code SDK the same as the Claude Agent SDK?
Yes. The package was renamed, and Anthropic’s docs include a migration guide for people moving from the old Claude Code SDK packages. Today you install @anthropic-ai/claude-agent-sdk.
Do I need to install Claude Code separately?
Usually not. The package bundles a native Claude Code binary through an optional dependency. If your package manager skips optional dependencies, install Claude Code yourself and set pathToClaudeCodeExecutable to its path.
Which Node.js version do I need?
The quickstart says Node.js 18.14 or newer. We ran our demo on Node 25.6.1.
Why use tsx?
It runs TypeScript files directly, so you can try an agent without a build step. For a real app you can compile your code in the usual way.
How should I sign in?
For products, use an API key from the Claude Console or a supported cloud provider. The docs say third-party developers may not offer claude.ai login unless Anthropic approved it. Our personal demo used an existing sign-in on one Mac.
Conclusion
The Claude Agent SDK turns Claude Code into a TypeScript package: install it, call query(), and read the messages as they stream back. In our test, a short script fixed two bugs in four turns, and a custom tool() let Claude call our own function. Start small, set maxTurns, read every diff, and move to an API key before you build anything other people will use. You can find more guides in our Claude Code tutorials and learn about the model behind it on our Claude AI page.
Previous in the series: Part 41: Claude Agent SDK in Python: Build a Small Agent
Next in the series: Part 43: Claude Code in a CI/CD Pipeline: A Working Example.