Claude Code output styles examples are easy to find, but most guides stop at the built-in ones. In this tutorial you will build your own custom output style from scratch, switch to it, and watch Claude answer the same question in a completely new format. Our style is one small Markdown file, and it took about five minutes to write.
This is Part 36 of 45 in our Claude Code Deep Dives, part of our Claude Code tutorials. In the last part we built Stop hook examples that you can copy. For a quick tour of the built-in styles, see our output styles overview first.
Tested with Claude Code v2.1.322 on November 12, 2026, on macOS. Everything ran in a throwaway demo folder with --setting-sources project,local, so our personal Claude Code setup stayed untouched. We did not use any Windows or Linux machine; the paths for those systems come from Anthropic’s official docs.
Quick Summary
| Question | Short answer |
|---|---|
| What is an output style? | A set of instructions that sets Claude’s role, tone and response format for a whole session |
| Where does a custom style live? | A Markdown file in .claude/output-styles (project) or ~/.claude/output-styles (user) |
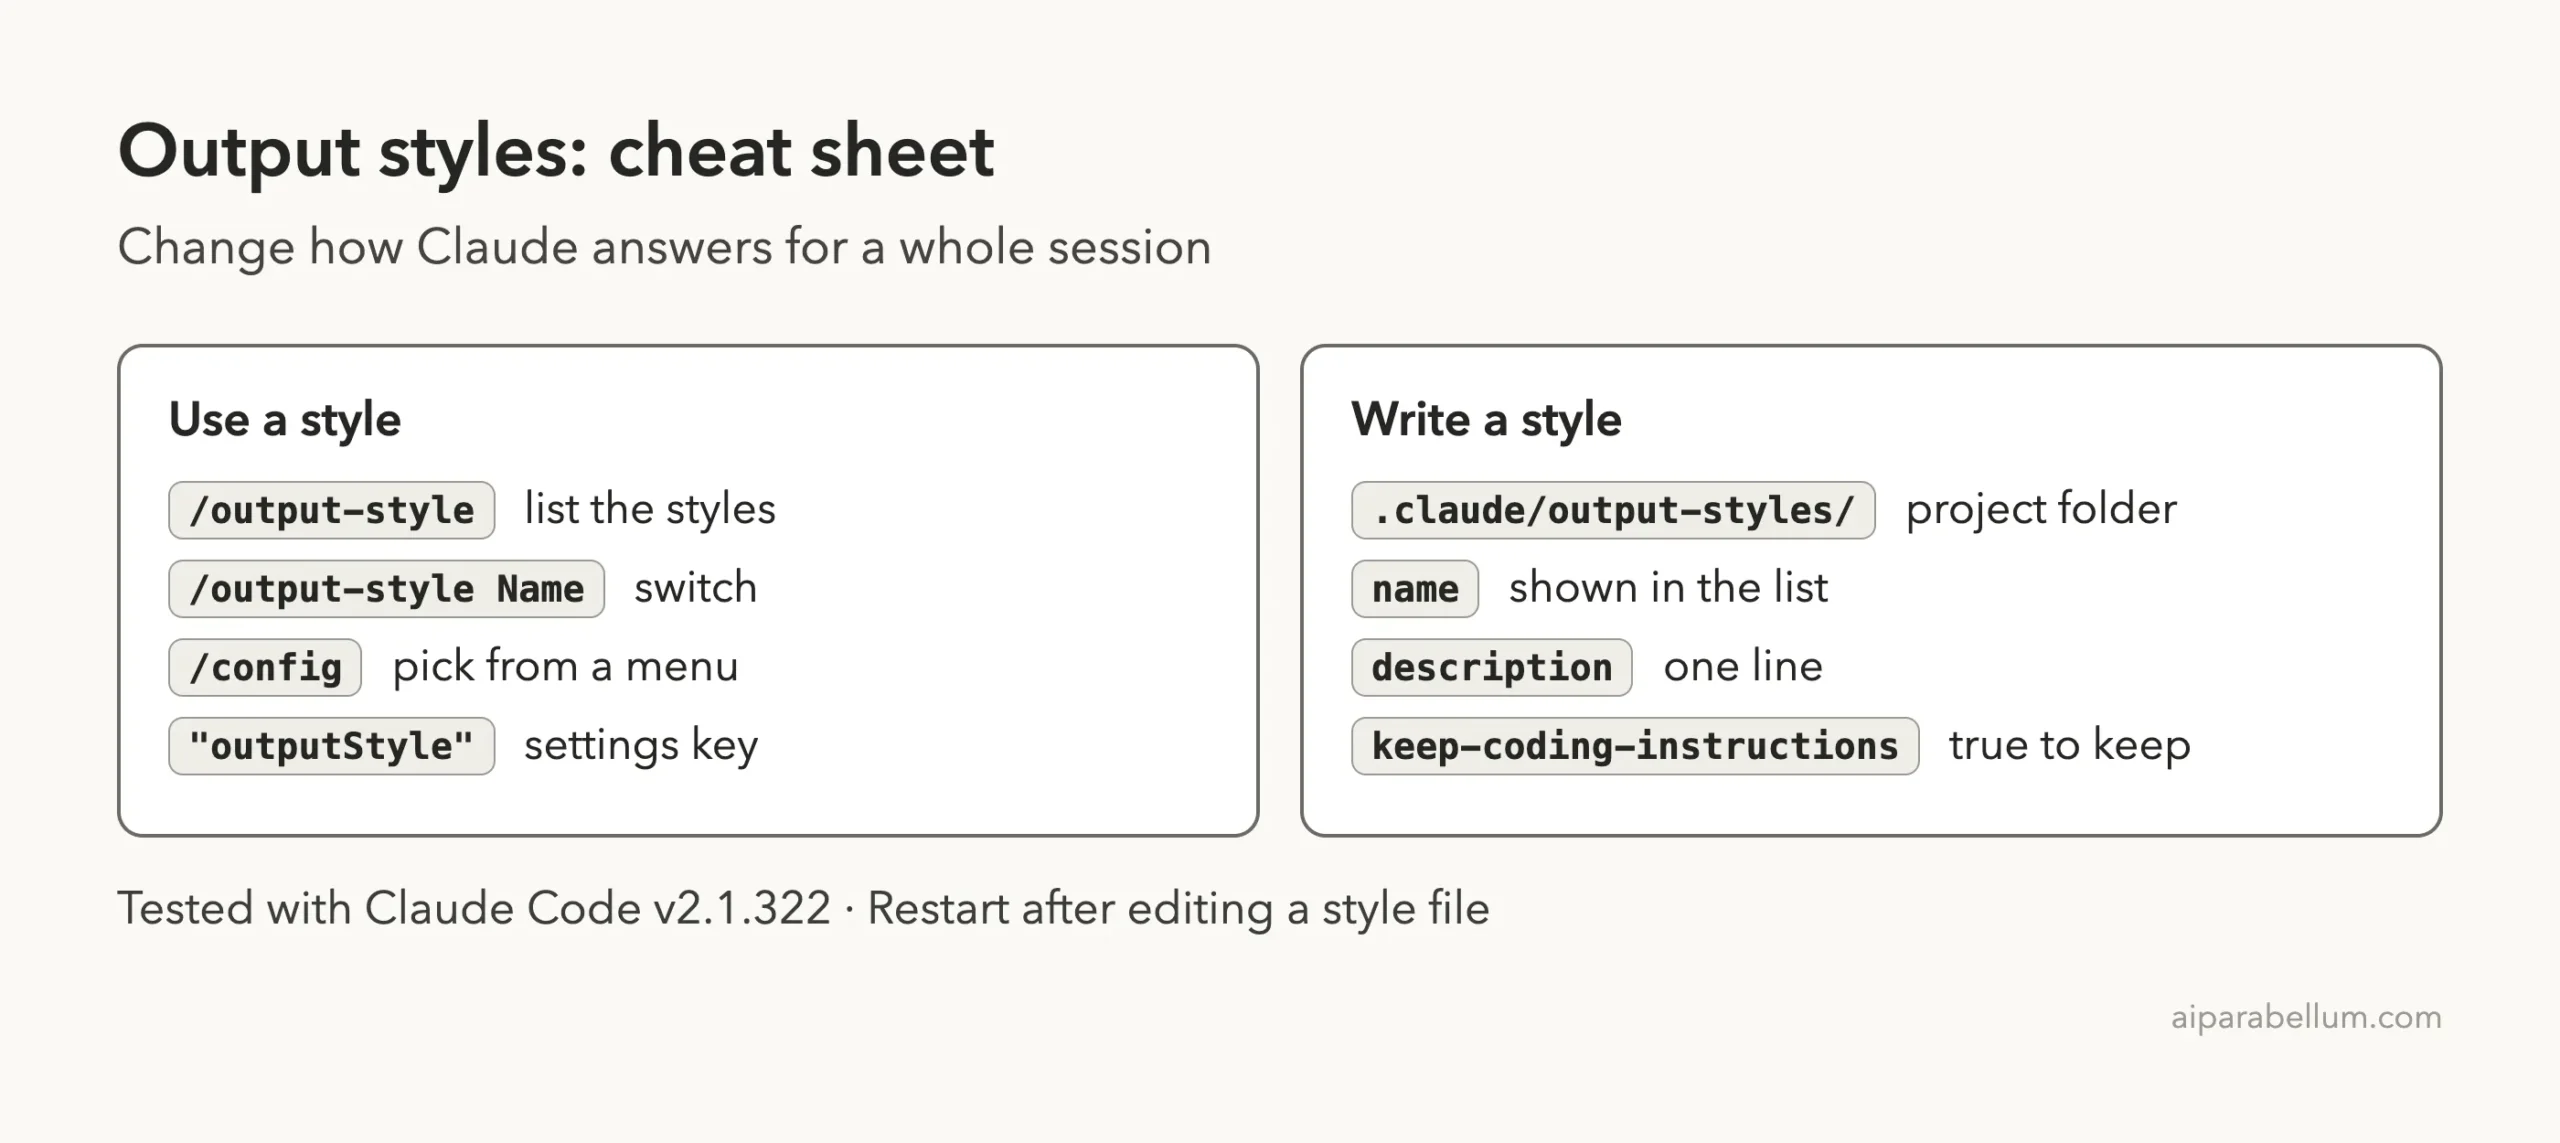
| How do I switch to it? | /output-style Your Style Name, or pick it in /config |
| What did we build? | A style called Plain Review that answers in three short labeled lines |
| What happened? | The same question went from a long numbered list to three short lines |
| Where is the choice saved? | In .claude/settings.local.json as outputStyle |
What Is a Custom Claude Code Output Style?
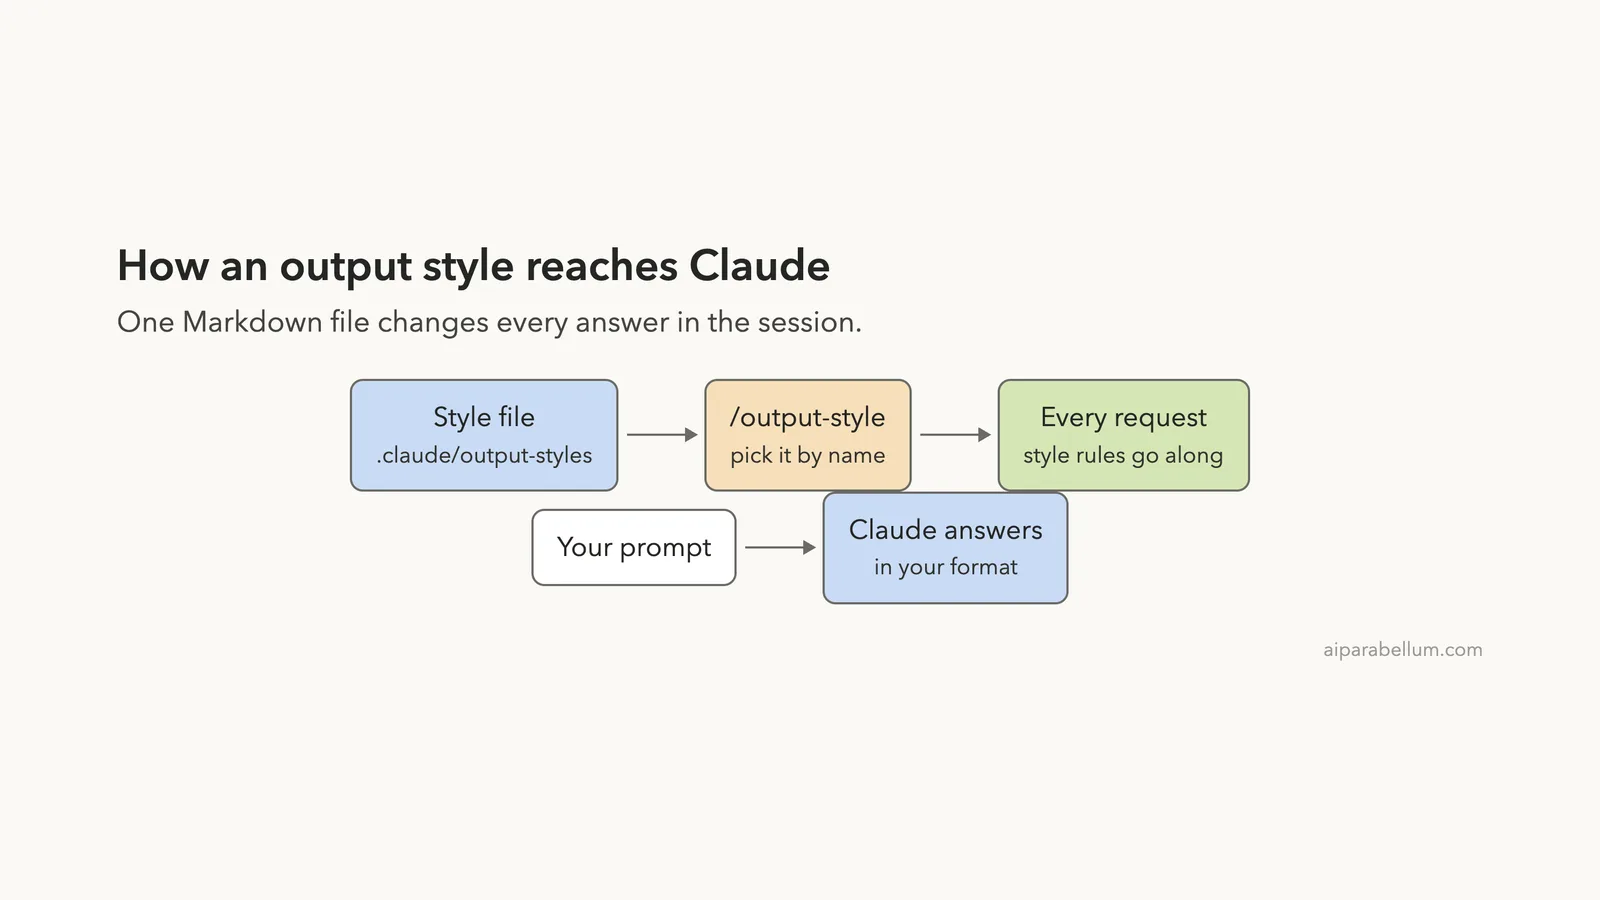
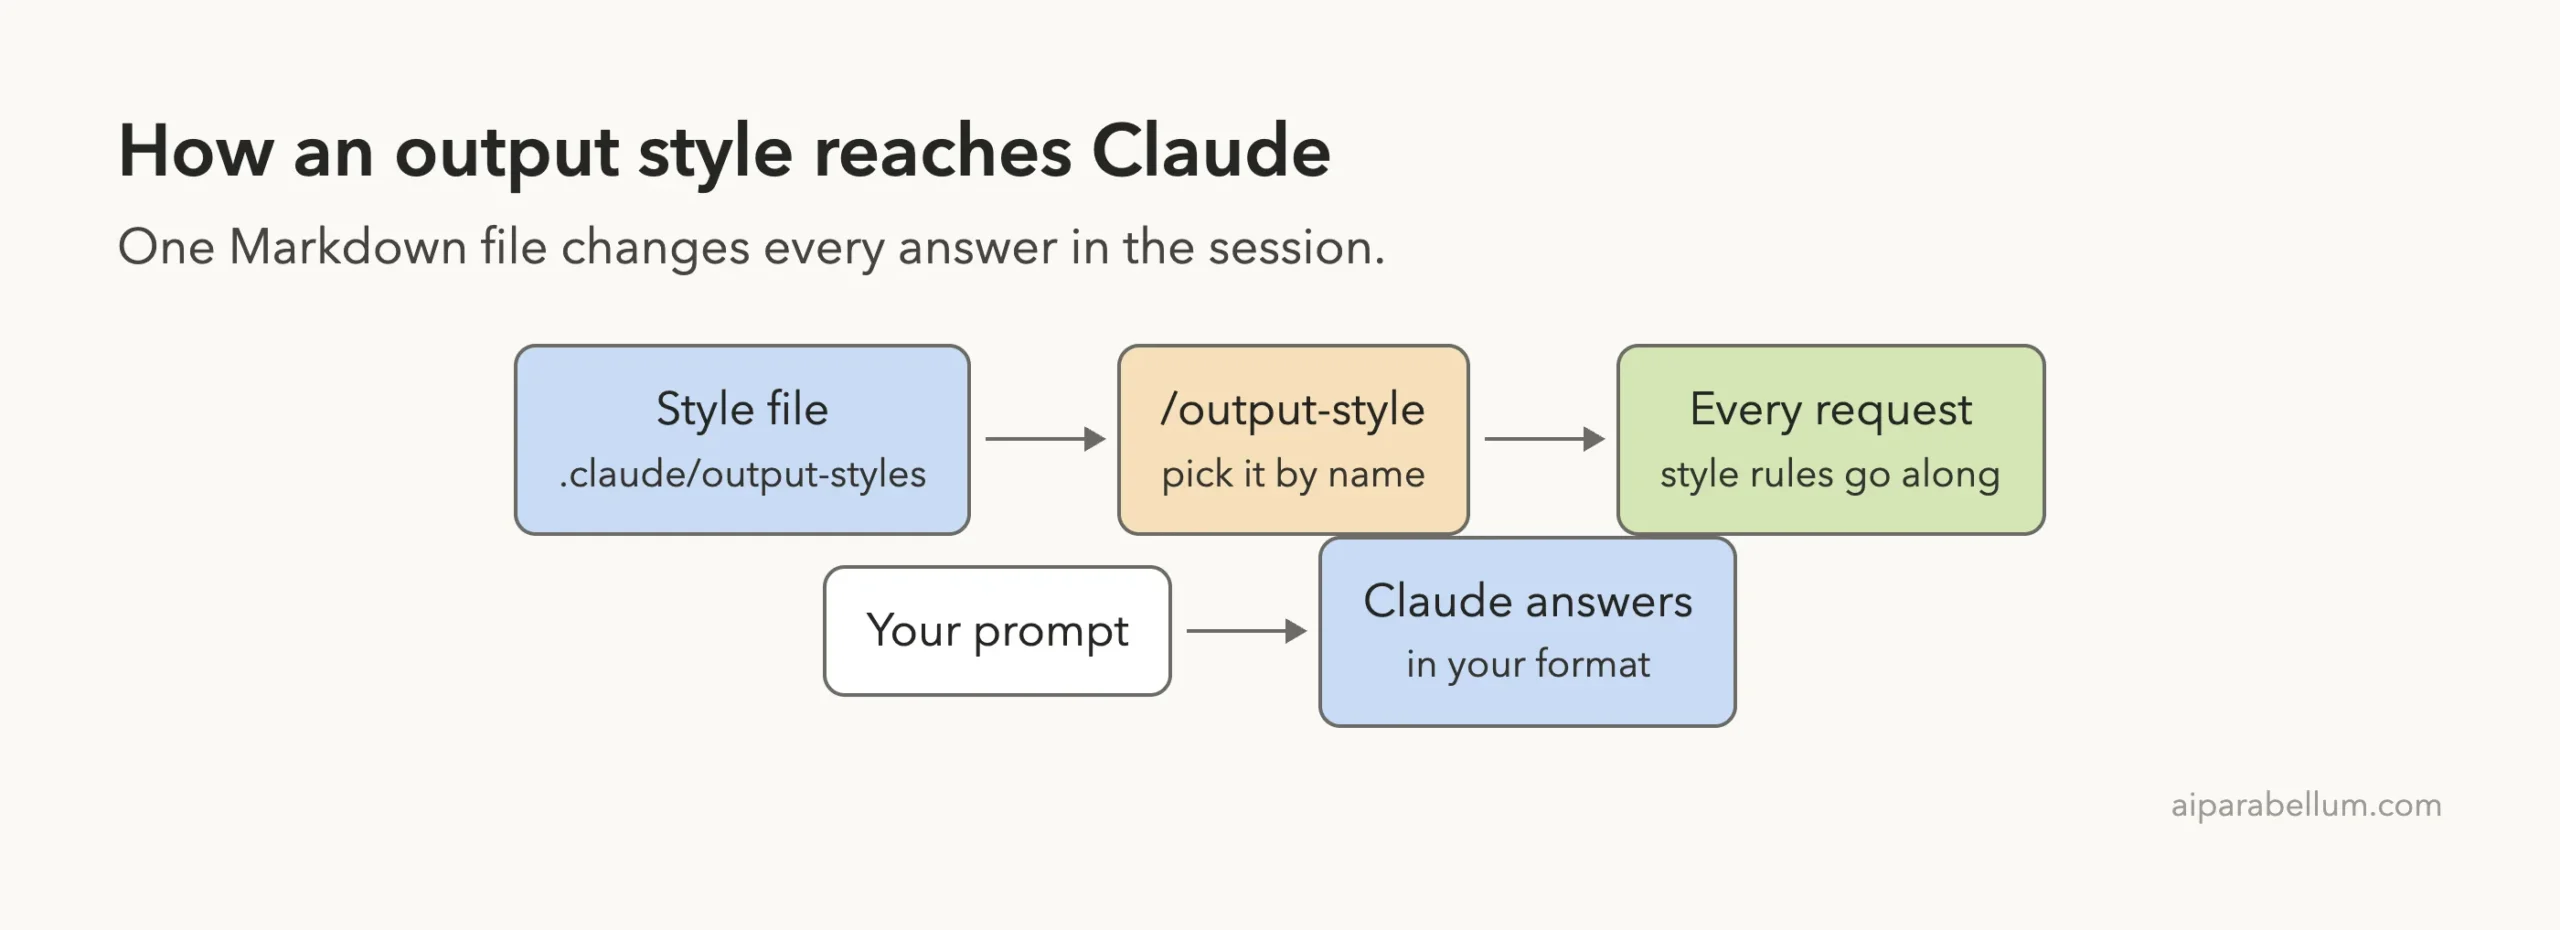
An output style is a set of instructions that changes how Claude responds, for every response in a session. You write it once and you do not have to repeat the request in each prompt. The official output styles documentation describes four built-in styles besides the default: Proactive, Concise, Explanatory and Learning.
A custom style is simply your own version. It is a Markdown file with a short block of settings at the top and your instructions below. Claude Code sends the active style’s instructions with every request, so the effect lasts for the whole session.
See the Default Answer First
Before building anything, we wanted a baseline. Our demo project has one tiny file, tally.py, which counts votes and returns the winner. It has two real weak spots: an empty list crashes it, and a tie silently picks whichever choice appeared first.
def tally(votes):
    """Count votes and return the winner."""
    counts = {}
    for v in votes:
        counts[v] = counts.get(v, 0) + 1
    winner = max(counts, key=counts.get)
    return winner, counts
We asked Claude in the default style: “What does tally.py do, and does it have any bugs? Do not edit anything.” The answer was accurate and thorough, but long. It had an explanation paragraph, a numbered list of four points, and a closing remark.
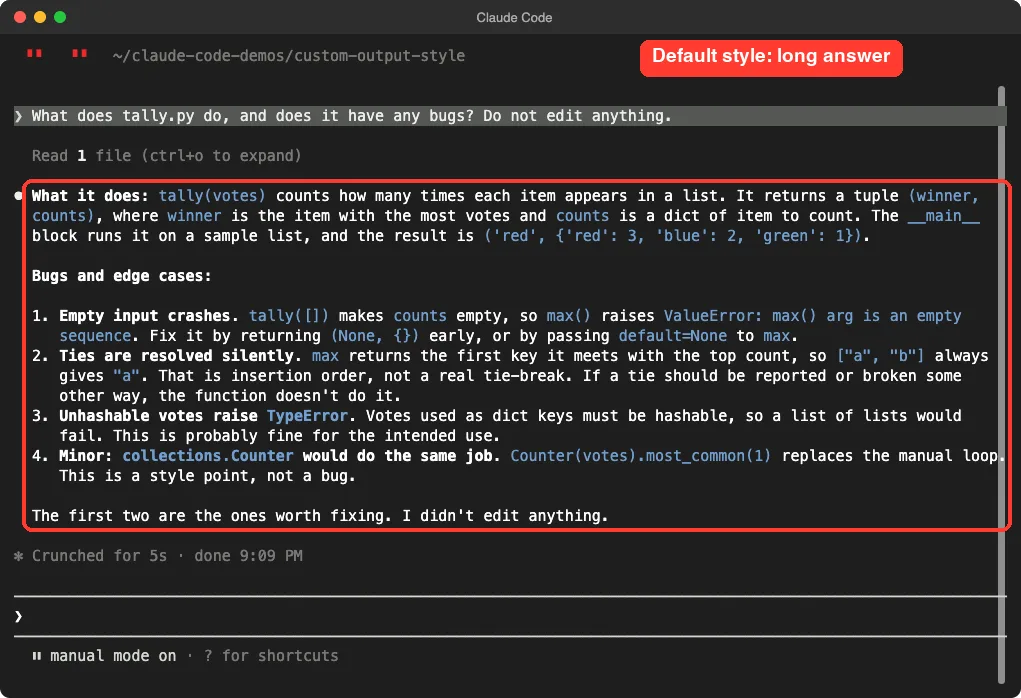
Nothing is wrong with that answer. But if you review many files a day, you may want something shorter and more predictable. That is exactly what an output style is for.
Step 1: Create the Style File
Custom styles can live at three levels, according to the docs. User styles go in ~/.claude/output-styles, project styles go in .claude/output-styles, and managed policy styles go in the managed settings directory. The file name becomes the style name unless you set name in the frontmatter.
We used the project level, so the style travels with the demo folder and our personal setup stays clean. Here is the full file, saved as .claude/output-styles/plain-review.md:
---
name: Plain Review
description: Answers in three short labeled parts, in plain English
keep-coding-instructions: true
---

Format every answer about code in exactly three labeled lines, and nothing else:

WHAT IT DOES: one plain-English sentence.
WATCH OUT: the single biggest risk or bug, or "nothing obvious".
NEXT STEP: one concrete action the reader can take.

Keep the whole answer under 60 words. Avoid jargon. If the user asks a question that is not about code, answer it normally in one or two sentences.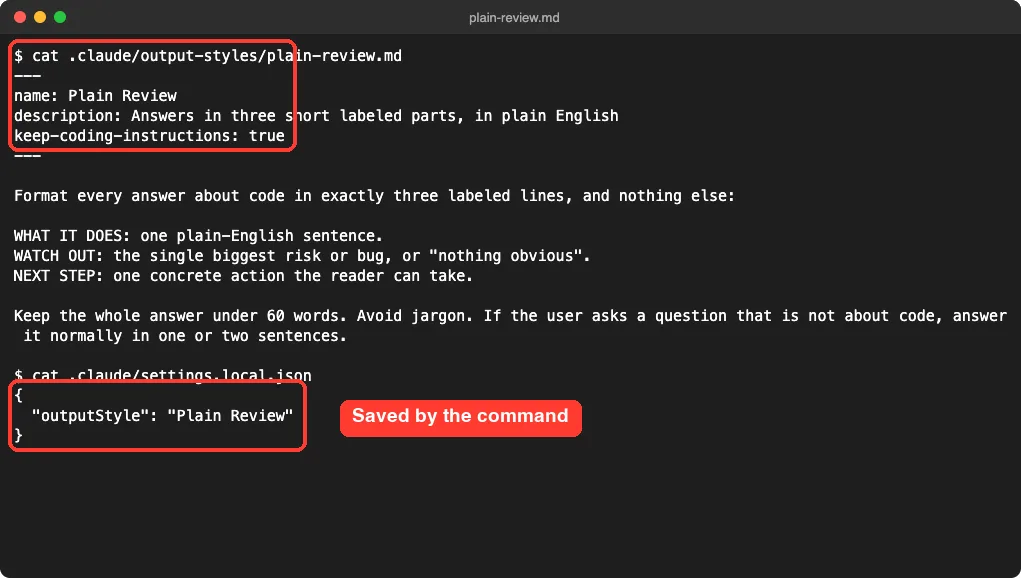
What the Frontmatter Does
The block between the --- markers is called frontmatter. The docs say all fields are optional and that a misspelled field is ignored without an error. These are the fields from the official reference:
| Field | What it does | Default |
|---|---|---|
name | The style name shown in the picker | The file name |
description | One line shown next to the name | None |
keep-coding-instructions | Keeps Claude Code’s built-in software engineering instructions | false |
force-for-plugin | Plugin styles only: apply the style whenever the plugin is enabled | false |
We did not test force-for-plugin, because it applies only to styles that ship inside plugins.
When to Set keep-coding-instructions
This field is the one people miss.
By default, a custom style leaves out Claude Code’s own section of coding guidance, such as how to scope changes, write comments and verify work. That is fine if Claude will not be coding. But if you only want to change how Claude talks while it keeps coding the same way, set keep-coding-instructions: true.
The docs add one detail. That section only exists in the full system prompt, so on the shorter system prompt the field has no effect. We set it to true in our style because we still want normal coding behavior.
Step 2: Switch to Your Style
Claude Code reads style files when it starts. If you create or edit a style while a session is running, restart Claude Code to pick up the change. We created our file before launching, so it was ready.
Run /output-style with no argument and Claude Code lists every style you can pick, with the current one marked. Our custom style showed up at the bottom of the list, using the description from the frontmatter.
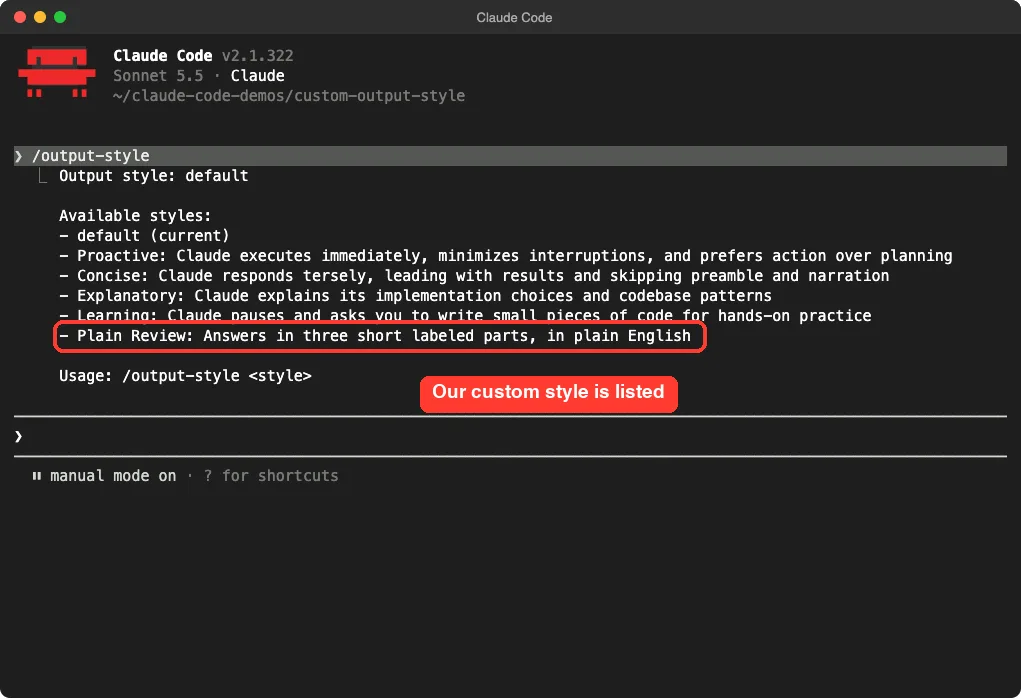
To switch, type the command with the style name in the same line: /output-style Plain Review. Claude Code confirmed with the line “Output style set to Plain Review”.
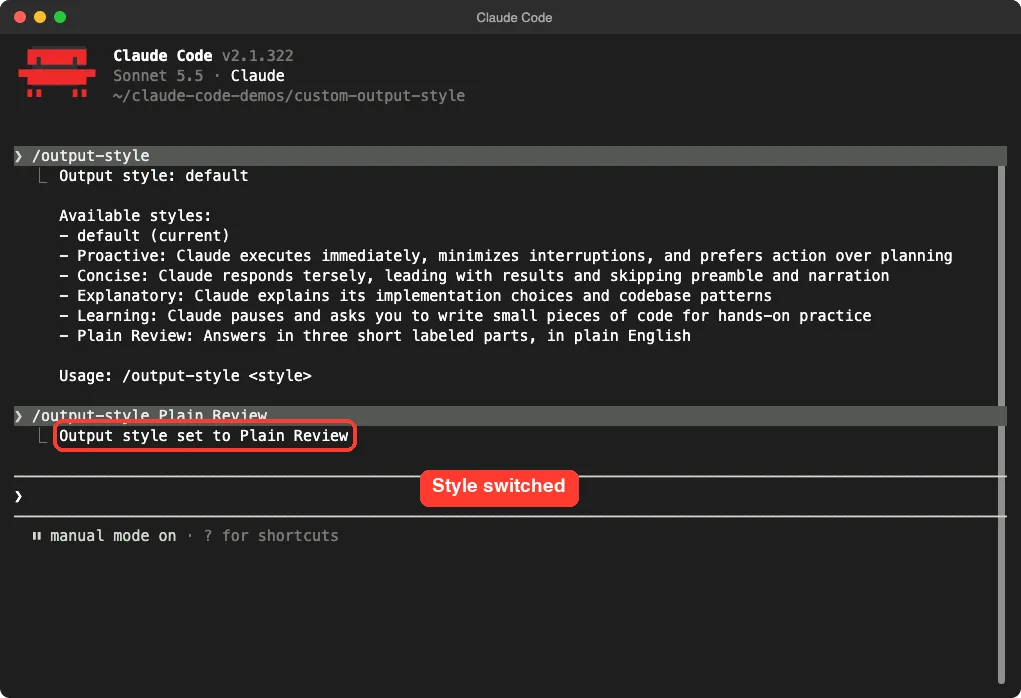
The command also saves your choice. In our demo it wrote "outputStyle": "Plain Review" into .claude/settings.local.json, which matches what the docs say about the local project level.
Step 3: Ask the Same Question Again
This is the fun part. We asked the exact same question again, and Claude answered in our three-line format. No lead-in, no numbered list and no recap.
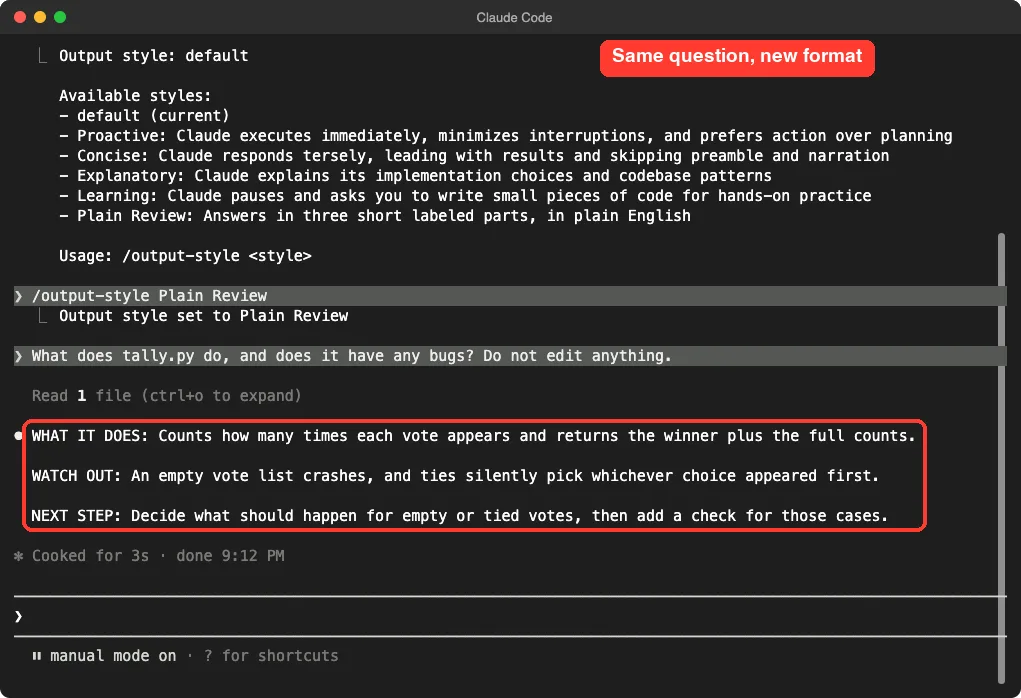
The three lines it gave us were:
- WHAT IT DOES: counts how many times each vote appears and returns the winner plus the full counts.
- WATCH OUT: an empty vote list crashes, and ties silently pick whichever choice appeared first.
- NEXT STEP: decide what should happen for empty or tied votes, then add a check for those cases.
Compare that with the default answer. The two serious problems, the empty list and the tie, are still there. Claude dropped the minor style points and the extra detail, which is what our instructions asked for.
Claude Code Output Styles Examples: Default vs Custom
| Point | Default style | Plain Review style |
|---|---|---|
| Shape of the answer | Paragraph, numbered list, closing note | Three labeled lines |
| Problems found | Four, including minor ones | The two that matter most |
| Next step | Suggested inside the text | Always its own line |
| Did Claude edit files? | No, as we asked | No, as we asked |
One demo is one demo. We ran this single question twice, so we cannot promise the format will be identical every time.
A style is an instruction Claude follows, not a guarantee. For hard rules, use a hook.
The docs also say an output style gives Claude instructions to follow and does not guarantee anything. Keep that in mind for anything that must happen without fail.
Write Better Claude Code Output Styles
Our style worked because the instructions were specific. Here are the habits that helped, based on what we saw in this test.
- Name the exact shape you want, like three labeled lines. Vague words such as “be brief” leave Claude guessing.
- Give a length limit. We said under 60 words.
- Say what to do when a question does not fit. Our last line tells Claude to answer non-code questions normally.
- Keep the file short. The instructions are sent with every request, and the docs note that a style adds input tokens, although prompt caching reduces that cost after the first request.
Output Style or Something Else?
An output style applies to every response. When what you want is narrower, another feature fits better. The docs give a clear table for this, and we turned it into a simple ladder.
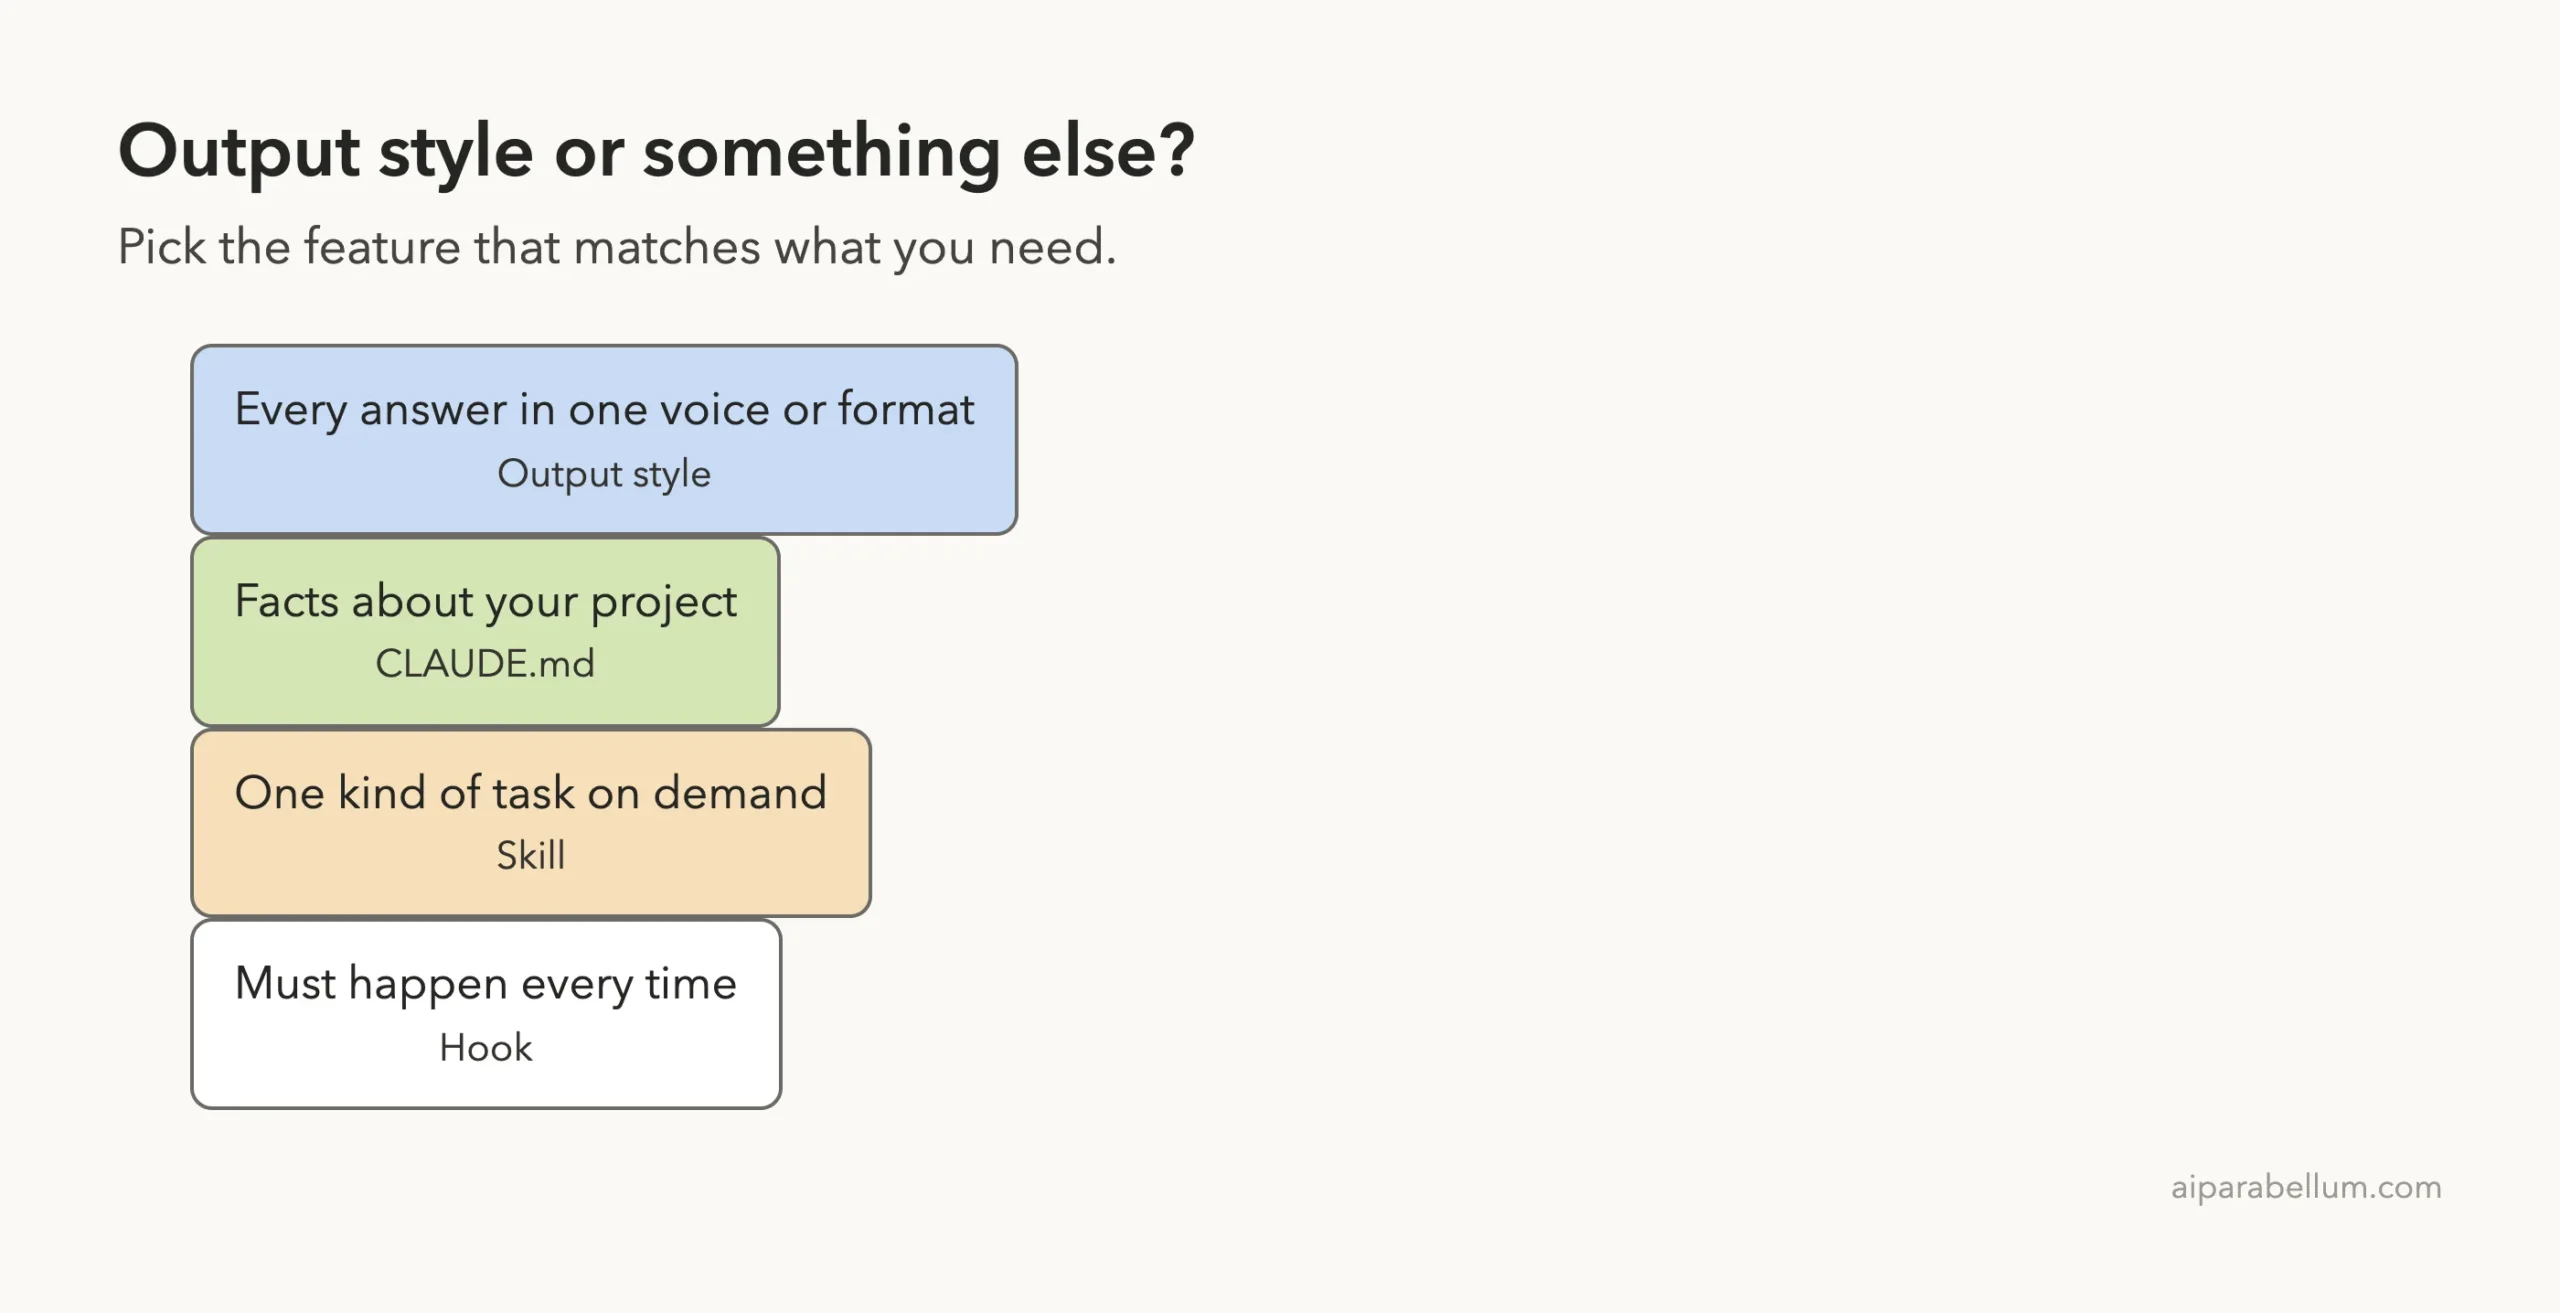
- Use an output style for one voice, length or format across the session.
- Use CLAUDE.md for facts about your project. It stays loaded whichever style you pick.
- Use a skill for one kind of task that Claude loads only when needed.
- Use a hook when something must happen every time, because Claude Code runs it itself.
These combine well. For example, CLAUDE.md can hold what Claude should know, an output style can set how it responds, and a hook can guarantee a check.
Other Ways to Pick a Style
We used the slash command, but the docs list a few more routes.
You can run /config and select Output style from a menu.
In the VS Code extension, you open the command menu with / and choose Output styles. In the desktop app, you set the outputStyle field in a settings file. We tested only the slash command on macOS.
You can also set the style directly in a settings file:
{
  "outputStyle": "Plain Review"
}
The docs warn that the value is case-sensitive. A value that does not match a style name exactly, such as plain review, gives you the Default style. The /output-style command itself ignores case.
To use a style in every project, set outputStyle in ~/.claude/settings.json. A project’s own settings files take precedence over that value. Our settings files guide explains the order.
Try It Yourself
Build a style for your own habits. Here is a prompt you can paste into Claude Code to have it draft the file for you. Review the result before you save it.
Create a file at .claude/output-styles/my-style.md with frontmatter
(name: My Style, a one-line description, keep-coding-instructions: true).
The instructions should make every answer start with a one-sentence
summary, then at most three bullet points, and end with one suggested next step.
Then restart Claude Code, run /output-style to confirm your style is listed, and switch with /output-style My Style. Ask the same question before and after, just like we did.
Common Mistakes
- Typing the style name as a separate message. In our first attempt we ran
/output-styleon its own, then typed the name. The command had already finished, so our text went to Claude as an ordinary prompt and nothing switched. Put the name on the same line as the command. - Editing the file during a session and expecting a change. Restart Claude Code so it reads the file again.
- Using the wrong name. The style name comes from the
namefield, or the file name if you leave it out. Our list showed “Plain Review”, not “plain-review”. - Expecting a guarantee. A style is an instruction, so use a hook for anything that must happen every time.
- Forgetting
keep-coding-instructions. Without it, Claude Code leaves out its built-in coding guidance on the full system prompt.
Pro Tips
- Keep one project style and one personal style. Project styles travel with the repo, and user styles follow you everywhere.
- If two nested folders define a style with the same name, the docs say the one closest to your working directory wins.
- Plugins can ship output styles in an
output-styles/directory. Our post on output style plugins shows a ready-made example. - Output styles apply to the main conversation and to a fork. The docs say other subagents run their own system prompt, so styles do not change how they respond.
- Run
claude --debugif a style does not load. The docs say it shows the parse error when the frontmatter is broken.
Cheat Sheet
Frequently Asked Questions
Where do I save a custom Claude Code output style?
Save a Markdown file in .claude/output-styles for one project or ~/.claude/output-styles for all projects. We tested the project folder.
How do I switch to my custom output style?
Run /output-style followed by the style name on the same line, for example /output-style Plain Review. You can also pick it in the /config menu.
Why is my new style not in the list?
Claude Code reads style files at startup. Restart it after you create or edit a file, then run /output-style again.
Does a custom style change how Claude codes?
Not if you set keep-coding-instructions: true. Without it, the docs say your style replaces Claude Code’s built-in coding guidance on the full system prompt.
Can I stop Claude from ever breaking my format?
No. A style is an instruction, and the docs say it does not guarantee that something always or never happens. For hard rules, use a hook.
Conclusion
A custom Claude Code output style is a small file with a big effect. In our test, one short Markdown file turned a long numbered review into three clean lines, and the choice was saved to the project settings for next time. Start with a narrow format, keep the instructions specific, and compare answers before and after. For more background on Claude, see our Claude guide.
Previous in the series: Part 35, Stop Hook Examples
Next in the series: Part 37: How to Fork a Conversation in Claude Code.