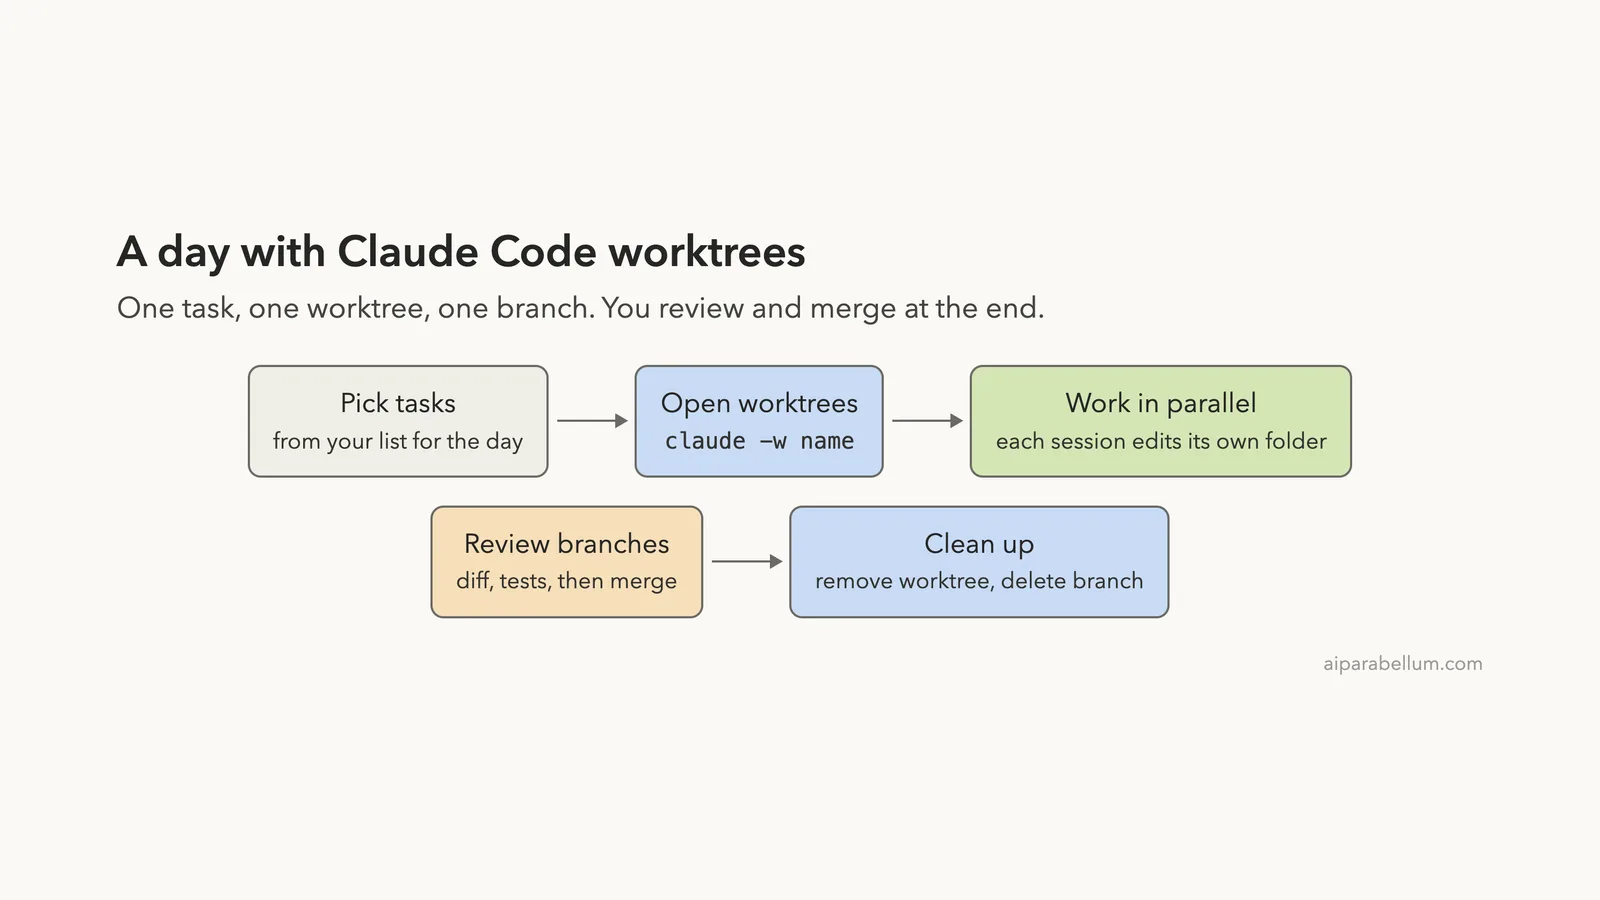
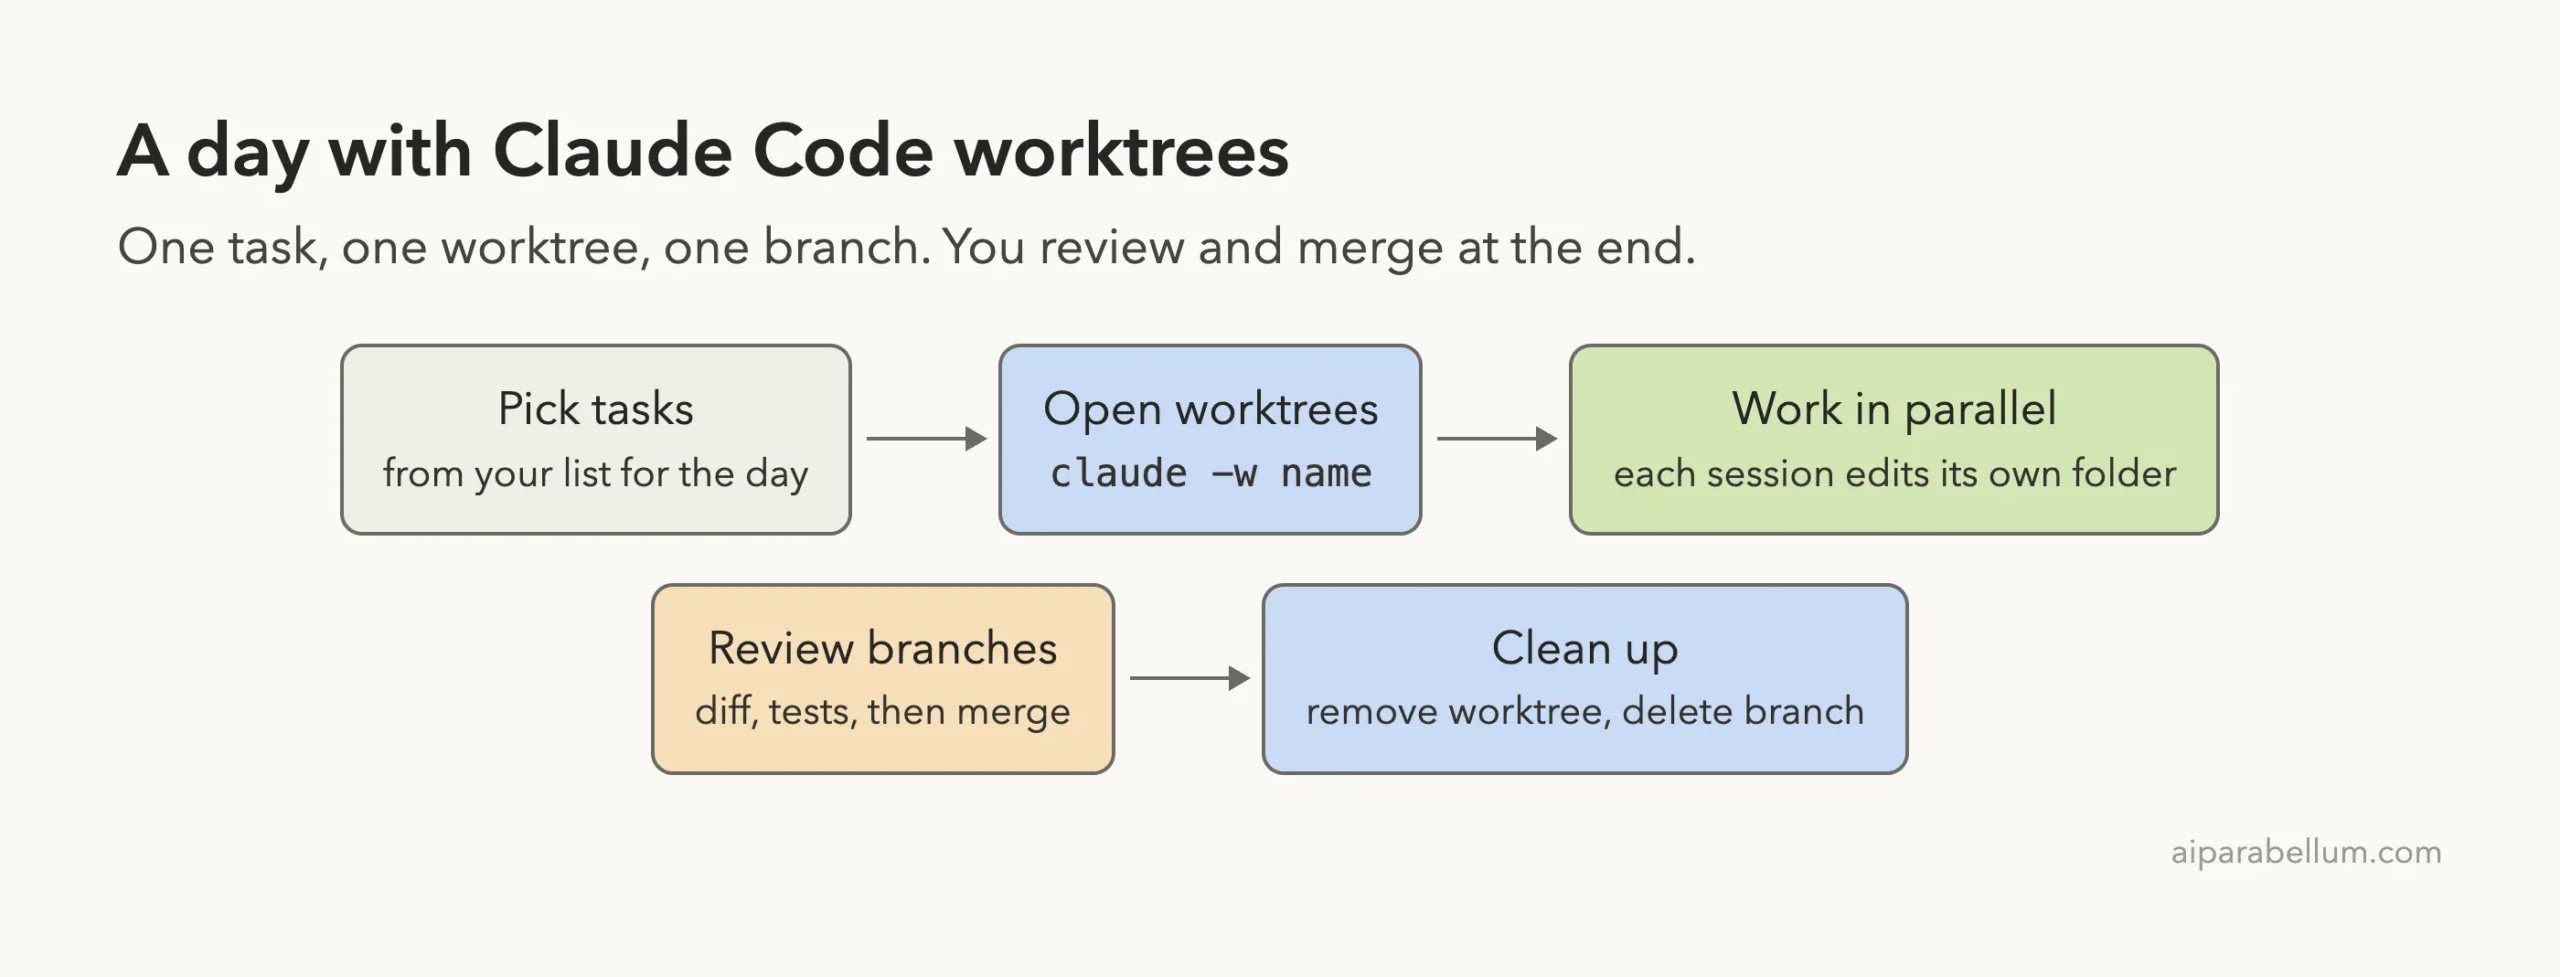
A good Claude Code worktrees workflow is less about one command and more about a daily routine. You start each task in its own folder, let several Claude sessions work side by side, review each branch, merge, and clean up before you close the laptop. In this guide you will run that routine for real on a small demo project, including the one cleanup problem we ran into.
This is Part 44 of 45 in our Claude Code Deep Dives, part of our Claude Code tutorials. In Part 43 we put Claude Code inside a CI pipeline, and here we focus on how you work with it every day.
Tested with Claude Code v2.1.322 on November 13, 2026, on macOS, in a throwaway Git repository with a local remote. We ran two worktree sessions, reopened one, merged both branches and cleaned up. Subagent worktrees, pull request worktrees and the worktree.baseRef setting follow Anthropic’s official docs, and we did not run them.
| Question | Short answer |
|---|---|
| What is the daily routine? | Pick tasks, open one worktree per task, work in parallel, review and merge, then clean up |
| Start a task | claude -w task-name |
| Where the work lives | .claude/worktrees/task-name on the branch worktree-task-name |
| Come back later | Run the same claude -w task-name again |
| See everything | git worktree list |
| Finish | git merge, then git worktree remove and git branch -d |
Why Build a Claude Code Worktrees Workflow
A git worktree is a separate working folder with its own files and branch, sharing the same history and remote as your main checkout. Claude Code uses it so that two sessions never edit the same files. That is the whole trick.
We already explained the basic flag, the trust prompt and the .env copy in our worktrees guide on parallel sessions. This post goes one step further. It shows how the pieces fit into a normal workday, so you do not have to think about them each time.
If you are new to the assistant itself, our Claude AI overview is a good starting point. If you have never used Claude Code before, read our first session guide first.
Step 1: Set Up the Project Once
Do the setup a single time per repository, and every later day gets easier. We made a tiny Python project called Todo Helper with a local remote, a .gitignore and a .worktreeinclude file. It also has a .env file that git ignores, like a real project with local secrets.
Two small files matter here. The first line below keeps worktree folders out of your main checkout’s status, and the second copies .env into every new worktree.
# .gitignore
.env
.claude/worktrees/
__pycache__/

# .worktreeinclude
.env
The .worktreeinclude file uses .gitignore syntax. According to the worktrees documentation, only files that match a pattern and are also gitignored get copied, so tracked files are never duplicated.
One more thing to know: interactive worktree sessions need workspace trust. If you have never run claude in the folder, run it once, accept the trust dialog, exit, and then use --worktree. We did exactly that before our demo.
Choose where new worktrees start
By default, a new worktree branches from the repository’s default branch on the remote, usually main. The docs call this "fresh". If you want worktrees to carry your unpushed commits instead, set worktree.baseRef to "head" in your settings.
{
  "worktree": {
    "baseRef": "head"
  }
}
For most daily work the default is the safer choice, because every task starts from a clean copy of the remote. Our settings files guide shows where this JSON can live.
One task, one worktree, one branch. Keep the worktree until you have merged the branch.
Step 2: Start Your First Task in a Worktree
Our morning list had two tasks: add a search command to the todo script, and fix a spelling mistake in the README. Each task gets its own named worktree. The name becomes the folder and part of the branch name.
claude -w add-search --permission-mode acceptEdits \
  --allowedTools "Bash(git add:*)" "Bash(git commit:*)"
Claude Code created .claude/worktrees/add-search on a new branch named worktree-add-search and opened the session inside it. You can see the path on the welcome screen, so you always know which folder this session owns.
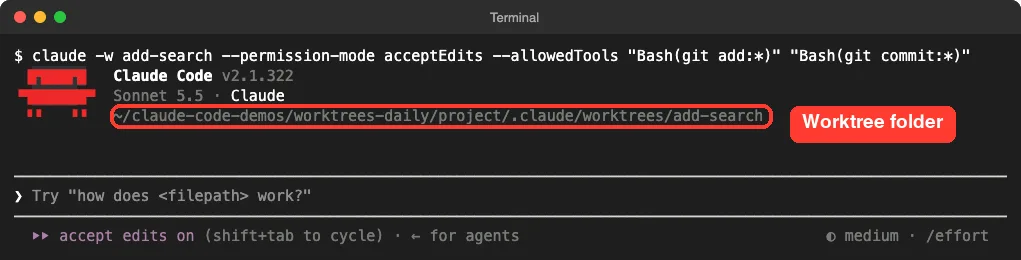
We used --permission-mode acceptEdits so file edits go through without a prompt, and we pre-approved only two git commands. If you want to understand these modes, read our permission modes guide.
Then we typed a plain request: add a search command so that python3 todo.py search milk prints matching tasks, and commit the change. Claude edited todo.py inside the worktree.
What happens when a session stops early
Our first session paused at an approval prompt for running the script, because we had not pre-approved python3. We ended that session there. Claude Code does not mind: the edit was already saved in the worktree on its own branch, and the main checkout stayed untouched.
This is a useful habit to learn. A worktree keeps your work even if the session ends. You can walk away mid-task and come back later.
Step 3: Reopen a Worktree and Finish the Job
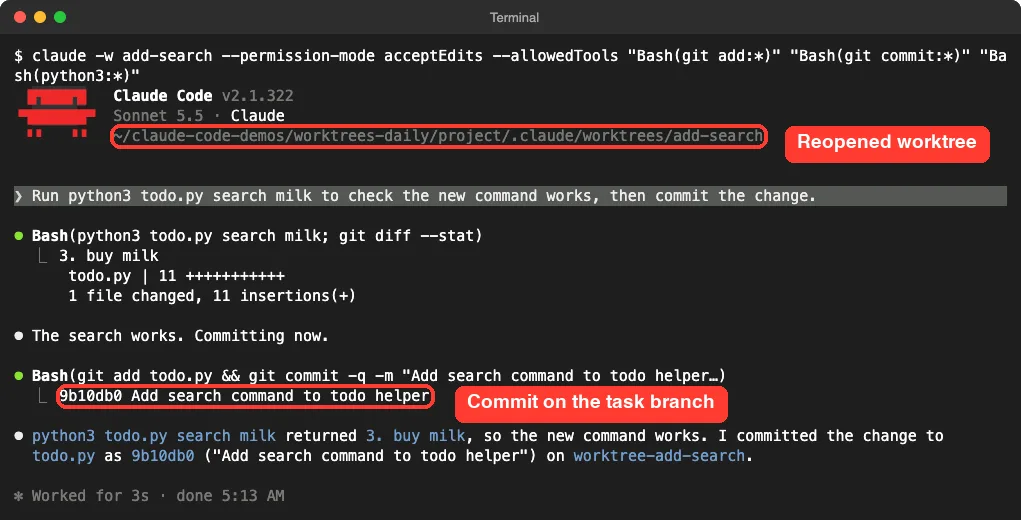
To come back, run the same command with the same name. The docs say that if a worktree with that name already exists, Claude Code opens it instead of creating a new one. We added "Bash(python3:*)" to the allowed tools this time.
Our prompt was short: run the new command to check it works, then commit. Claude ran python3 todo.py search milk, saw 3. buy milk, and committed the change on worktree-add-search.
If you want the older conversation back too, the docs describe resuming. Running the claude --worktree name --resume command that Claude Code prints on exit returns you to that session. Our session management guide covers naming and resuming in more detail.
Step 4: Run a Second Task in Parallel
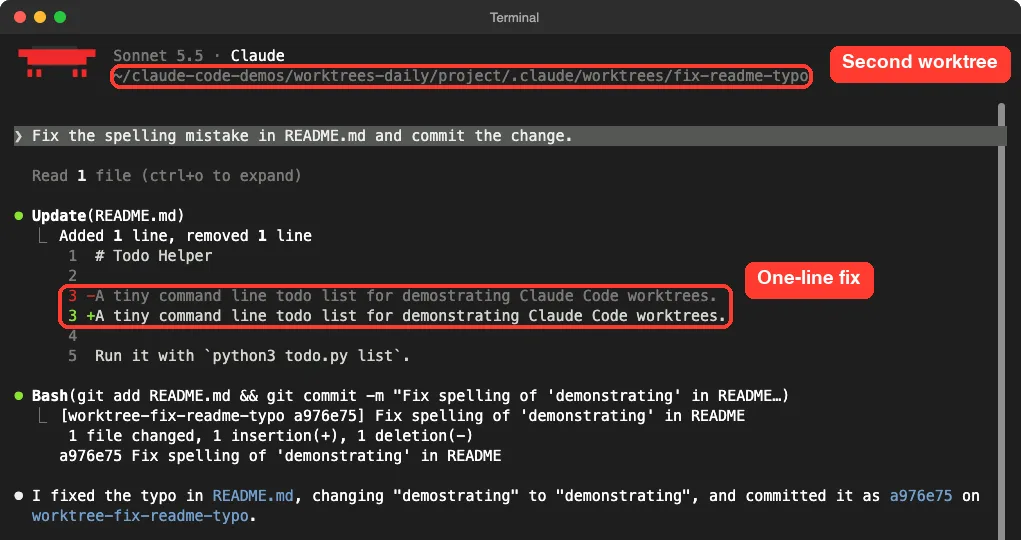
Now the payoff. While the search worktree still existed, we opened a second one for the README fix. In daily use you would do this in another terminal tab while the first session is still running.
claude -w fix-readme-typo --permission-mode acceptEdits \
  --allowedTools "Bash(git add:*)" "Bash(git commit:*)"
We asked Claude to fix the spelling mistake in README.md and commit. It changed one word and committed on worktree-fix-readme-typo. Neither session saw the other’s files, which is the point of the routine.
How Claude Code keeps sessions apart
The docs list four checks that apply while a session is isolated in a worktree. Claude Code blocks file edits that target a path in the main checkout. It also blocks shell commands whose working directory resolves to the main checkout, git commands redirected into it, and commands whose git use it cannot verify.
The same checks cover every subagent that the session starts. One honest limit from the docs: a command like cp or a shell redirect can write into the main checkout without those checks catching it, because they read paths and command text rather than tracking every file a command writes. So permissions and sandboxing still matter.
Step 5: Exit Cleanly and Choose Keep or Remove
When you type /exit in a worktree session that has work in it, Claude Code asks what to do. It tells you how many commits the branch has and offers two choices: keep the worktree, or remove it and lose the changes and commits.
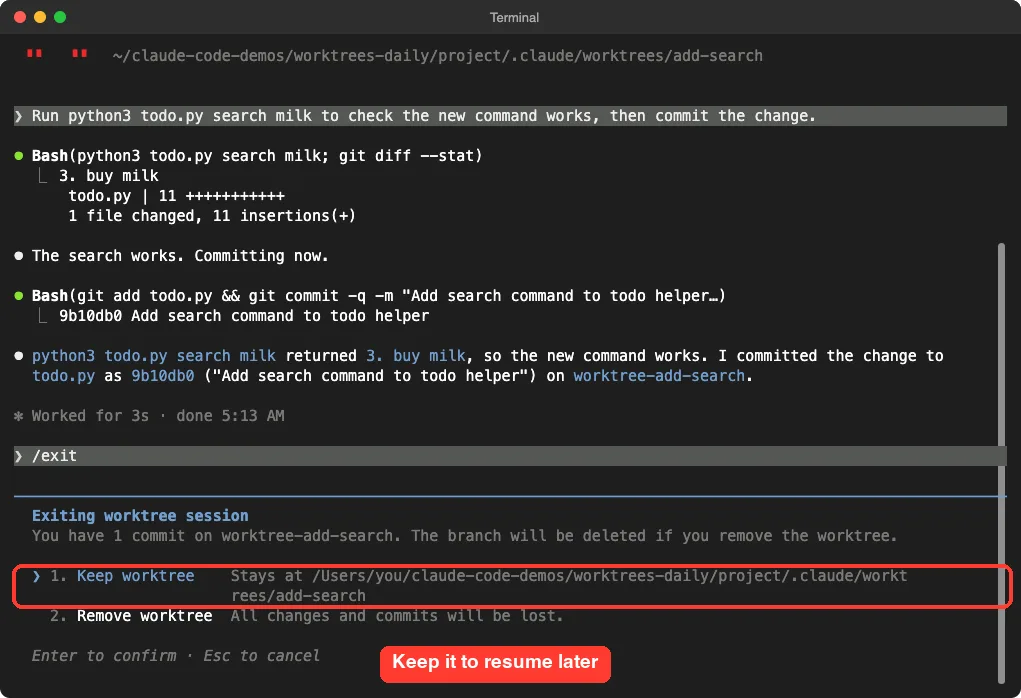
Choose keep until you have merged the branch. Per the docs, the exit rules depend on the state of the worktree:
- A clean, unnamed session is removed automatically with its branch.
- A clean, named session asks you first, so you can keep it.
- A worktree with changes or new commits asks you to keep or remove it.
- If Claude Code cannot check the worktree’s state, it asks rather than deleting anything.
Step 6: Review the Branches and Merge Them
At the end of the day, look at what you have. Plain git is all you need, because each worktree is an ordinary branch. We ran one command that lists the worktrees, the branches, and each branch’s new commits.
git worktree list
git branch -v
git log --oneline main..worktree-add-search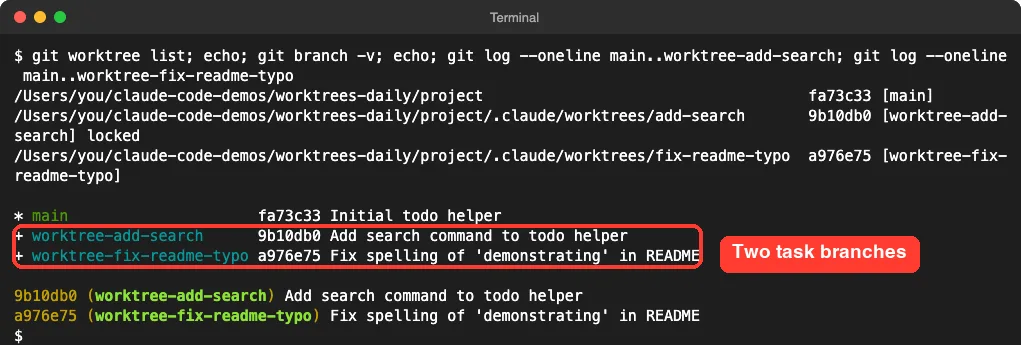
Then merge. We merged the README fix first, which fast-forwarded, and then the search branch, which created a merge commit. The two branches touched different files, so there was no conflict.
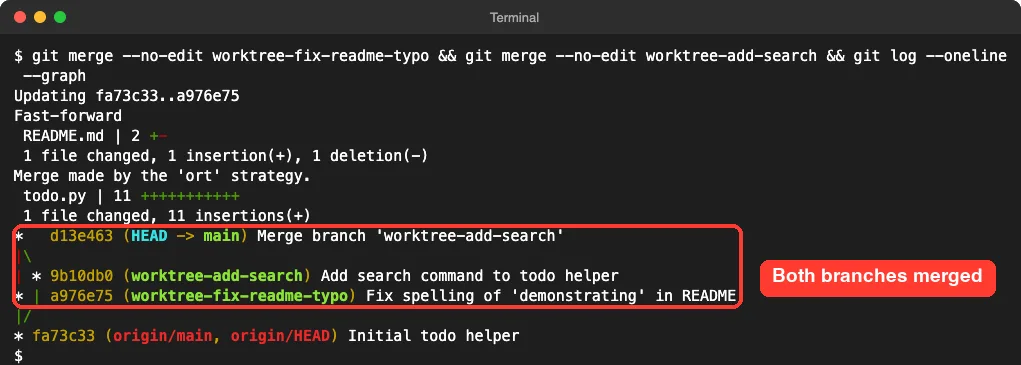
In a team setting you would push each branch and open a pull request instead of merging locally. The workflow is the same up to this step. Read each diff the way you would read a coworker’s change, and run your tests before you merge.
Step 7: Clean Up the Worktrees
Cleanup is where we hit the one snag of the day. We removed both worktrees in a single command. The README worktree went away, but the search worktree refused with a message about a locked working tree.
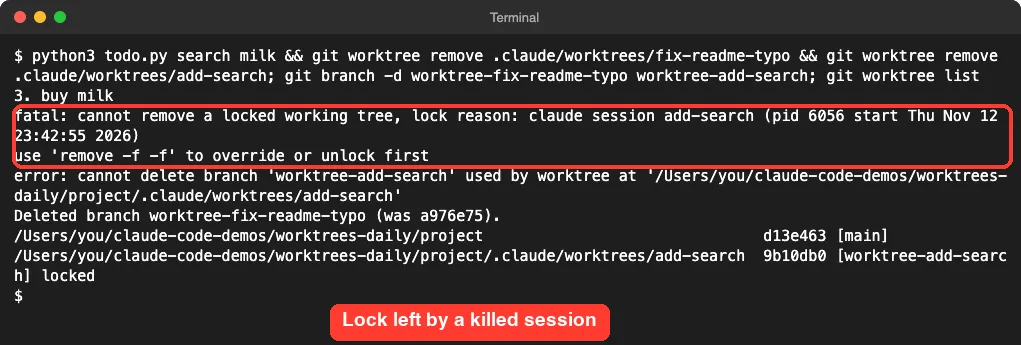
The lock reason named the Claude session. Our first session had been ended before it exited normally, so its lock stayed behind. The docs explain that Claude Code takes a lock on a worktree while a session runs, and that you can run git worktree unlock if git refuses to remove one.
git worktree unlock .claude/worktrees/add-search
git worktree remove .claude/worktrees/add-search
git branch -d worktree-add-search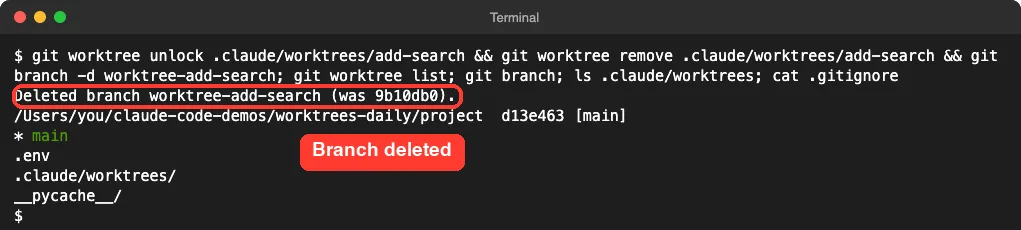
Use git branch -d and not -D for the branch. The lowercase flag refuses to delete a branch that has not been merged, which protects you from throwing away work by mistake.
Cleanup you do not have to do yourself
Subagent and background-session worktrees get a periodic sweep. According to the docs, it removes them once they are older than your cleanupPeriodDays setting, and it leaves a worktree alone when it still holds changed files or unpushed commits. It never removes a worktree you created yourself with git worktree add.
Headless runs are different. Non-interactive runs with -p have no exit prompt, so Claude does not clean up their worktrees, and you remove them with git worktree remove. Our headless mode guide explains -p in full.
Add Subagent Isolation to the Routine
Worktrees isolate whole sessions, while subagents split work inside one session. You can combine them.
The docs describe two ways. Ask Claude to use worktrees for its agents, or add isolation: worktree to a custom subagent’s frontmatter.
---
name: refactorer
description: Applies mechanical refactors across many files
isolation: worktree
---

Apply the requested refactor across every affected file, then run the tests
and report the results.
Each such subagent gets a temporary worktree. Claude Code removes it when the subagent finishes without changes, and a worktree with changes stays until the sweep can remove it without losing work. We did not run this example ourselves, so treat it as the documented behavior.
To build your own helpers, see our subagents guide and the subagent file examples.
Which Worktree Command Should You Use?
Most days you need only the first rung of the ladder below. The other two cover special cases from the docs, and we did not run them in this demo.
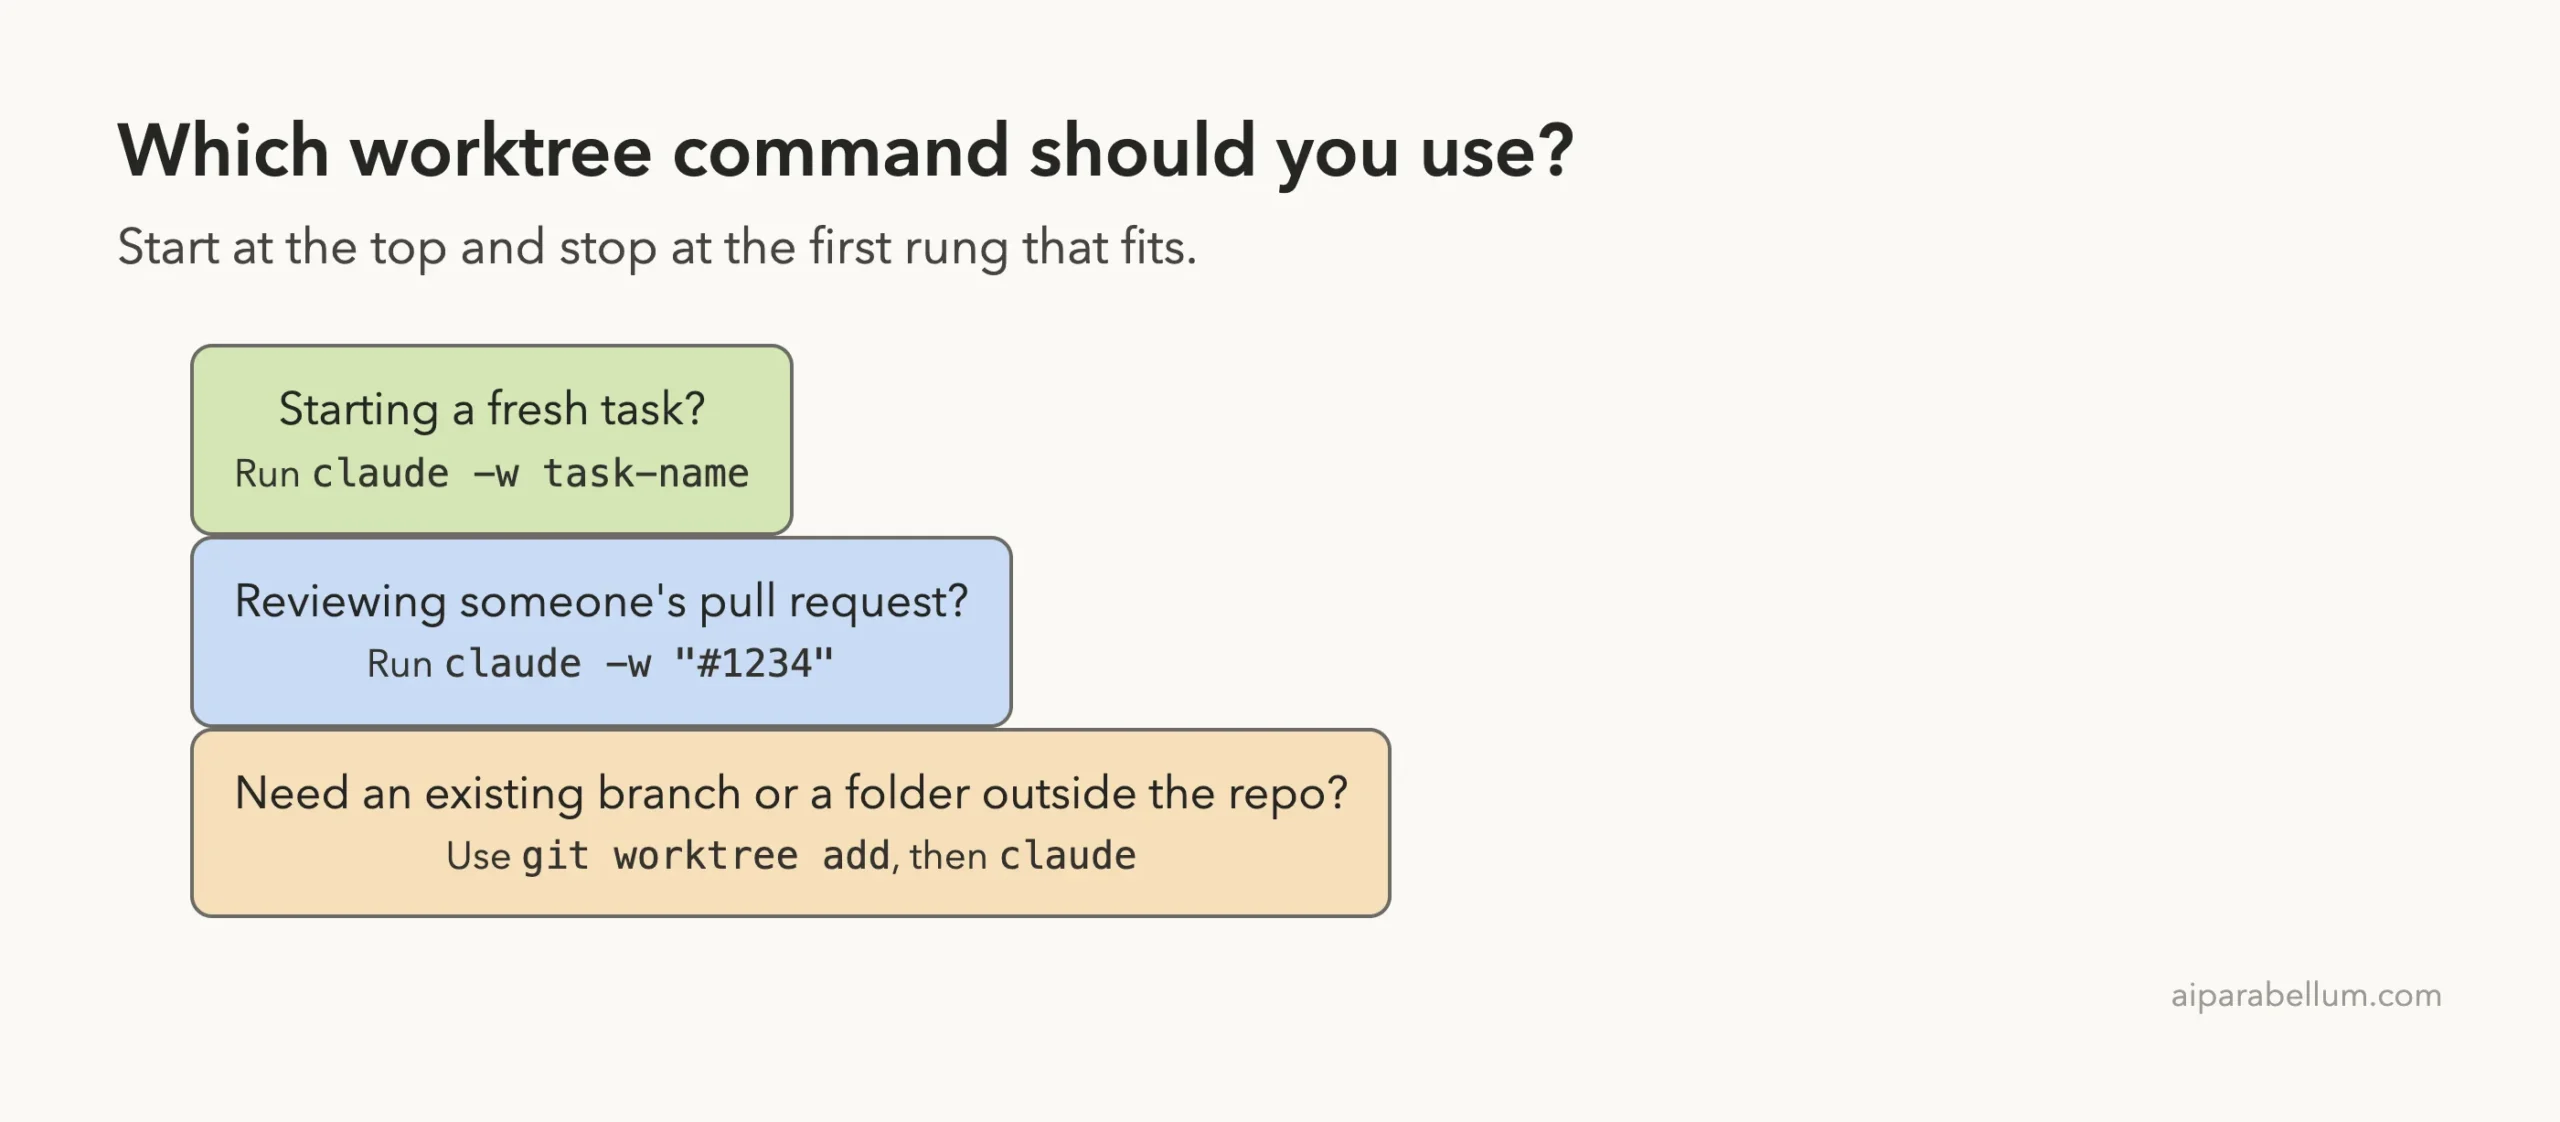
| Situation | Command | Note from the docs |
|---|---|---|
| New task | claude -w task-name | Branches from the default branch unless baseRef is "head" |
| Review a pull request | claude -w "#1234" | Creates .claude/worktrees/pr-1234; quote the argument |
| Existing branch | git worktree add ../project-bugfix fix-issue-456 | Then run claude inside that folder |
| Check all worktrees | git worktree list | Lists the main checkout and every worktree |
Try It Yourself
Make a small practice repository, add a .gitignore line for .claude/worktrees/, and commit a file or two. Run plain claude once to accept the trust dialog, exit, and then paste this prompt into a worktree session.
claude -w practice-one

Add a short comment above each function in the main file explaining what it does, then commit the change.
Open a second terminal tab and start claude -w practice-two for a different small task. When both finish, run git worktree list, merge the branches, and remove the worktrees. If git reports a lock, use git worktree unlock as shown above.
Common Mistakes
- Forgetting
.claude/worktrees/in.gitignore, so worktree folders clutter your main status. - Choosing Remove at the exit prompt before merging, which deletes the folder, the branch and the commits.
- Starting Claude in a subdirectory of a worktree. The docs warn that with the sandbox on, git commands can fail with an
index.lockerror there, so launch from the worktree root. - Launching a resume from inside another kind of worktree. The docs say to resume from the main checkout when Claude Code cannot vouch for the folder.
- Expecting dependencies to be installed. A worktree is a fresh checkout, so install packages there or ask Claude to do it.
- Reusing a worktree name by accident. Claude Code opens the existing one instead of making a new one.
Pro Tips
- Name worktrees after the task, such as
fix-login-bug, sogit worktree listreads like your to-do list. - Keep one task per worktree. The branch then holds one clean change that is easy to review.
- Pre-approve only the commands a task needs, as we did with git and
python3. - Remember that choosing “Yes, and don’t ask again” for a Bash command in a worktree saves the rule in the main checkout’s
.claude/settings.local.json, so it applies to every worktree of that repository. - Project-scope plugins load in your worktrees too, so you do not reinstall them each time.
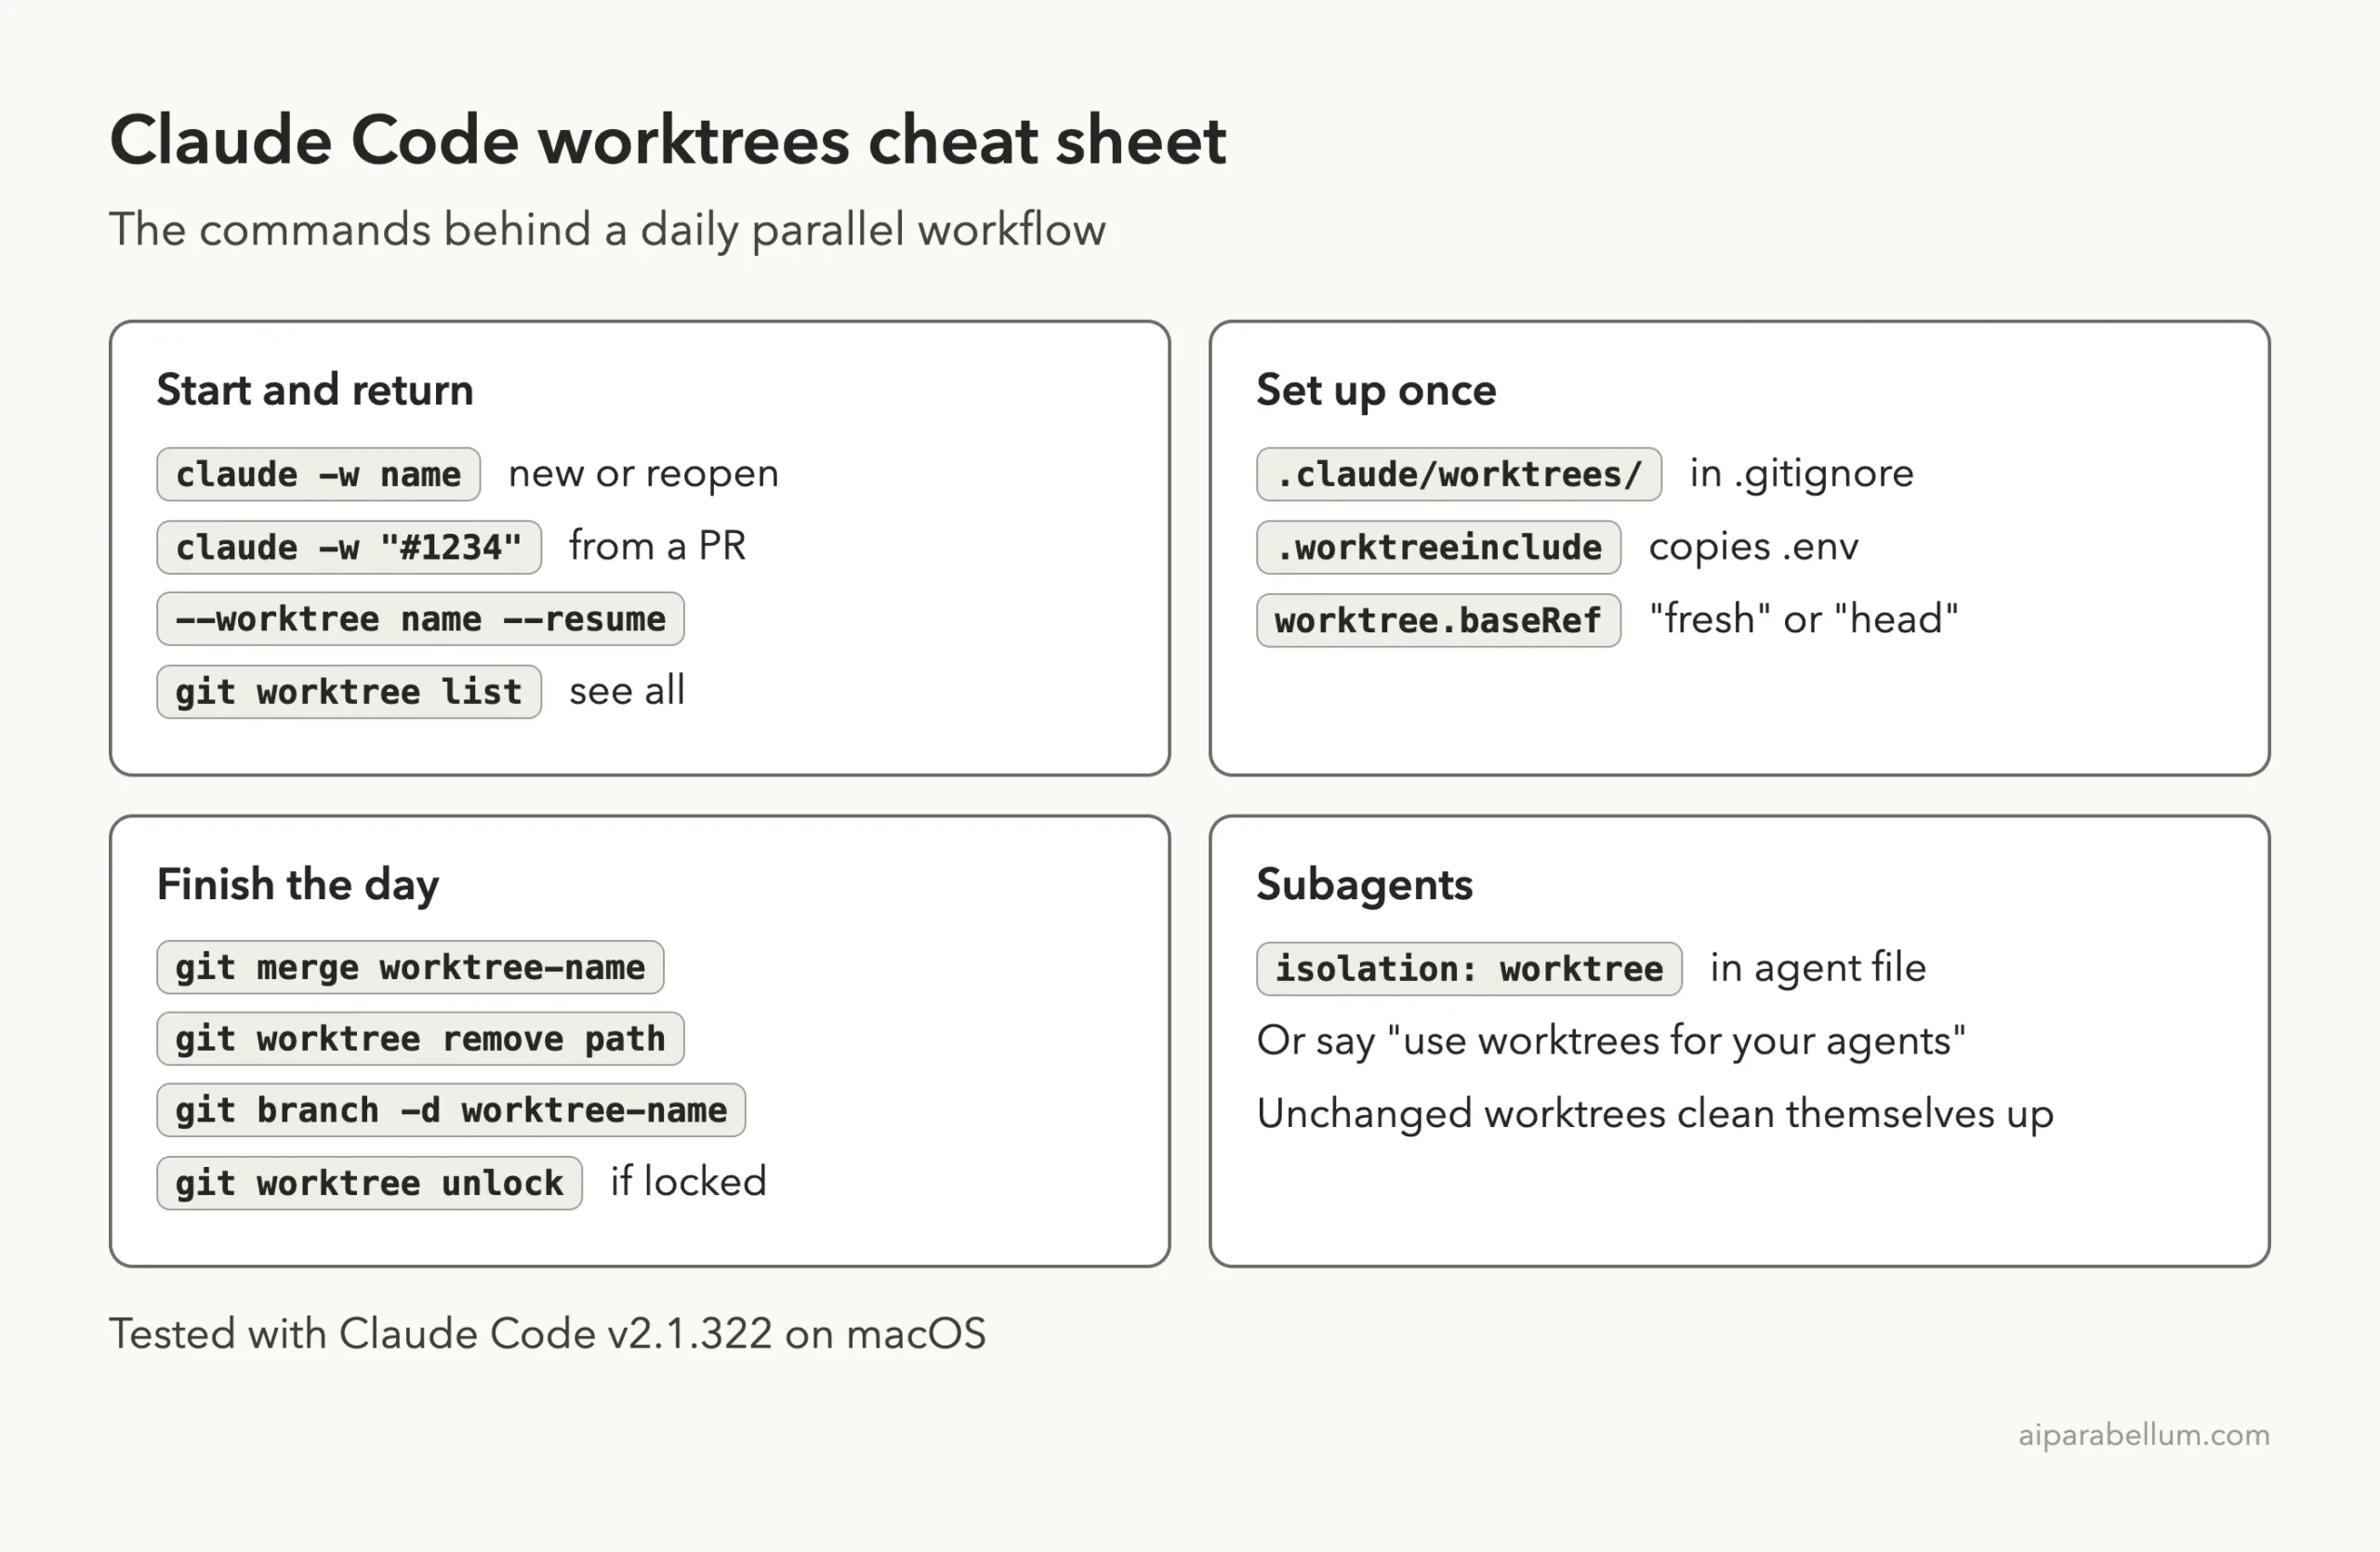
Claude Code Worktrees Cheat Sheet
Frequently Asked Questions
What is the best Claude Code worktrees workflow for a daily routine?
Open one named worktree per task with claude -w task-name, let each session finish its own branch, review each branch, merge, and then remove the worktree and its branch. That is the loop we ran in this guide.
Can I reopen a worktree the next day?
Yes. Run claude -w with the same name and Claude Code opens the existing worktree. If you also want the earlier conversation, use the claude --worktree name --resume command that Claude Code prints when you exit.
Do worktrees share my .env file?
Not by default, because a worktree is a fresh checkout. Add the file to .worktreeinclude and Claude Code copies it into each new worktree, as long as the file is also gitignored.
Why does git say the worktree is locked?
Claude Code holds a lock on a worktree while a session runs. A session that ended abnormally can leave the lock behind, so run git worktree unlock on that folder and then remove it.
Do worktrees work outside git?
Worktrees need a git repository. For other version control systems, the docs describe replacing the git logic with WorktreeCreate and WorktreeRemove hooks, which we did not test.
Conclusion
A worktree routine turns parallel Claude Code sessions from a risky trick into a calm habit. You name a task, let Claude work in its own folder, keep the worktree until you have merged it, and then unlock and remove anything left over. Set up the ignore file and .worktreeinclude once, and the rest of the day is just a few commands. In Part 45 we finish the series with dynamic workflow examples you can copy.
Previous in the series: Part 43: Claude Code in a CI/CD Pipeline: A Working Example
Next in the series: Part 45, Claude Code Dynamic Workflow Examples You Can Copy, is coming soon.