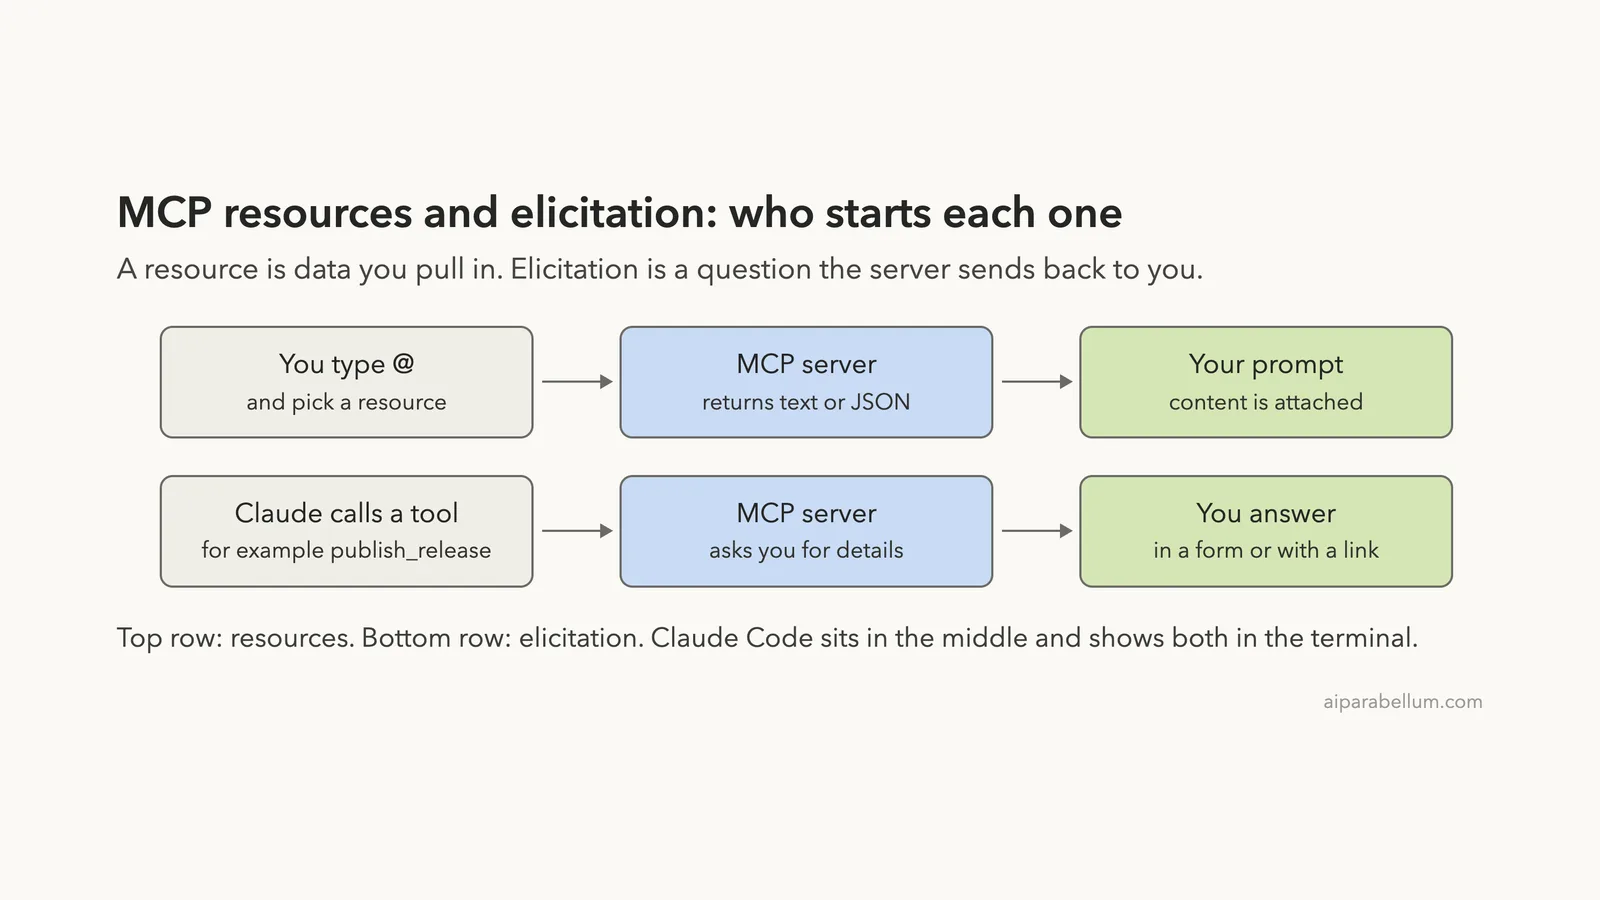
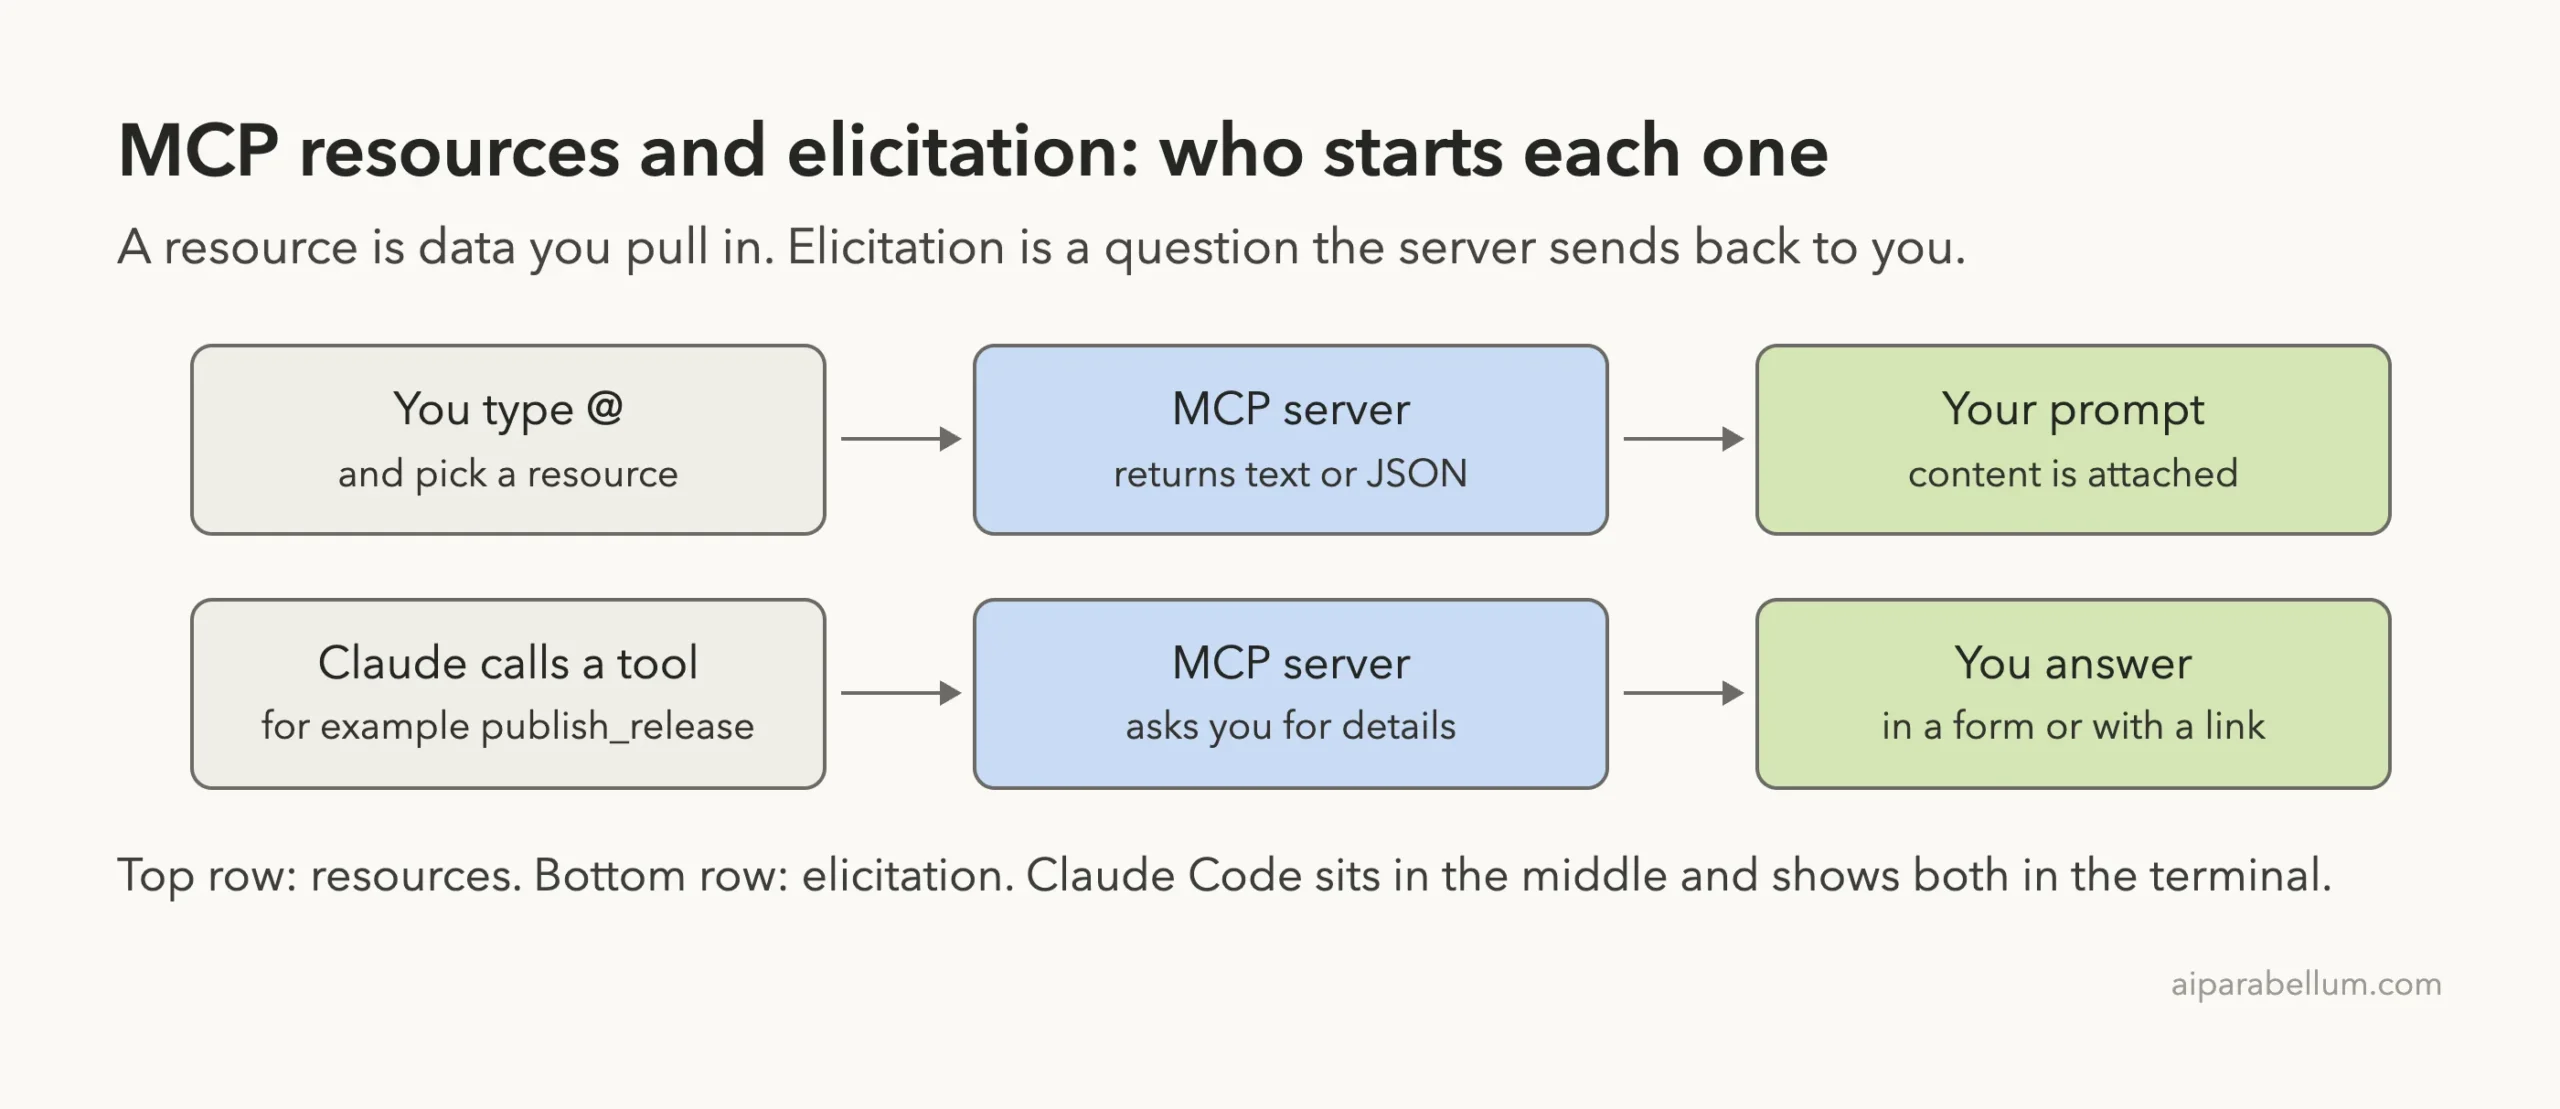
Claude Code MCP resources let you pull data from a server into your prompt with an @ mention, the same way you mention a file. Elicitation is the reverse trip: the server stops in the middle of a tool call and asks you a question. Most guides only cover tools, so in this one we build a 76-line server that does both and watch how each one looks in the terminal.
Browse all our Claude Code tutorials for more guides like this one.
Tested with Claude Code v2.1.322 on November 14, 2026, on macOS, with version 1.32.2 of the official MCP TypeScript SDK. Everything ran in a throwaway project, and the release data in the screenshots is made up for the demo.
Claude Code MCP Resources and Elicitation: The Quick Answer
Both features work out of the box once a server that supports them is connected. You do not turn anything on.
| Feature | Who starts it | How it looks in Claude Code | What you do |
|---|---|---|---|
| Resource | You | An entry in the @ menu, written as server:scheme://path | Pick it, and its content is attached to your prompt |
| Resource (found by Claude) | Claude | listMcpResources and readMcpResource tool calls | Nothing, Claude reads it when it needs it |
| Elicitation, form mode | The server | A dialog titled “requests your input” with fields | Fill the fields, then choose Accept or Decline |
| Elicitation, URL mode | The server | A dialog titled “wants to open a URL” | Check the address, then Accept or Decline |
What MCP Resources and Elicitation Are
An MCP server can offer three kinds of things. Tools are actions Claude can run, prompts become slash commands, and resources are pieces of data with an address. If you are new to all of this, start with our MCP basics guide.
A resource is read-only content such as a document, a database schema or a status report. Each one has a URI, for example release://status. The server decides what the address means and what comes back when it is read.
Elicitation solves a different problem. Sometimes a tool cannot finish without a detail only you know, such as which version to publish. Instead of failing, the server sends a request back through Claude Code, and you answer it in a dialog.
Tools let Claude act, resources let you bring data in, and elicitation lets the server ask you before it goes on.
Step 1: Build a Small MCP Server
Our server plays a release desk for a made-up app. It offers two resources and two tools, and each tool asks the user something before it answers. You only need Node.js and one package.
mkdir release-desk && cd release-desk
npm init -y
npm install --save-exact @modelcontextprotocol/[email protected]
Create server.mjs. The first part registers the two resources: one returns a Markdown file, and the other builds a small JSON report every time it is read.
import { McpServer } from "@modelcontextprotocol/sdk/server/mcp.js";
import { StdioServerTransport } from "@modelcontextprotocol/sdk/server/stdio.js";
import { appendFileSync, readFileSync } from "node:fs";

const dir = new URL(".", import.meta.url);
const log = (line) => appendFileSync(new URL("server.log", dir), line + "\n");
const server = new McpServer({ name: "release-desk", version: "1.0.0" });

server.registerResource(
  "release-notes",
  "release://notes/2.4",
  { title: "Release 2.4 notes", description: "Draft notes for version 2.4", mimeType: "text/markdown" },
  async (uri) => ({
    contents: [{ uri: uri.href, mimeType: "text/markdown",
      text: readFileSync(new URL("notes-2.4.md", dir), "utf8") }],
  })
);

server.registerResource(
  "release-status",
  "release://status",
  { title: "Release status", description: "Current build and test status", mimeType: "application/json" },
  async (uri) => ({
    contents: [{ uri: uri.href, mimeType: "application/json",
      text: JSON.stringify({ version: "2.4.0", build: "passing", tests: "212 of 212", blockers: 0 }, null, 2) }],
  })
);
The second part is the tool that uses elicitation. It calls elicitInput with a message and a small schema, waits for your answer, and logs what came back.
server.registerTool(
  "publish_release",
  { description: "Publish the current release. Asks the user for the details." },
  async () => {
    const answer = await server.server.elicitInput({
      mode: "form",
      message: "Confirm the release details",
      requestedSchema: {
        type: "object",
        properties: {
          version: { type: "string", title: "Version", description: "For example 2.4.0" },
          channel: { type: "string", title: "Channel", enum: ["beta", "stable"] },
          notify: { type: "boolean", title: "Email the team", default: false },
        },
        required: ["version", "channel"],
      },
    });
    log("form answer: " + JSON.stringify(answer));
    if (answer.action !== "accept") {
      return { content: [{ type: "text", text: "Nothing published. The user chose: " + answer.action }] };
    }
    const { version, channel, notify } = answer.content;
    return { content: [{ type: "text",
      text: `Published ${version} to ${channel}. Team email: ${notify ? "sent" : "skipped"}.` }] };
  }
);
The last part adds a tool for URL mode, records what Claude Code says it supports, and starts the server. The tool publishes nothing for real, it only builds a sentence from your answers.
server.registerTool(
  "request_signoff",
  { description: "Ask the user to sign off on the release in the browser." },
  async () => {
    const answer = await server.server.elicitInput({
      mode: "url",
      message: "Open the sign-off page to approve release 2.4",
      elicitationId: "signoff-2-4",
      url: "https://example.com/signoff?release=2.4",
    });
    log("url answer: " + JSON.stringify(answer));
    return { content: [{ type: "text", text: "Sign-off request result: " + answer.action }] };
  }
);

server.server.oninitialized = () =>
  log("client capabilities: " + JSON.stringify(server.server.getClientCapabilities()));

await server.connect(new StdioServerTransport());
Add a short notes-2.4.md file with a few bullet points, so the first resource has something to return. If you would rather have Claude write a server for you, see our test of two ways to build MCP servers.
Step 2: Connect the Server to Claude Code
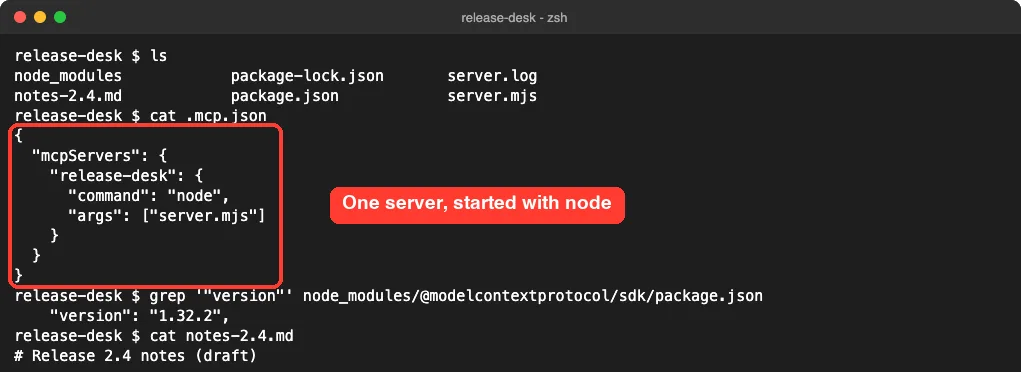
We used a project-scoped config, so the server only loads in this folder. Save this as .mcp.json in the project root.
{
  "mcpServers": {
    "release-desk": {
      "command": "node",
      "args": ["server.mjs"]
    }
  }
}
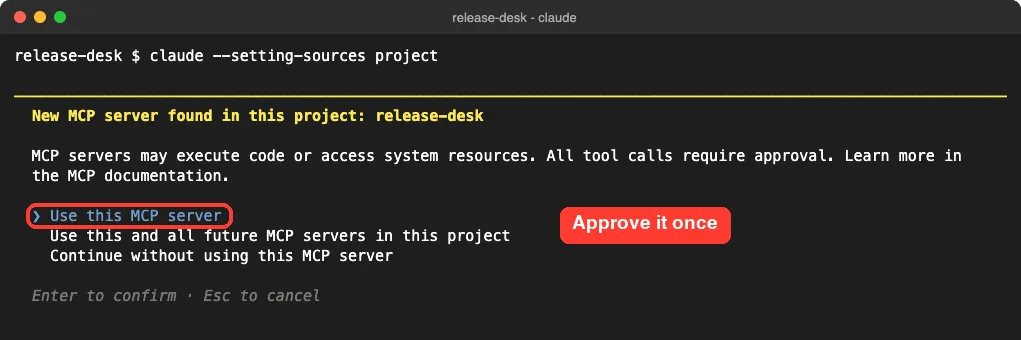
Start claude in the folder. Because the server comes from a project file, Claude Code asks before it runs it, and you can read more about that choice in our guide to MCP server scopes.
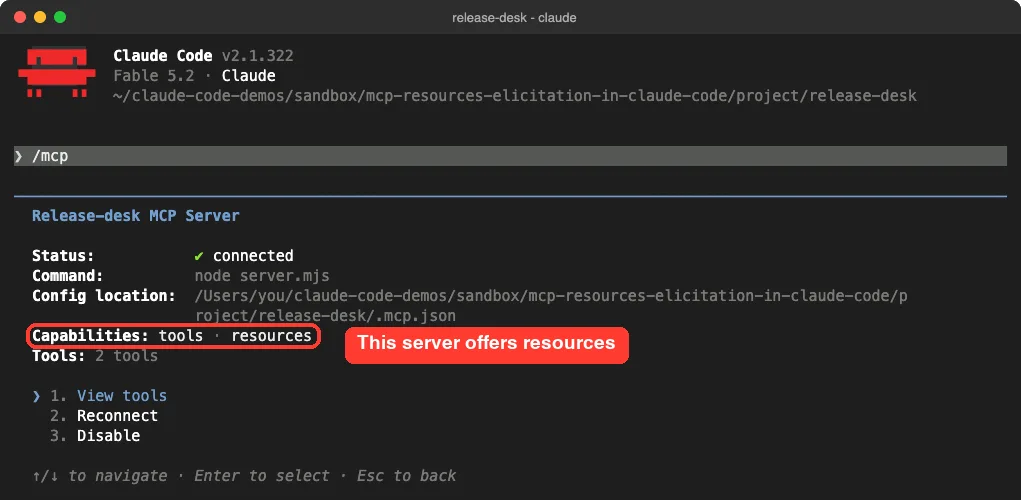
Now run /mcp and open the server. The line to look for is Capabilities, which listed tools and resources for our server.
Step 3: Use Claude Code MCP Resources With @
Type @ in the prompt box. The menu that normally lists files now also lists the two resources, each marked with a small diamond and followed by the description our server gave it.
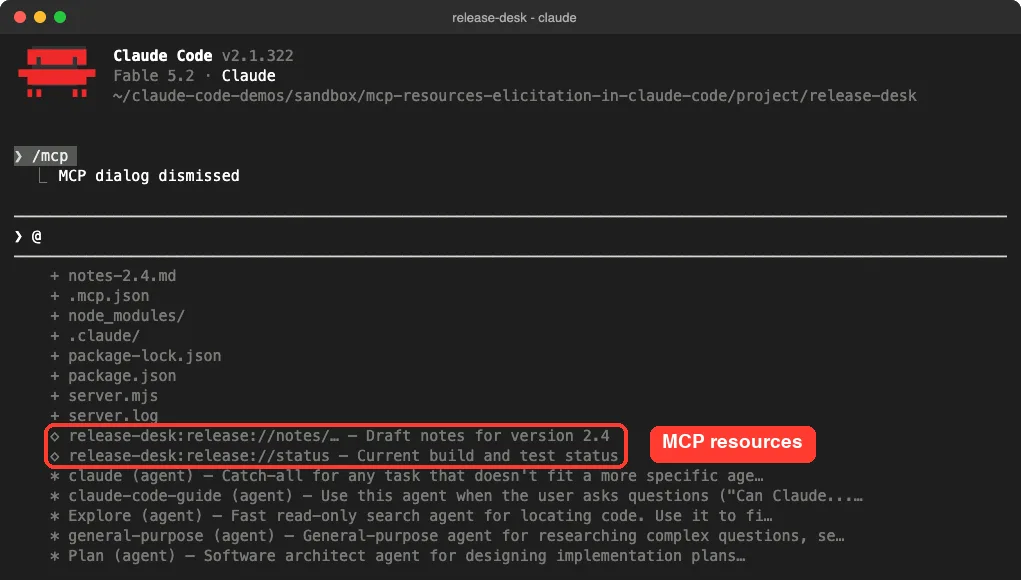
The format is @server:scheme://path. In a project with many files, the resources can get lost in the list, so type the server name and a colon to narrow it down.
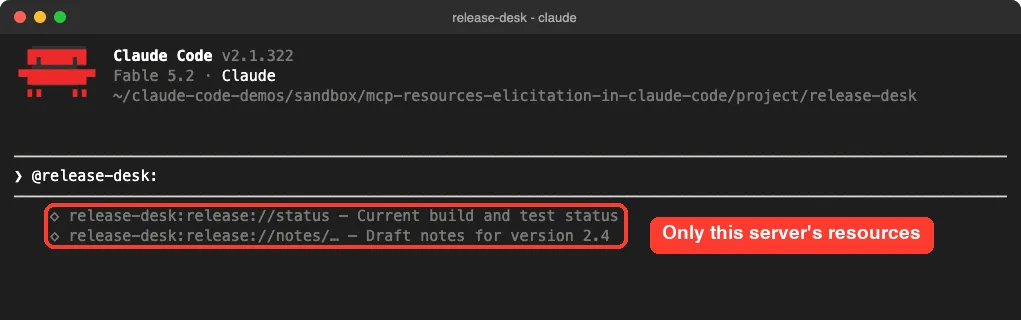
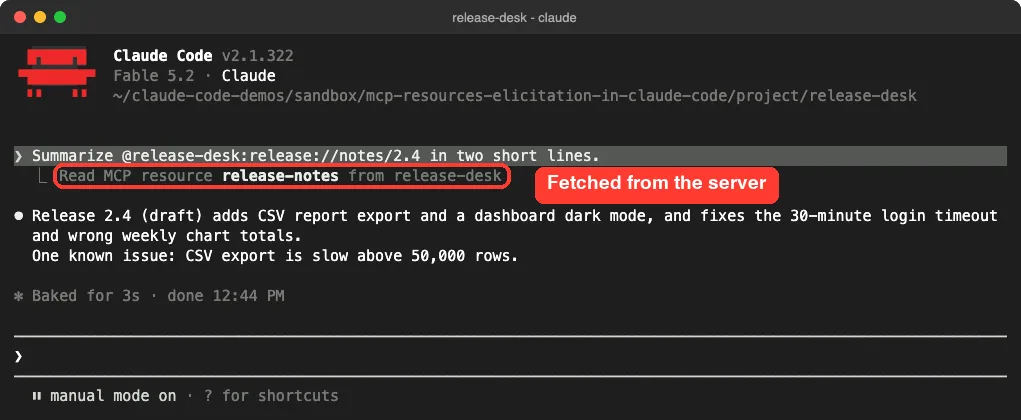
@release-desk: left only that server’s resourcesWe then asked for a summary of the release notes with this prompt.
Summarize @release-desk:release://notes/2.4 in two short lines.Claude Code fetched the resource before the model answered. A gray line under the prompt confirms it, and the summary matches the five bullet points in our notes file.
Let Claude Find Resources on Its Own
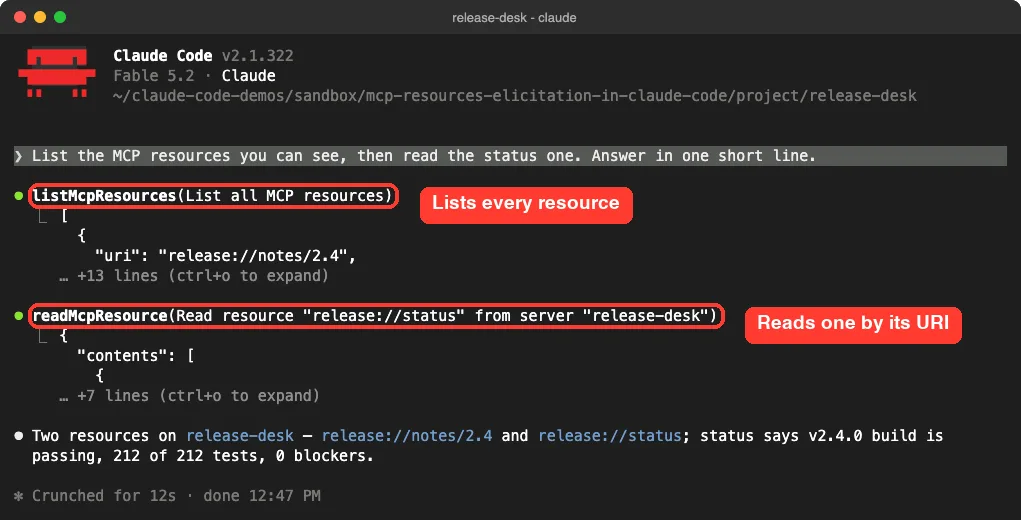
You do not have to type the address yourself. The official docs say Claude Code provides tools to list and read resources when a server supports them, so we asked a plain question to see them.
List the MCP resources you can see, then read the status one. Answer in one short line.Claude called listMcpResources and then readMcpResource with the URI and server name. In our session, neither call asked for permission, and the answer quoted the JSON our server built: build passing, 212 of 212 tests, 0 blockers.
Step 4: Answer a Form Elicitation Request
Next we asked Claude to publish the release. The first thing you see is the normal tool approval, because publish_release is an MCP tool like any other. After you approve it, the tool runs and the server sends its question.
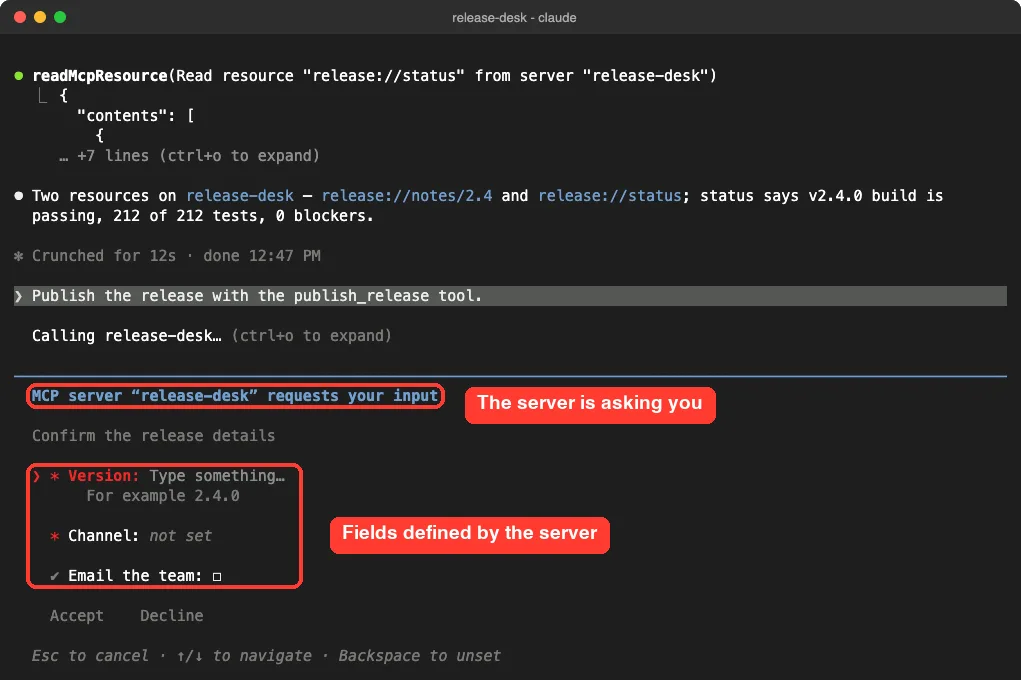
Every part of this dialog comes from the server. The message, the field titles, the hint under Version and the red star on the two required fields all map to lines in our schema.
Keys That Work in the Form
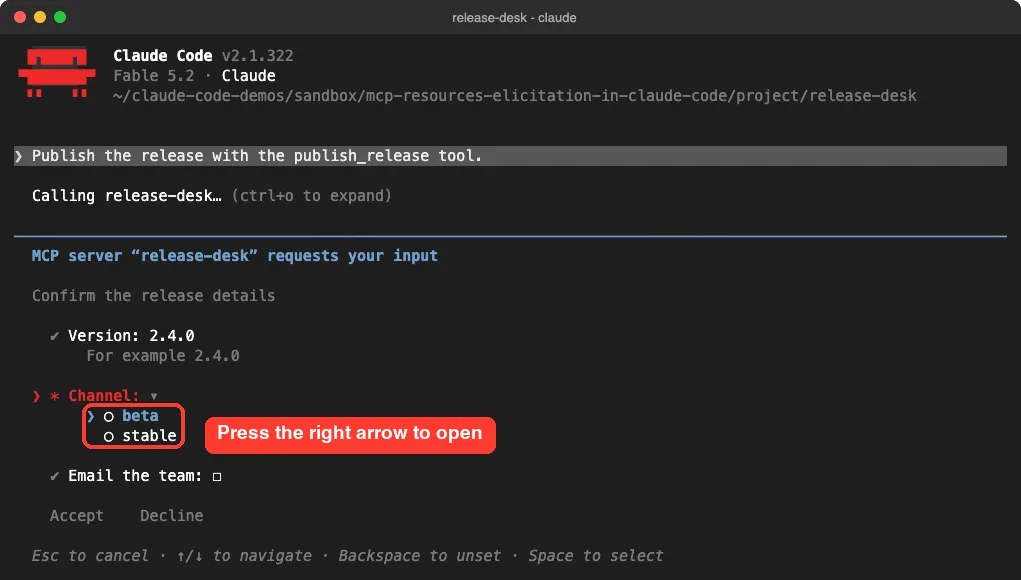
Here is how we filled it in. The footer of the dialog changes as you move, and it shows the keys for the current field.
- Type the version in the text field.
- Press the down arrow to move to Channel, then the right arrow to open the list.
- Pick an option, and the cursor moves on to the checkbox.
- Press Space to tick or untick the checkbox.
- Move down to Accept and press Enter.
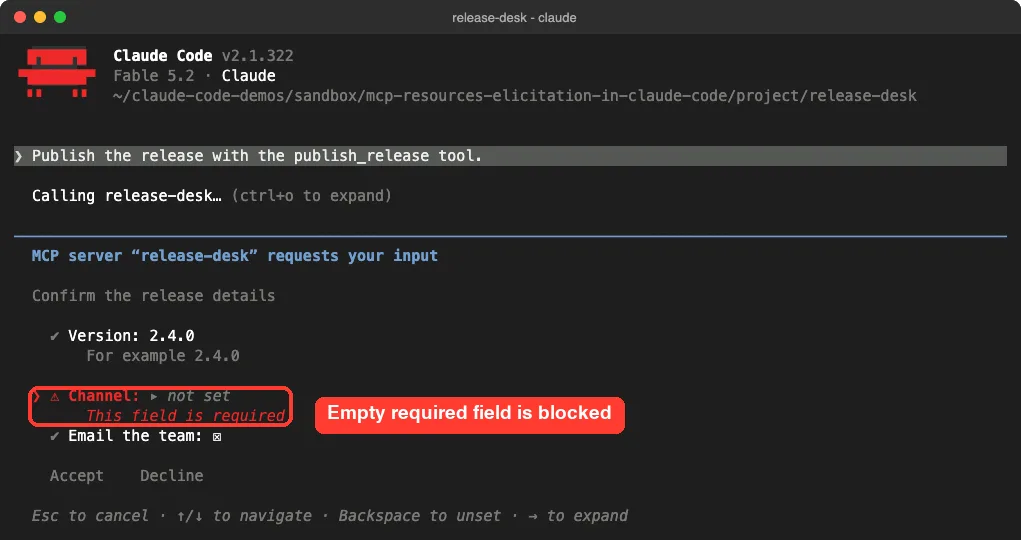
We also tried to accept the form with Channel left empty. Claude Code did not send it and jumped back to the field with a message.
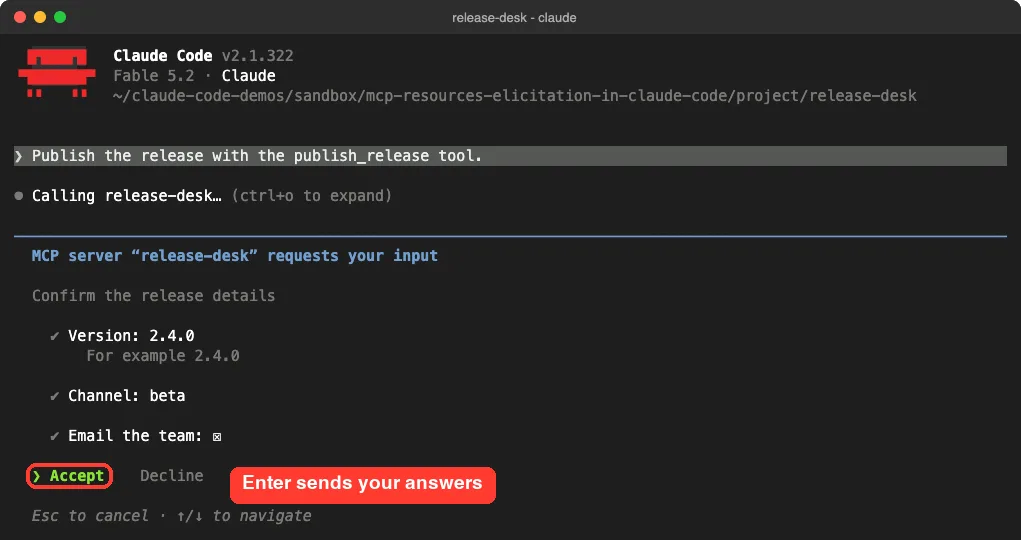
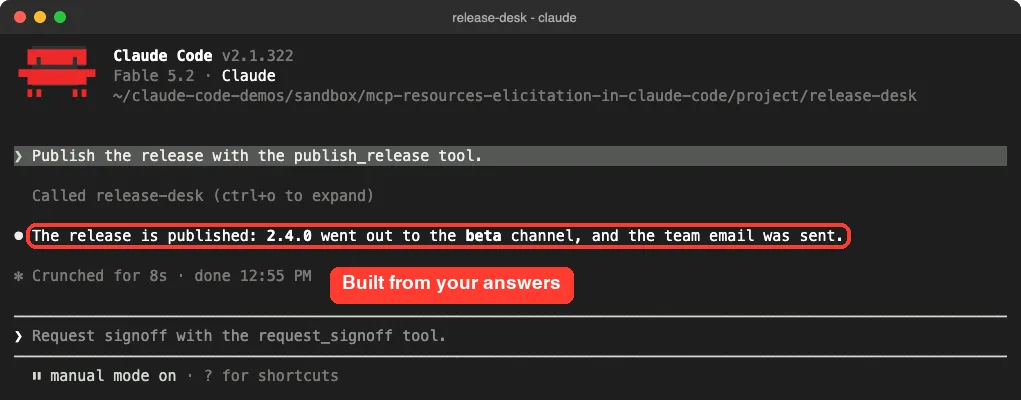
After Enter, the dialog closed and the tool finished. Claude’s reply repeats exactly what we typed, which shows the values traveled from the form to the server and back in the tool result.
Accept, Decline or Cancel: What the Server Receives
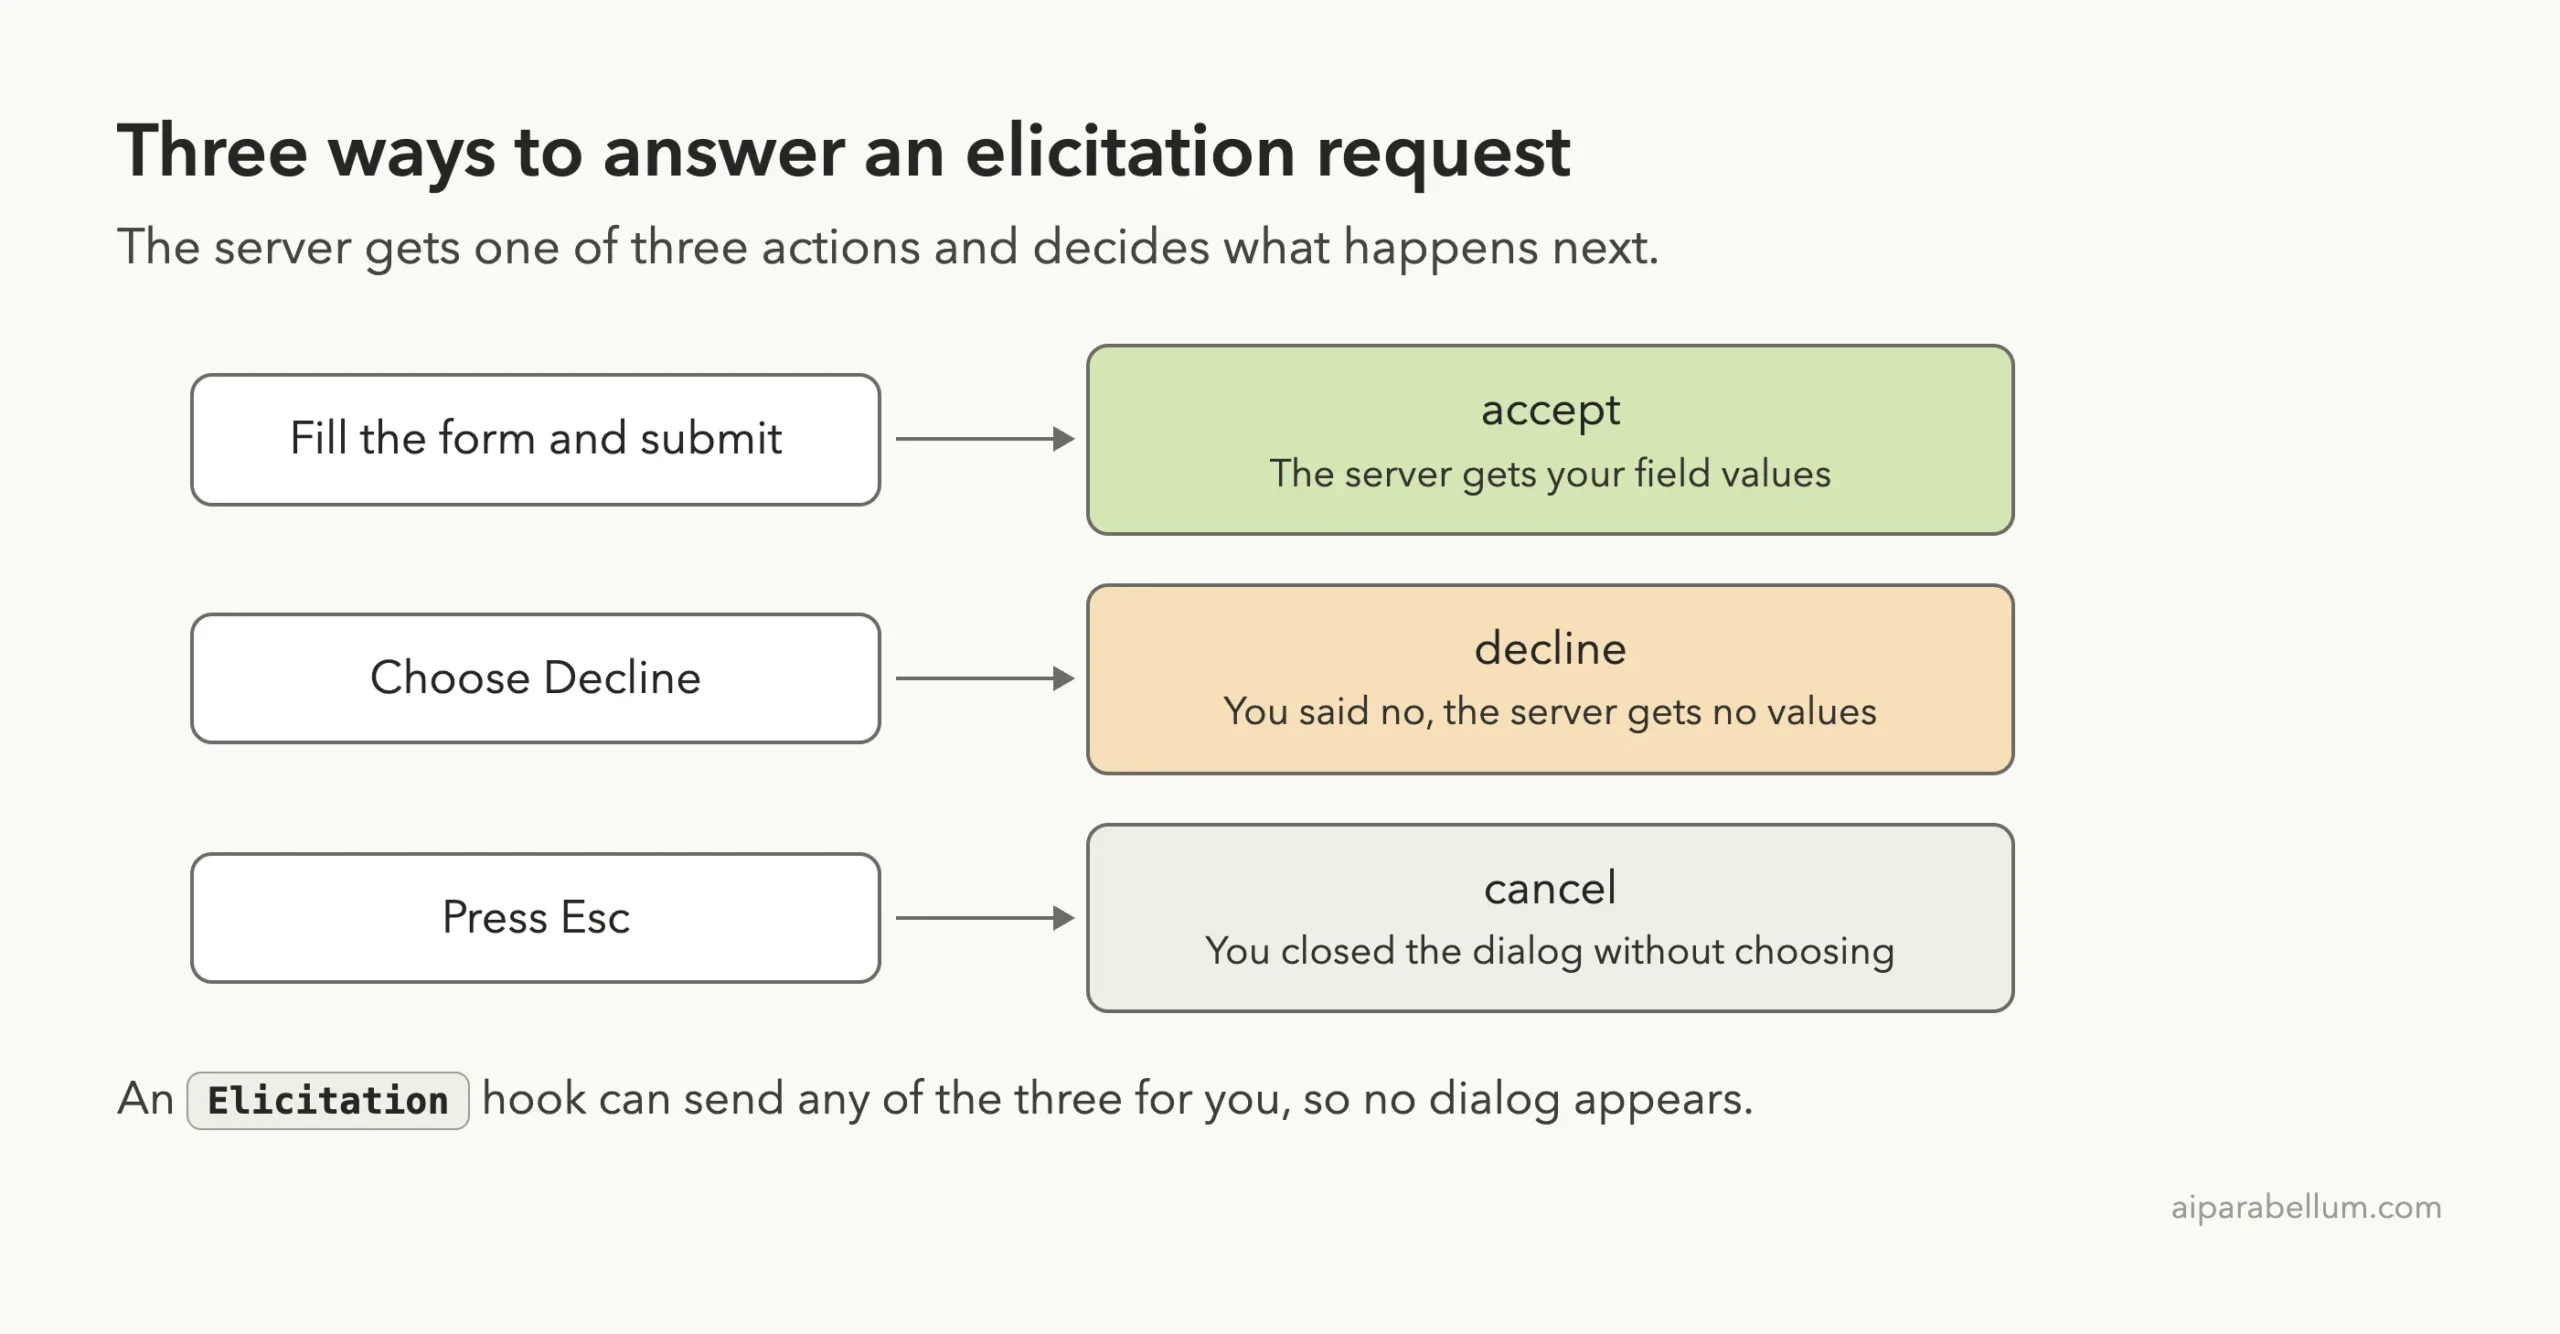
There are three ways out of the dialog, and the server can tell them apart. We ran the tool three times and logged the answer each time.
| What we did | What the server logged | What Claude said |
|---|---|---|
| Filled the form and chose Accept | accept plus the three values | The release is published |
| Chose Decline | decline, no values | Nothing was published, the prompt was declined |
| Pressed Esc | cancel, no values | Nothing was published, the prompt was cancelled |
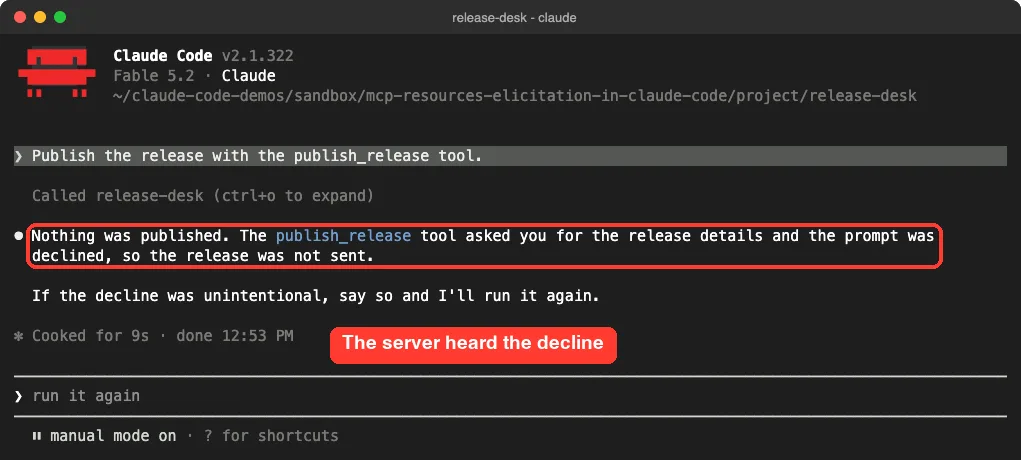
What happens next is up to the server. Ours returns a polite message for anything other than accept, and a real server should do the same so Claude is not left guessing.
Step 5: See a URL Mode Request
Some steps cannot happen in a terminal, such as a sign-in page. For those, a server can use URL mode, and Claude Code asks whether to open the link in your browser.
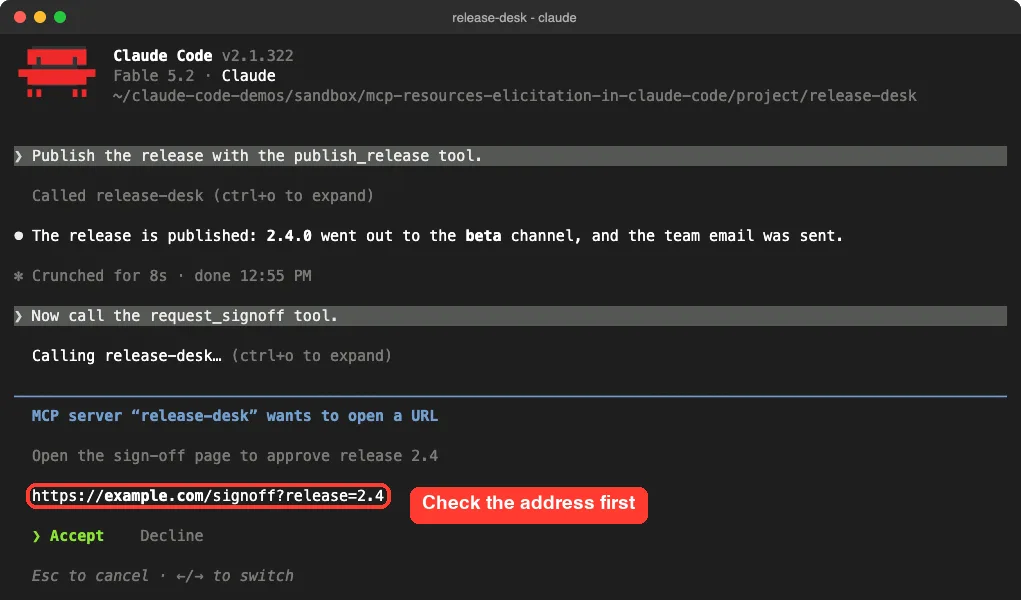
The dialog shows the server’s message and the full address, with the domain in a brighter color. We pressed Esc here, so no browser opened and the server logged cancel. Treat this dialog like any link from someone else: read the domain before you accept.
What Claude Code Tells the Server It Supports
A server should only use a mode the client supports. Our server logs the capabilities Claude Code sent when it connected, and the line shows both form and URL.
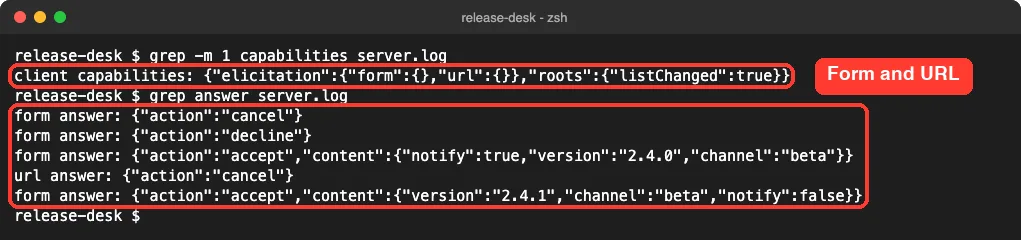
This matches the elicitation section of the official docs. They say Claude Code declares both modes for servers in your own MCP configuration from v2.1.287, and form mode only on some other connections, such as claude.ai connectors on older protocol revisions.
Answer Elicitation Requests Automatically With a Hook
If a server asks the same question every time, you can answer it with a script. Claude Code has an Elicitation hook event for this, and its matcher is the server name. Our general guide to Claude Code hooks covers how hooks are set up.
We added this to .claude/settings.json in the project.
{
  "hooks": {
    "Elicitation": [
      {
        "matcher": "release-desk",
        "hooks": [
          {
            "type": "command",
            "command": "${CLAUDE_PROJECT_DIR}/.claude/hooks/answer-release.sh",
            "args": []
          }
        ]
      }
    ]
  }
}
The script reads the request, and if it is a form, prints an answer. For a URL request it prints nothing, which leaves the dialog to you. It needs jq and must be made executable with chmod +x.
#!/bin/bash
input=$(cat)
if [ "$(jq -r '.mode' <<<"$input")" = "form" ]; then
  jq -n '{hookSpecificOutput: {hookEventName: "Elicitation", action: "accept",
    content: {version: "2.4.1", channel: "beta", notify: false}}}'
fi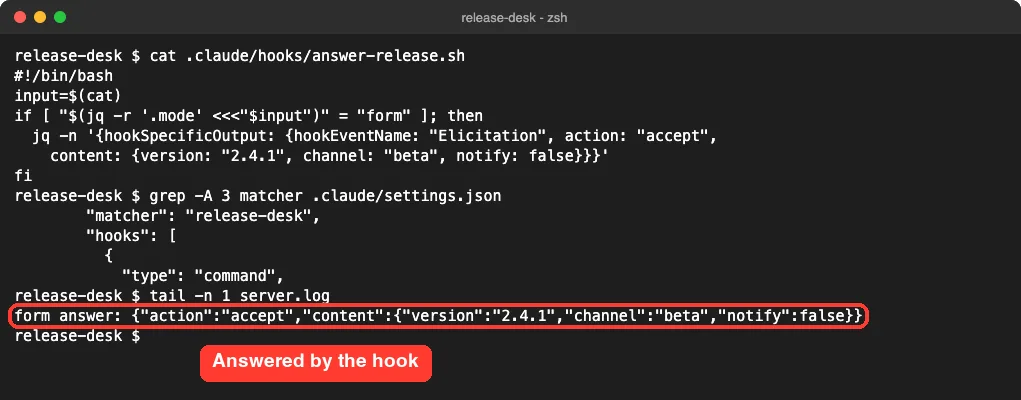
We ran the same publish prompt in a new session. The tool approval still appeared, but the form did not, and the server received the values from the script.
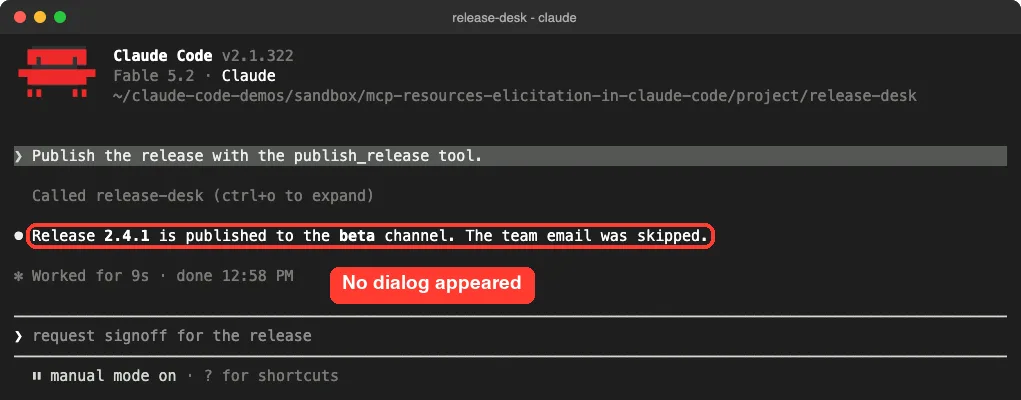
The Elicitation hook reference lists the other outcomes. A hook can return decline or cancel, and exiting with code 2 also declines. Be careful with auto-accept: a hook that answers every form removes the pause that elicitation exists to give you.
Try It Yourself
Build the server from Step 1, connect it, and paste this prompt. It uses a resource and triggers the form in one go.
Read @release-desk:release://status. If there are no blockers, publish the release with the publish_release tool.Then try these changes to see how the dialog follows the schema:
- Add a number field, such as
rollout: { type: "number", title: "Rollout percent" }. - Remove
channelfromrequiredand accept the form with it empty. - Add a third resource and check that it appears under
@release-desk:after you restart the session.
Common Mistakes
- Expecting resources from a server that does not offer any. Check the Capabilities line in
/mcpfirst. - Typing only the URI. The mention needs the server name in front, as in
@release-desk:release://status. - Treating Esc as a decline. The server receives
cancel, and some servers handle the two differently. - Asking for secrets in a form. A sign-in belongs in URL mode, where it happens in the browser and not in the chat.
- Calling
elicitInputwithout handling a decline. The tool should still return a clear message. - Writing server logs to standard output. A stdio server uses that channel for the protocol, so log to a file as we did.
Pro Tips
- Write a useful description for each resource. It is the text people see in the
@menu, and a long URI gets shortened there. - Use resources for data you want to choose yourself, and tools for data Claude should fetch when it decides to.
- Keep forms short. Three fields took a few seconds to fill, and each one adds keystrokes.
- If the server does not connect at all, our guide to MCP logs shows where to look.
- Looking for real servers with resources to try? Start in our MCP Servers Directory.
- A server that passes a key should take it from the environment, as covered in our guide to MCP env vars.
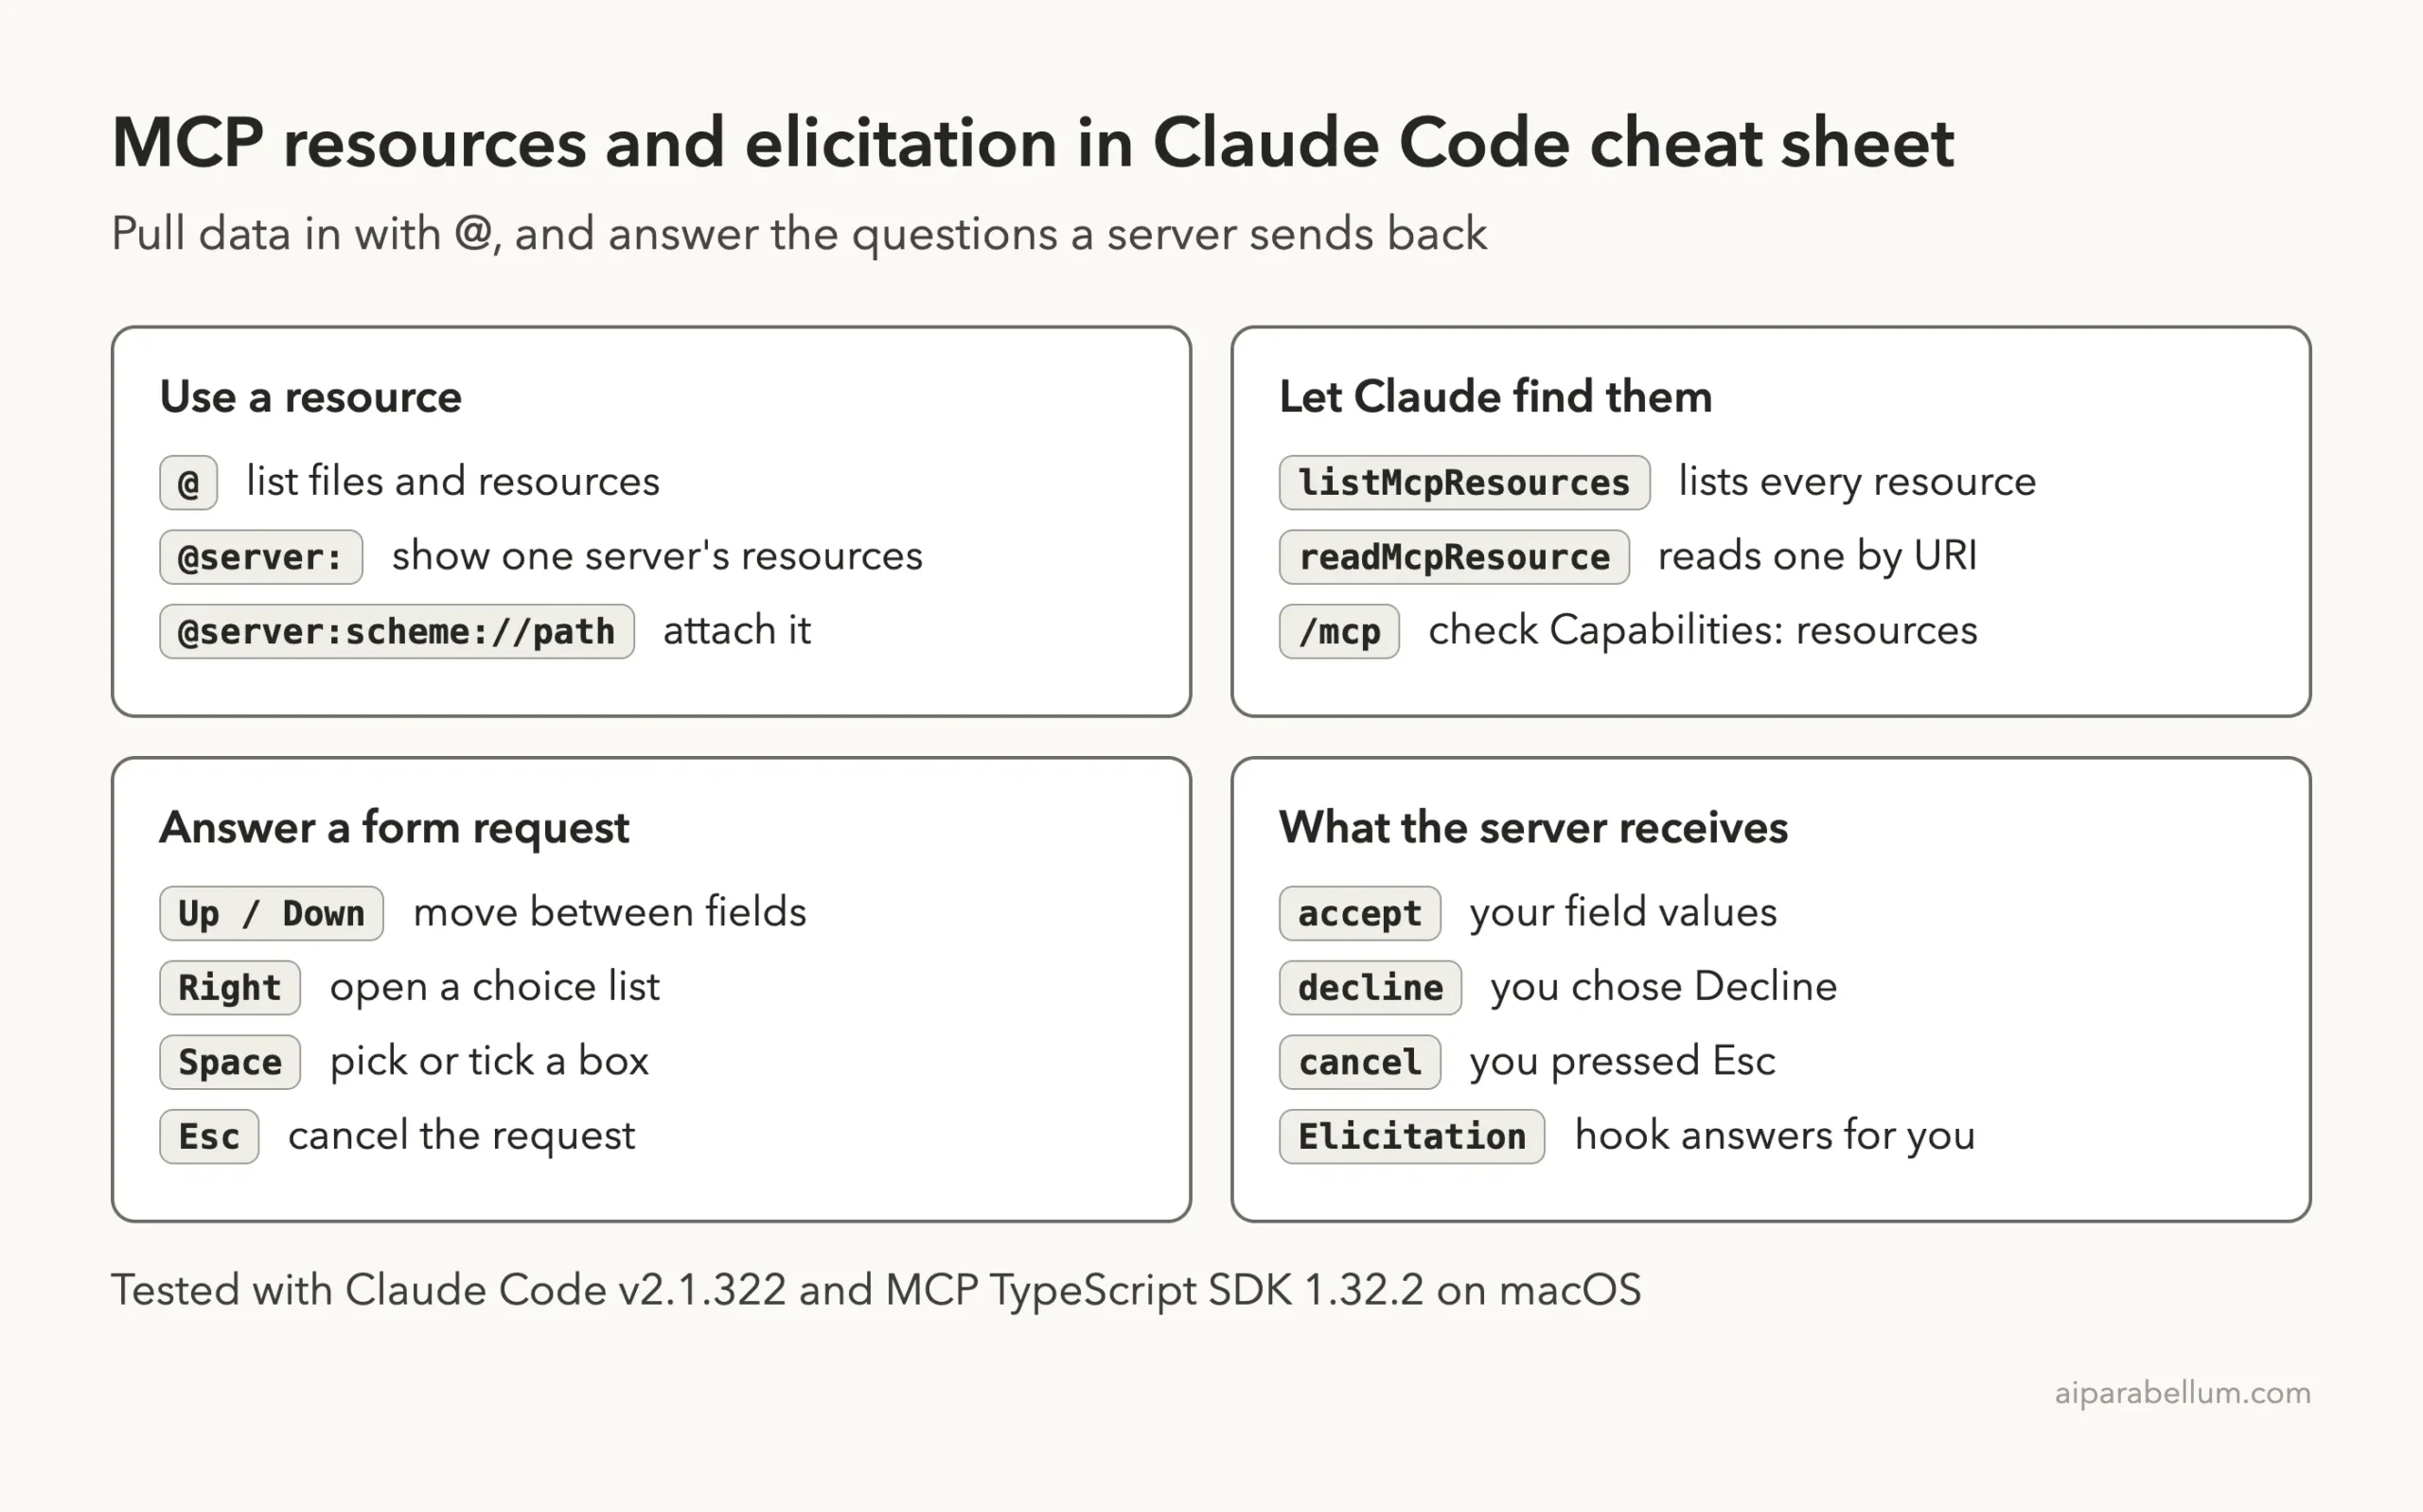
Cheat Sheet
Frequently Asked Questions
How do I use MCP resources in Claude Code?
Type @ in the prompt and pick a resource from the menu, or write it as @server:scheme://path. Claude Code fetches the content and attaches it to your message. The resources section of the docs has more examples.
Why don’t I see any resources in the @ menu?
The server may not offer any, or it may not be connected. Open /mcp and check that the server’s Capabilities line includes resources. The docs also note that MCP Apps UI resources, the ones with a ui:// address, are left out of the menu on purpose.
What is MCP elicitation in Claude Code?
It is a way for an MCP server to ask you for input in the middle of a task. Claude Code shows a dialog, either a form with fields or a request to open a link, and passes your answer back to the server.
Do I need to enable elicitation?
No. The docs say no configuration is required, and in our test the dialog appeared as soon as the server sent a request. The only setup is on the server side, which has to send the request.
Can Claude answer an elicitation form for me?
Not by itself, because in our test the form waited for a person each time. To skip the dialog you need an Elicitation hook that returns the answer, like the script above. You can also turn a server off for a while, as shown in our guide to disabling MCP servers.
Conclusion
MCP resources and elicitation fill the two gaps that tools leave open: resources let you choose what data goes into a prompt, and elicitation lets a server check with you before it acts. In our test on Claude Code v2.1.322, a 76-line server was enough to see both. The resources showed up in the @ menu, the form followed our schema field by field, and the server logged accept, decline and cancel as three different answers. If you already use Claude AI in the terminal, build this small server once, and the two features will be easy to spot in any real server you connect later.