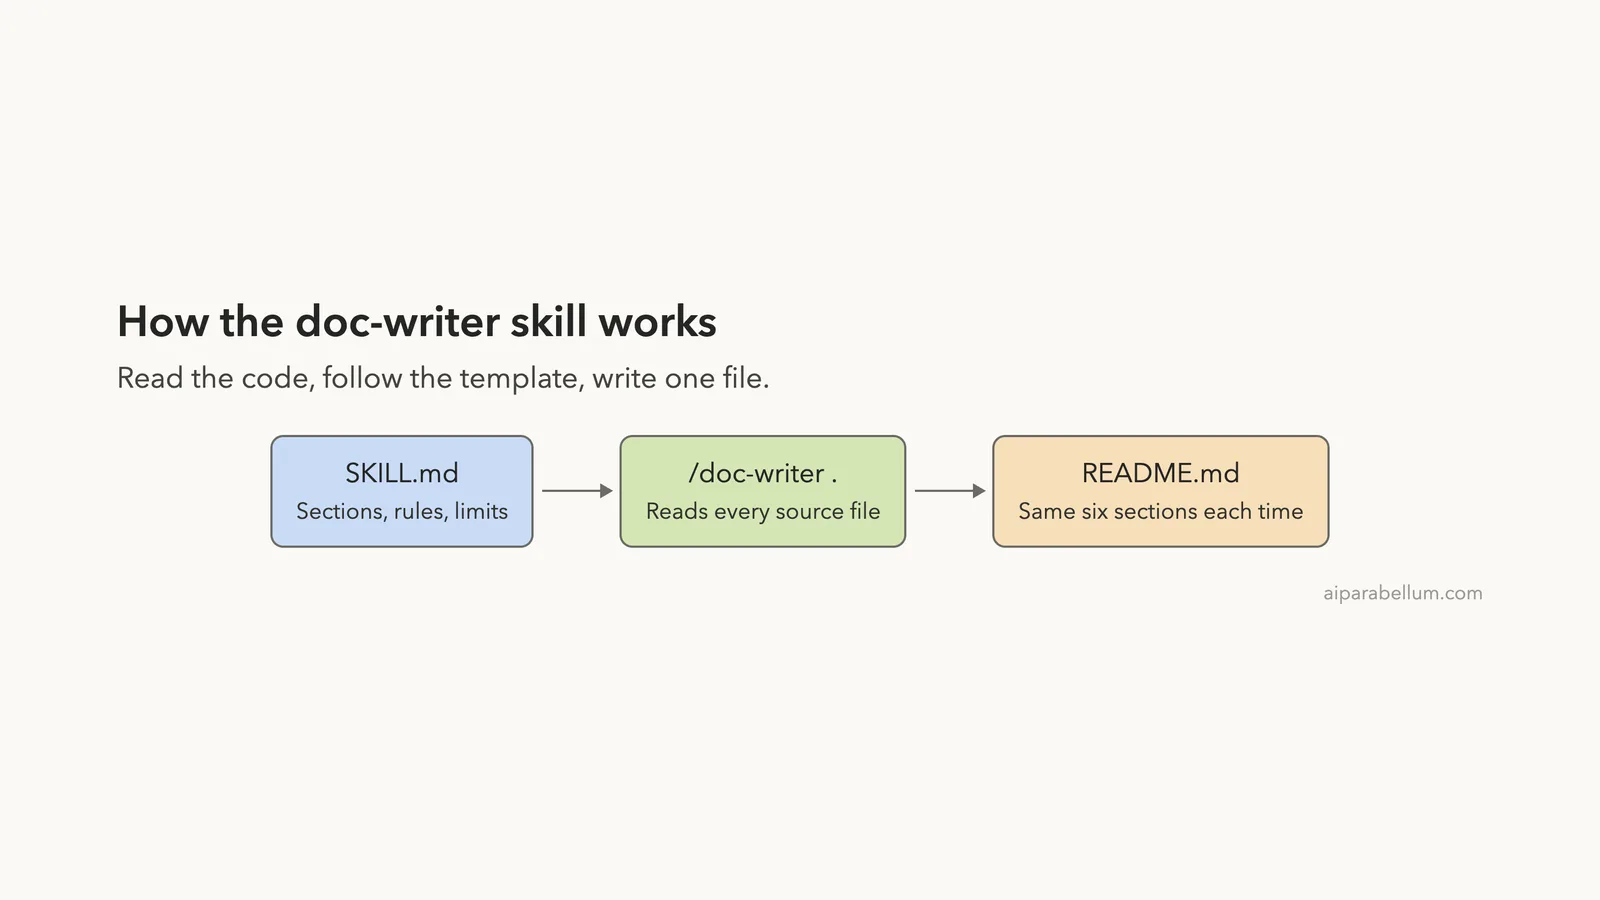
A claude code documentation skill is a small text file that tells Claude how to document your project: which sections to write, what to leave out and where to save the result. We built one called doc-writer, ran it on a tiny shopping cart project, and compared the README it wrote with the README from a plain “Write a README” request. The two results were both good, but they were not the same kind of good.
This is Part 13 of 45 in our Claude Code Deep Dives, part of our Claude Code tutorials. In the last part we built a code review skill, and today we use the same idea for docs.
Tested with Claude Code v2.1.318 on November 5, 2026, in two throwaway demo folders. Nothing was installed into the global Claude Code setup, and both sessions started with --setting-sources project.
Quick Summary
| Question | Answer |
|---|---|
| What did we build? | One SKILL.md that writes a README in six fixed sections |
| Where does it live? | .claude/skills/doc-writer/SKILL.md inside the project |
| What did we document? | A 4-file Python shopping cart with no comments and no docs |
| Skill result | 57-line README with an API table, an example and a Limits section |
| Plain request result | 79-line README with extra sections and a Python version guess |
| Biggest surprise | Claude asked us to approve a shell command, even though the skill listed read-only tools |
Why Build a Claude Code Documentation Skill
Documentation is a job where consistency matters. If every project in your team has its README in a different order, readers waste time hunting for the install command or the list of functions.
You can ask Claude for a README every time, and it will do a decent job. But the layout, the length and the level of detail will drift from one request to the next.
A skill pins those choices down. You write the section order and the rules once, and Claude follows them whenever you run the command. Anthropic’s skills documentation says to build a skill when you keep pasting the same instructions into chat, and a README template is a good example of that.
New to skills? Our guide to Claude Code skills explains the basics, and the SKILL.md format guide covers every field.
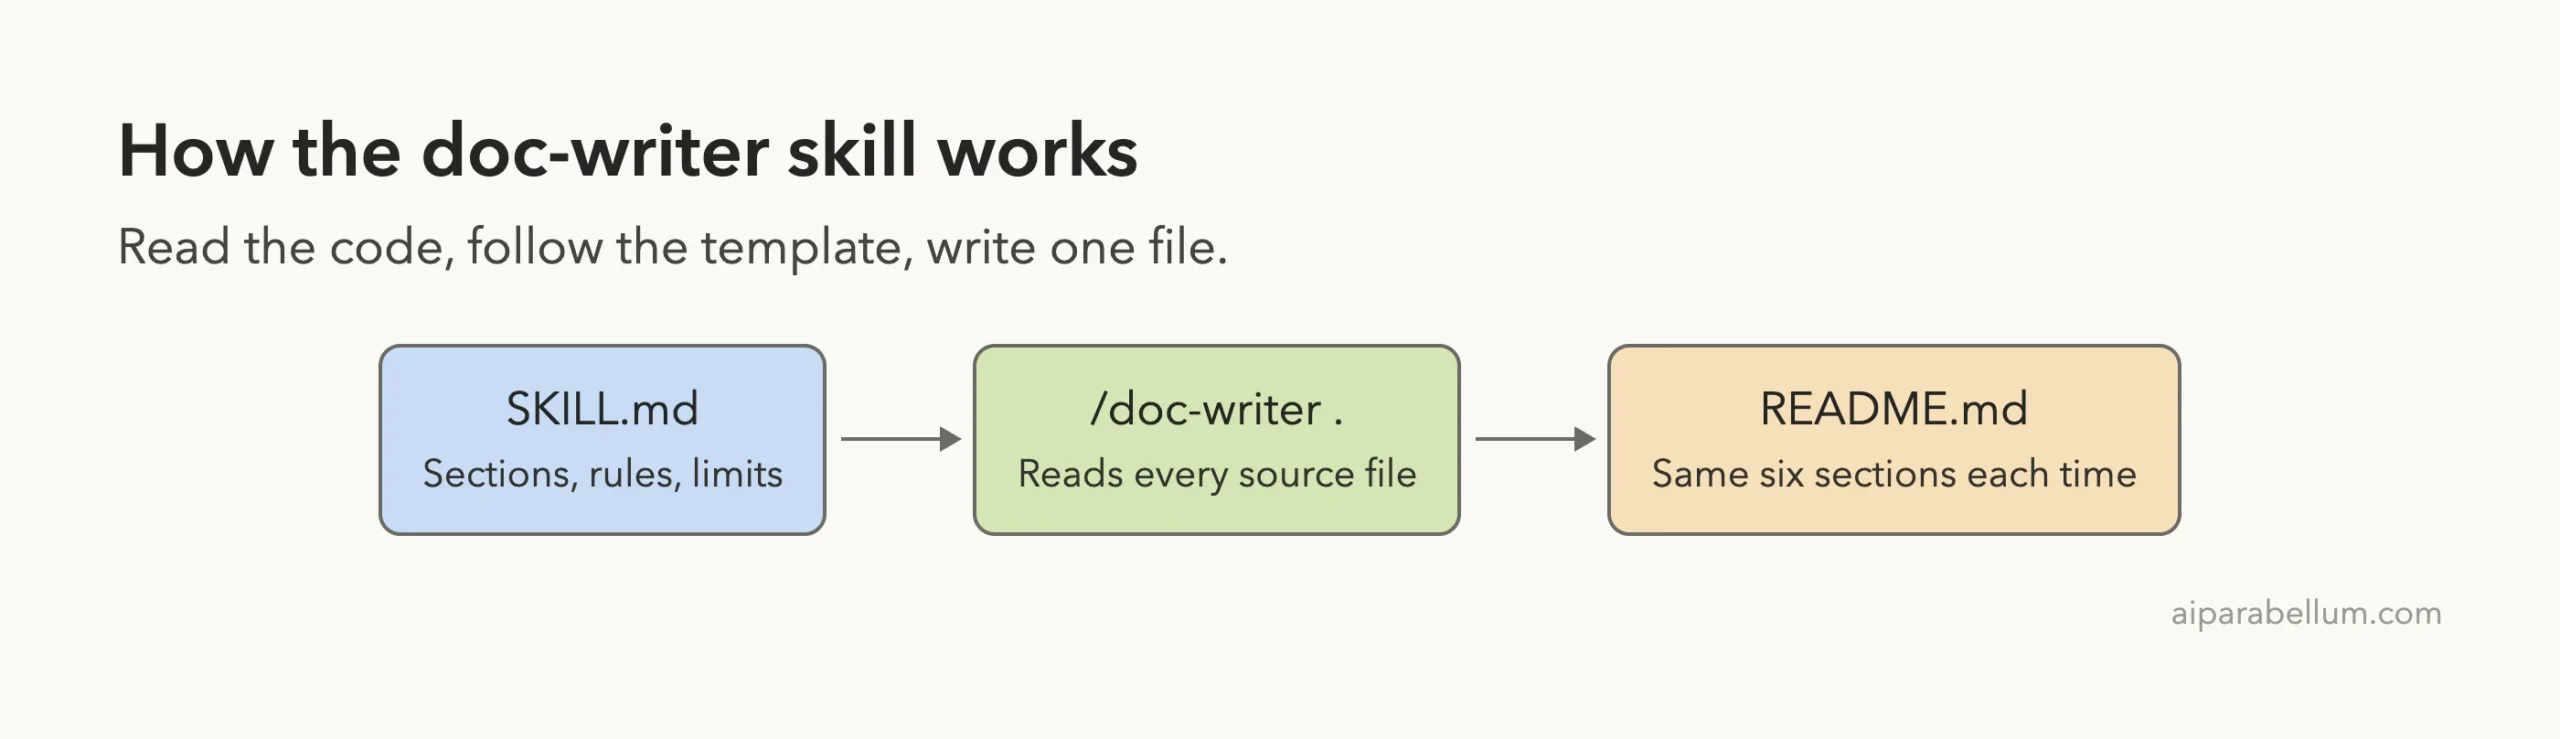
The Demo Project We Documented
We made two identical folders under ~/claude-code-demos/. Each holds a small Python shopping cart that we wrote ourselves, with no comments and no README.
main.pybuilds a cart, adds a few items and prints the total.shop/cart.pyhas aCartclass withadd,subtotalandtotal.shop/pricing.pyhasapply_discount,add_taxand a table of tax rates for three states.shop/__init__.pyis empty.
Running python main.py TX prints a total of 17.69, which is three notebooks and four pens with a 10 percent coupon and Texas tax. That gives us a number to check the READMEs against.
Only the first folder, skill-docs, got the skill. The second folder, skill-docs-plain, is the control.
How to Build the Documentation Skill
Step 1: Make the skill folder
A project skill is a folder inside .claude/skills/, and the file in it must be named SKILL.md.
mkdir -p .claude/skills/doc-writerStep 2: Write the frontmatter
The block between the two --- lines tells Claude what the skill is. We used four fields.
nameis the command you type, heredoc-writer.descriptionsays what the skill does and when to use it. Claude reads it to decide when the skill applies.argument-hintis the hint shown while typing, such as[folder].allowed-toolslists tools Claude may use without asking. We gave itRead Grep Glob.
We avoided the name docs on purpose. As we learned in the previous part, a skill with the same name as a bundled command can replace it, so pick a name that is clearly yours.
Step 3: Write the instructions
Below the frontmatter goes plain Markdown. This is the full file we used.
---
name: doc-writer
description: Write or update a README for a small project from its real code. Use when the user asks to document, write docs or write a README for a project.
argument-hint: [folder]
allowed-tools: Read Grep Glob
---

# Doc writer

Document $ARGUMENTS (or the current project). Read every source file first. Write only what the code proves.

## README sections, in this order

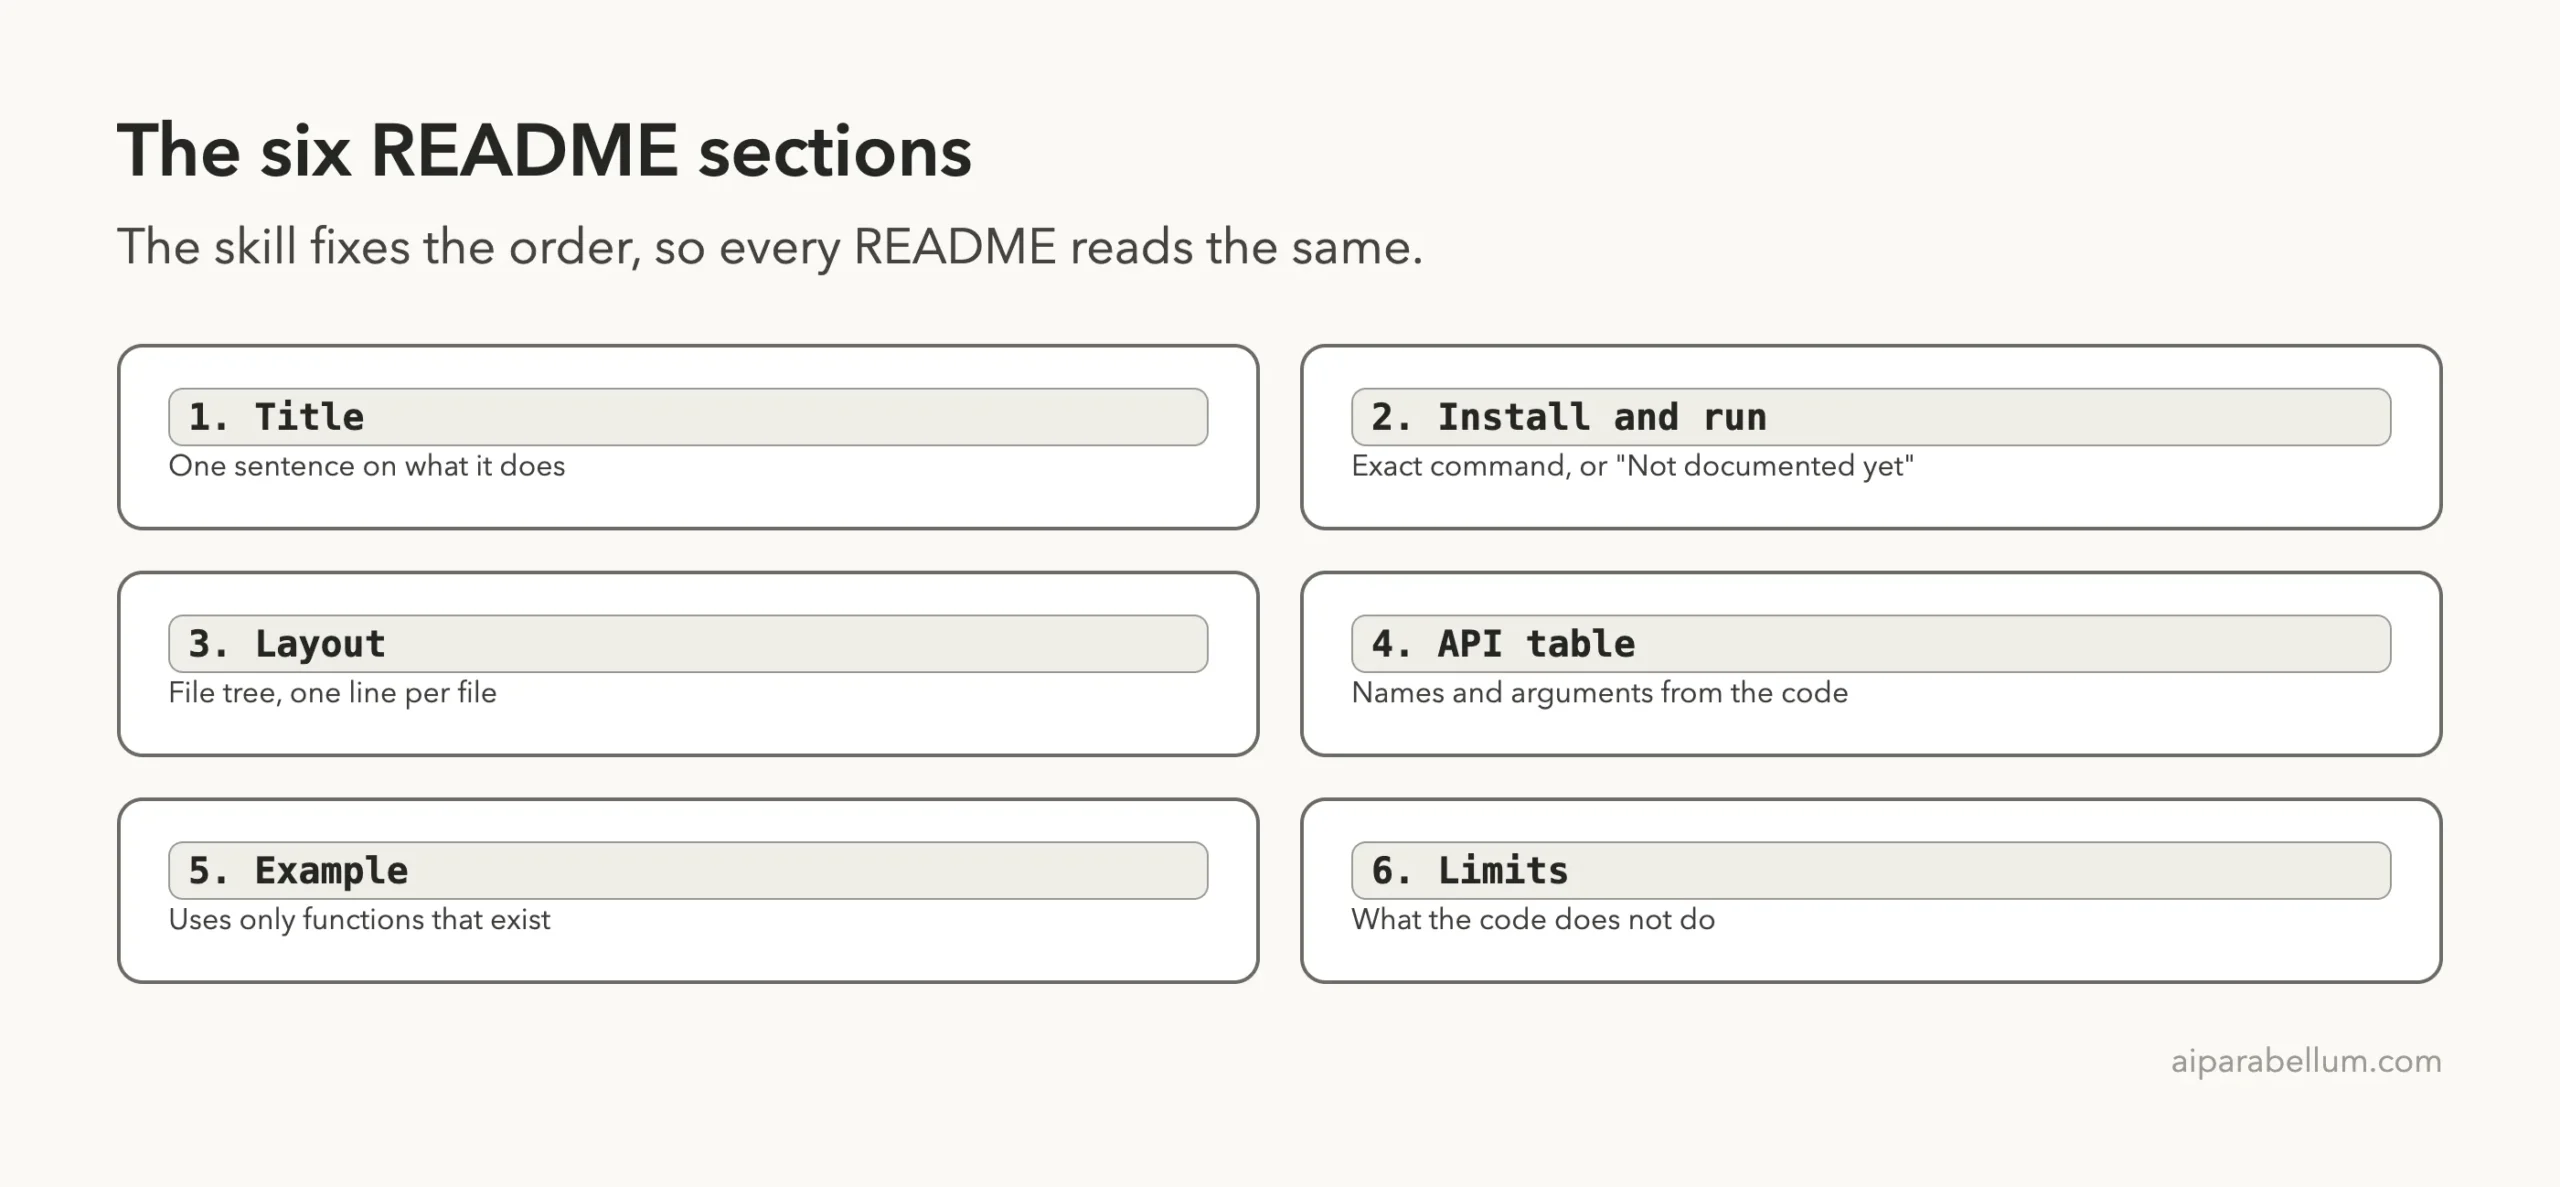
1. Title and one sentence saying what the project does.
2. Install and run: the exact command to run the entry point. If you cannot tell, write "Not documented yet".
3. Project layout: a short file tree with one line per file.
4. API reference: a table with Function or class, Arguments, Returns, Raises. Take names and arguments from the code, never from guesses.
5. Example: a short code example that uses only functions that exist.
6. Limits: things the code does not do, such as missing tests or hardcoded values.

## Rules

Save the result as README.md in the project root. Do not edit any other file.
Never invent features, flags, commands or file names. Use plain words and short sentences.
Keep the README under 70 lines. End your reply with one line listing anything you were unsure about.
Four choices carry most of the weight. The numbered sections fix the order, and “write only what the code proves” fights made-up features.
The escape hatch “Not documented yet” gives Claude an honest option when the code does not say. The last rule asks for a list of doubts, which turned out to be the most useful line in the whole file.
Step 4: Check that Claude sees the skill
Start Claude Code in the folder and run /skills. A loaded skill appears in the list with its source and its size in tokens.
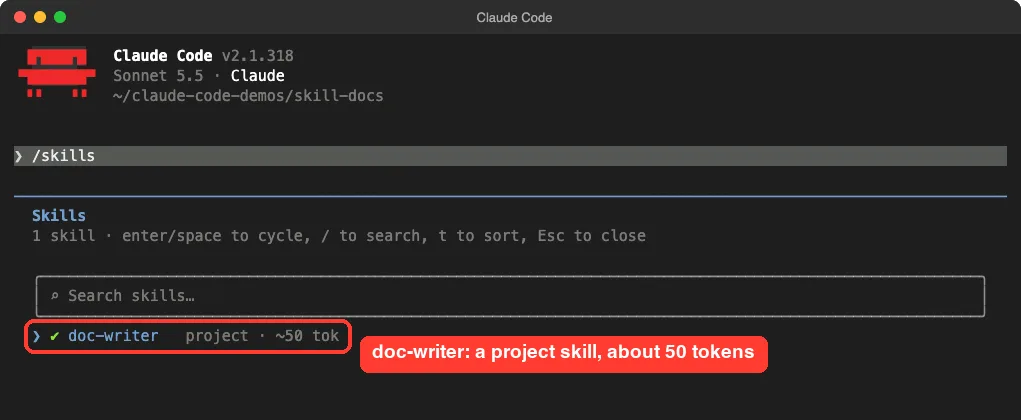
The small size is the point. Claude keeps the short description in view and loads the full file only when the skill runs.
Running the Claude Code Documentation Skill
We typed one line: /doc-writer .. The dot means the current folder, and it replaces $ARGUMENTS in the skill text.
Approval prompts you should expect
Here is the first surprise. Our skill lists Read Grep Glob, yet Claude read the source files with a shell command that loops over the files and prints them. Because we were in the default permission mode, it stopped and asked us to approve it.
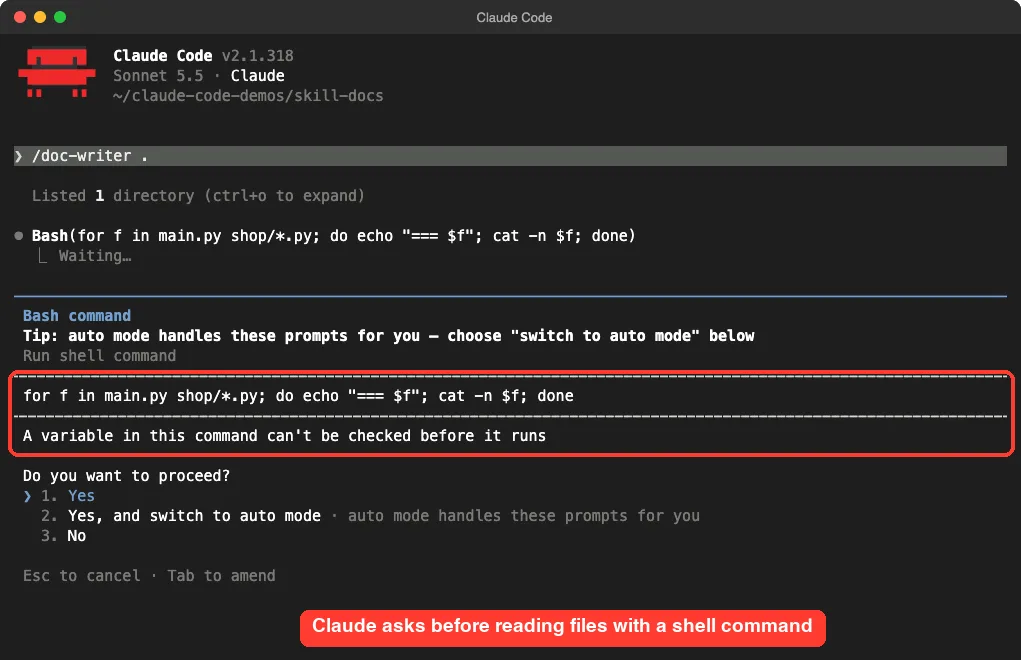
The documentation describes allowed-tools as tools Claude can use without asking during the turn that runs the skill. It is a pre-approval list, not a fence, so Claude is still free to choose another tool and ask you about it. We approved the command once, which is read-only, and then approved the file write.
If you want fewer prompts, you can add a permission rule for your own project. We left the defaults in place so you can see what a normal first run looks like.
The result
Claude read the files, wrote README.md in the project root and finished in 14 seconds of working time.
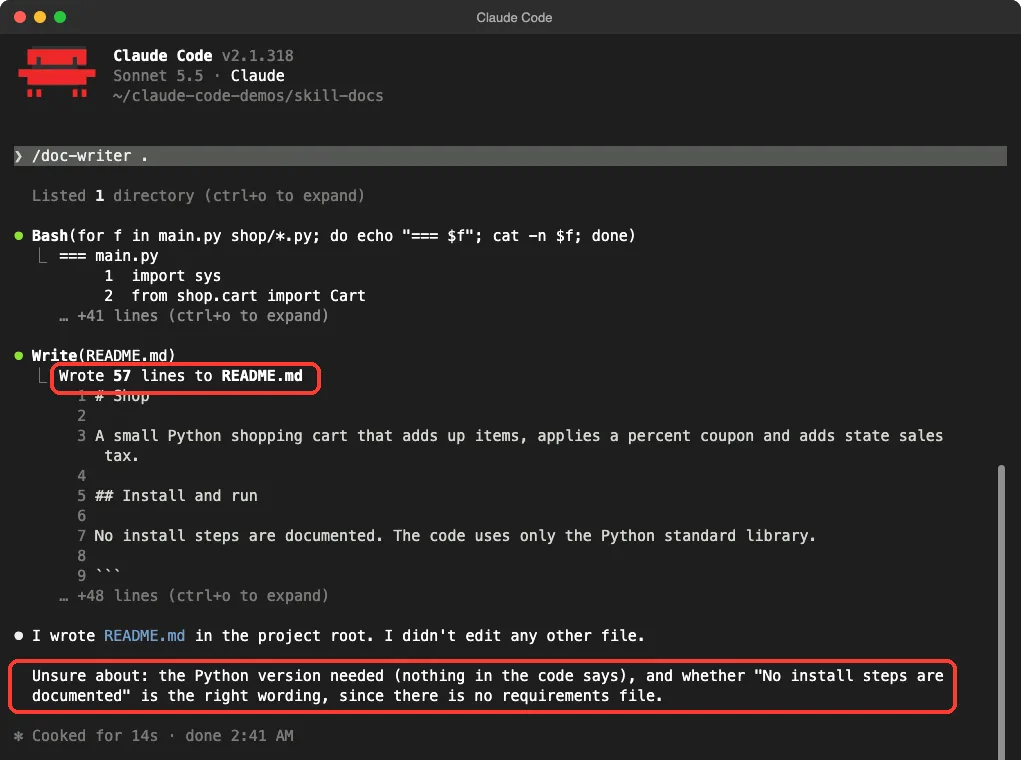
The reply stays inside the rules: it says it wrote the README, says it did not edit any other file and ends with one line of doubts. Claude said it was unsure about the Python version, because nothing in the code states one, and about the exact wording for the install section.
What the Skill’s README Contains
The file follows our six sections. Here are the parts that matter.
# Shop

A small Python shopping cart that adds up items, applies a percent coupon and adds state sales tax.

## Install and run

No install steps are documented. The code uses only the Python standard library.

python main.py [STATE]

## API reference

| Function or class | Arguments | Returns | Raises |
|---|---|---|---|
| Cart | state="CA" | A new empty cart | Nothing |
| Cart.total | coupon_percent=0 | Subtotal after coupon and tax | ValueError, KeyError |
| apply_discount | price, percent | Price minus the percent | ValueError if percent is below 0 or above 100 |
| add_tax | price, state | Price plus state tax | KeyError if the state has no tax rate |
The table above is trimmed. The full file also lists Cart.add and Cart.subtotal, a file tree with one line per file, and a short example.
We checked the claims against the code. The argument names, defaults and the two error types all match. It also noted that state codes are not case sensitive in add_tax, which is true because the function upper-cases the state.
The Limits section
This is the part most README files skip. Ours listed that there are no tests, no requirements file, only three states with hardcoded tax rates, no way to remove cart items, no checks on negative prices and percent-only coupons.
Every item is true for our demo code. That section came straight from the rule “things the code does not do”, and it is the one we would keep even if we dropped everything else.
The Same Job Without the Skill
In the control folder we typed Write a README for this project and nothing else. Claude took the same first step, reading the files with a shell command, and then wrote a 79-line README.
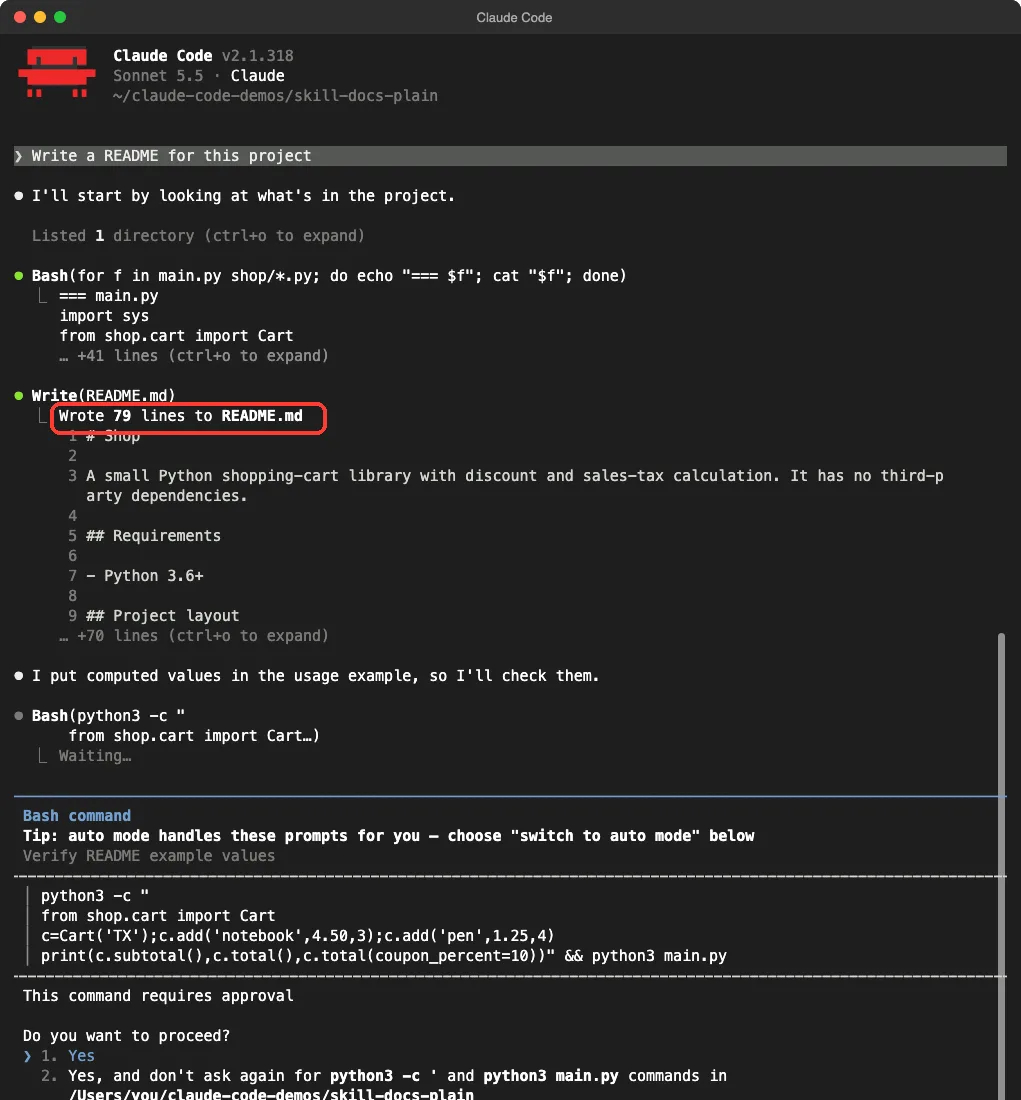
It is a good README. It has a project layout drawn as a tree, a quick start with two commands, a usage example with the expected results written as comments, and a table of supported states. It also adds a tip to consider decimal.Decimal for real money handling, which is sensible advice that our skill never asked for.
We checked its numbers: for Texas, the subtotal of 18.5, the 19.66 total with tax only and the 17.69 with the coupon all match what the code produces.
After writing, Claude said it had put computed values in the example and wanted to run a command to verify them. We did not approve that step in this capture, so we cannot say what it would have found. The values we checked by hand were right.
One claim that the code does not prove
The plain README lists a requirement of Python 3.6 or newer. Nothing in our files states a version. The number may be a fair guess from the use of f-strings, but it is still a guess written as a fact.
The skill version flagged the same gap as a doubt instead of writing a number. That is the “write only what the code proves” rule doing its job.
Side by Side: What the Skill Changed
| Point | Plain request | With the skill |
|---|---|---|
| Length | 79 lines | 57 lines |
| Section order | Chosen by Claude | Fixed by the skill |
| API reference | Two tables with short descriptions | One table with arguments, returns and errors |
| Limits section | Short notes at the end | Full list of what the code lacks |
| Python version | Stated as 3.6+ | Left out and flagged as unsure |
| Doubts reported | No | Yes, one closing line |
| Extra advice | Suggests decimal.Decimal | None |
| Numbers we checked | All matched | All matched |
Takeaway: both READMEs were accurate where we checked. The skill gave us a predictable layout and honest doubts, and the plain request gave us a little more content.
Skills and the Docs Settings You Should Know
Writing documentation changes files, so one frontmatter field deserves a look. The field disable-model-invocation stops Claude from loading the skill by itself, which means it runs only when you type the command.
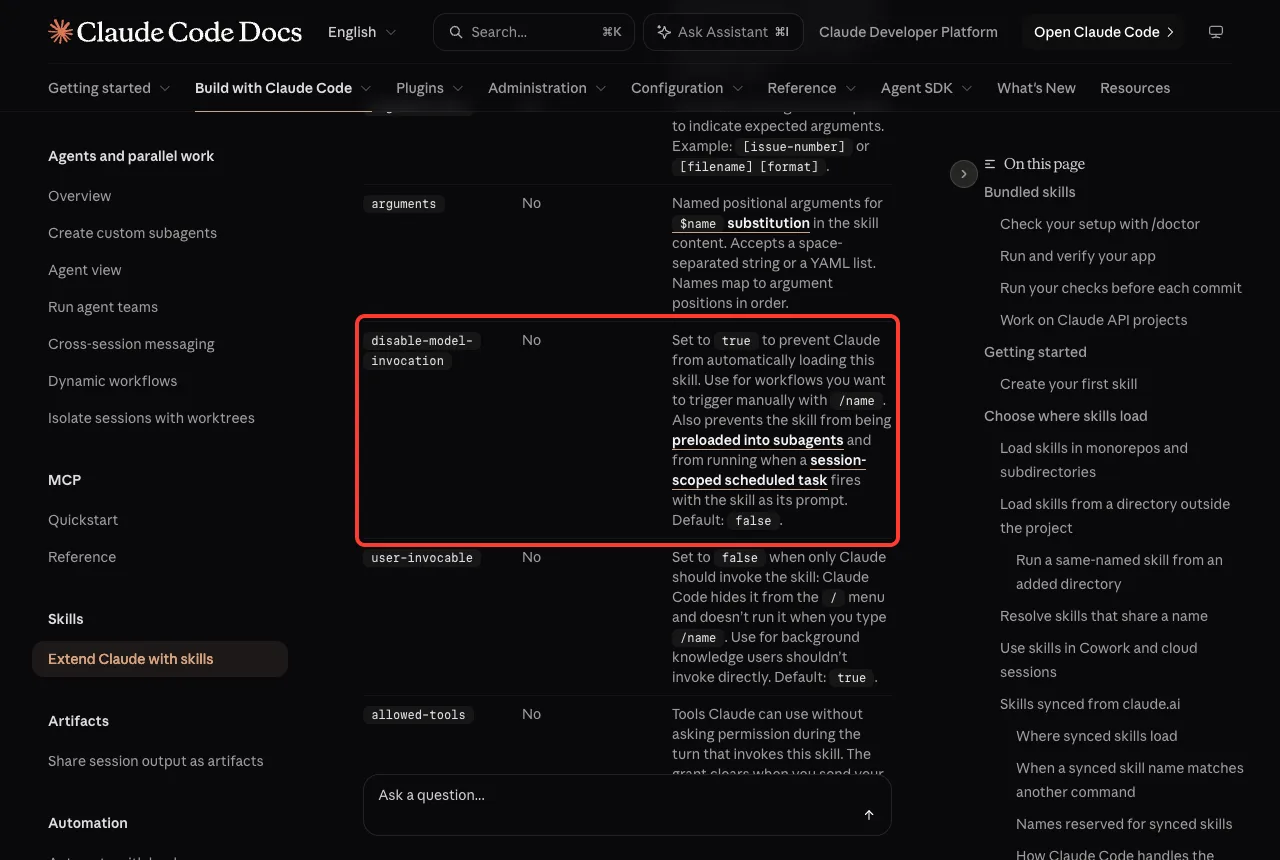
We did not set it in our test, so we only know that our skill ran when we typed it. If a documentation skill writes files into your repository, setting it to true is a sensible choice, because you decide when it runs.
Compare that with a read-only skill such as a code review, where letting Claude trigger it on its own is usually harmless. Our post on workflow versus skill helps you decide which shape fits your job.
Honest Verdict
The skill is worth the few minutes it takes to write if you document several small projects and want them to look alike. It produced a clean README on the first run, it was careful about guesses, and its Limits section was the most useful part.
It is not a magic upgrade. The plain request produced an equally accurate README that was longer and a bit friendlier to beginners. If you document one project once, you may not need a skill.
Keep the limits of our test in mind. We documented one tiny project with one run per setup, and we did not repeat each run many times. A bigger codebase, or a different template, may give different results.
Who should build one
- You maintain many small repos and want the same README shape in each.
- You care that docs never claim things the code does not do.
- You want a reply that lists what Claude was unsure about.
Who can skip it
- You write a README once for a single project. A plain request works fine.
- Your team already uses a template in another tool and you do not want a second one.
Try It Yourself
Make a demo folder with a few small code files, never a real project. Save the skill from above, then start Claude Code with project settings only.
mkdir -p ~/claude-code-demos/docs-test/.claude/skills/doc-writer
cd ~/claude-code-demos/docs-test
# save the SKILL.md from this post in .claude/skills/doc-writer/
claude --setting-sources project
Inside Claude Code, run /skills to confirm that doc-writer is listed. Then run it.
/doc-writer .Read the new README.md next to your code and check every function name and argument. If the skill does not show up, see our fix guide on skills not triggering.
Ideas to extend it
- Add a section for environment variables, with the rule “list only variables the code reads”.
- Ask for a short “Troubleshooting” section built from the errors the code raises.
- Make a second skill that only updates the API table after you change a function.
- Test your changes with the method in our guide to testing skills.
Common Mistakes
- Letting the README state versions, commands or features the code does not show. Tell the skill to write “Not documented yet” instead.
- Leaving out a length limit, so the README grows with every run.
- Trusting the output without checking it. Read each table row against the code at least once.
- Assuming
allowed-toolsblocks other tools. It only pre-approves the ones listed. - Running the skill in a real repository before you have tested it in a demo folder.
Pro Tips
- Ask for a closing line of doubts. It turns hidden guesses into a short list you can fix.
- Put the strictest rules near the top of
SKILL.md. The docs say that after a long chat is compacted, only the start of an invoked skill may be kept. - Name the exact file to write, such as
README.md, and say not to touch other files. - Use
disable-model-invocation: trueif you want to be the only one who starts it. - Check your name against the commands reference, and browse more ideas in our list of UI design skills.
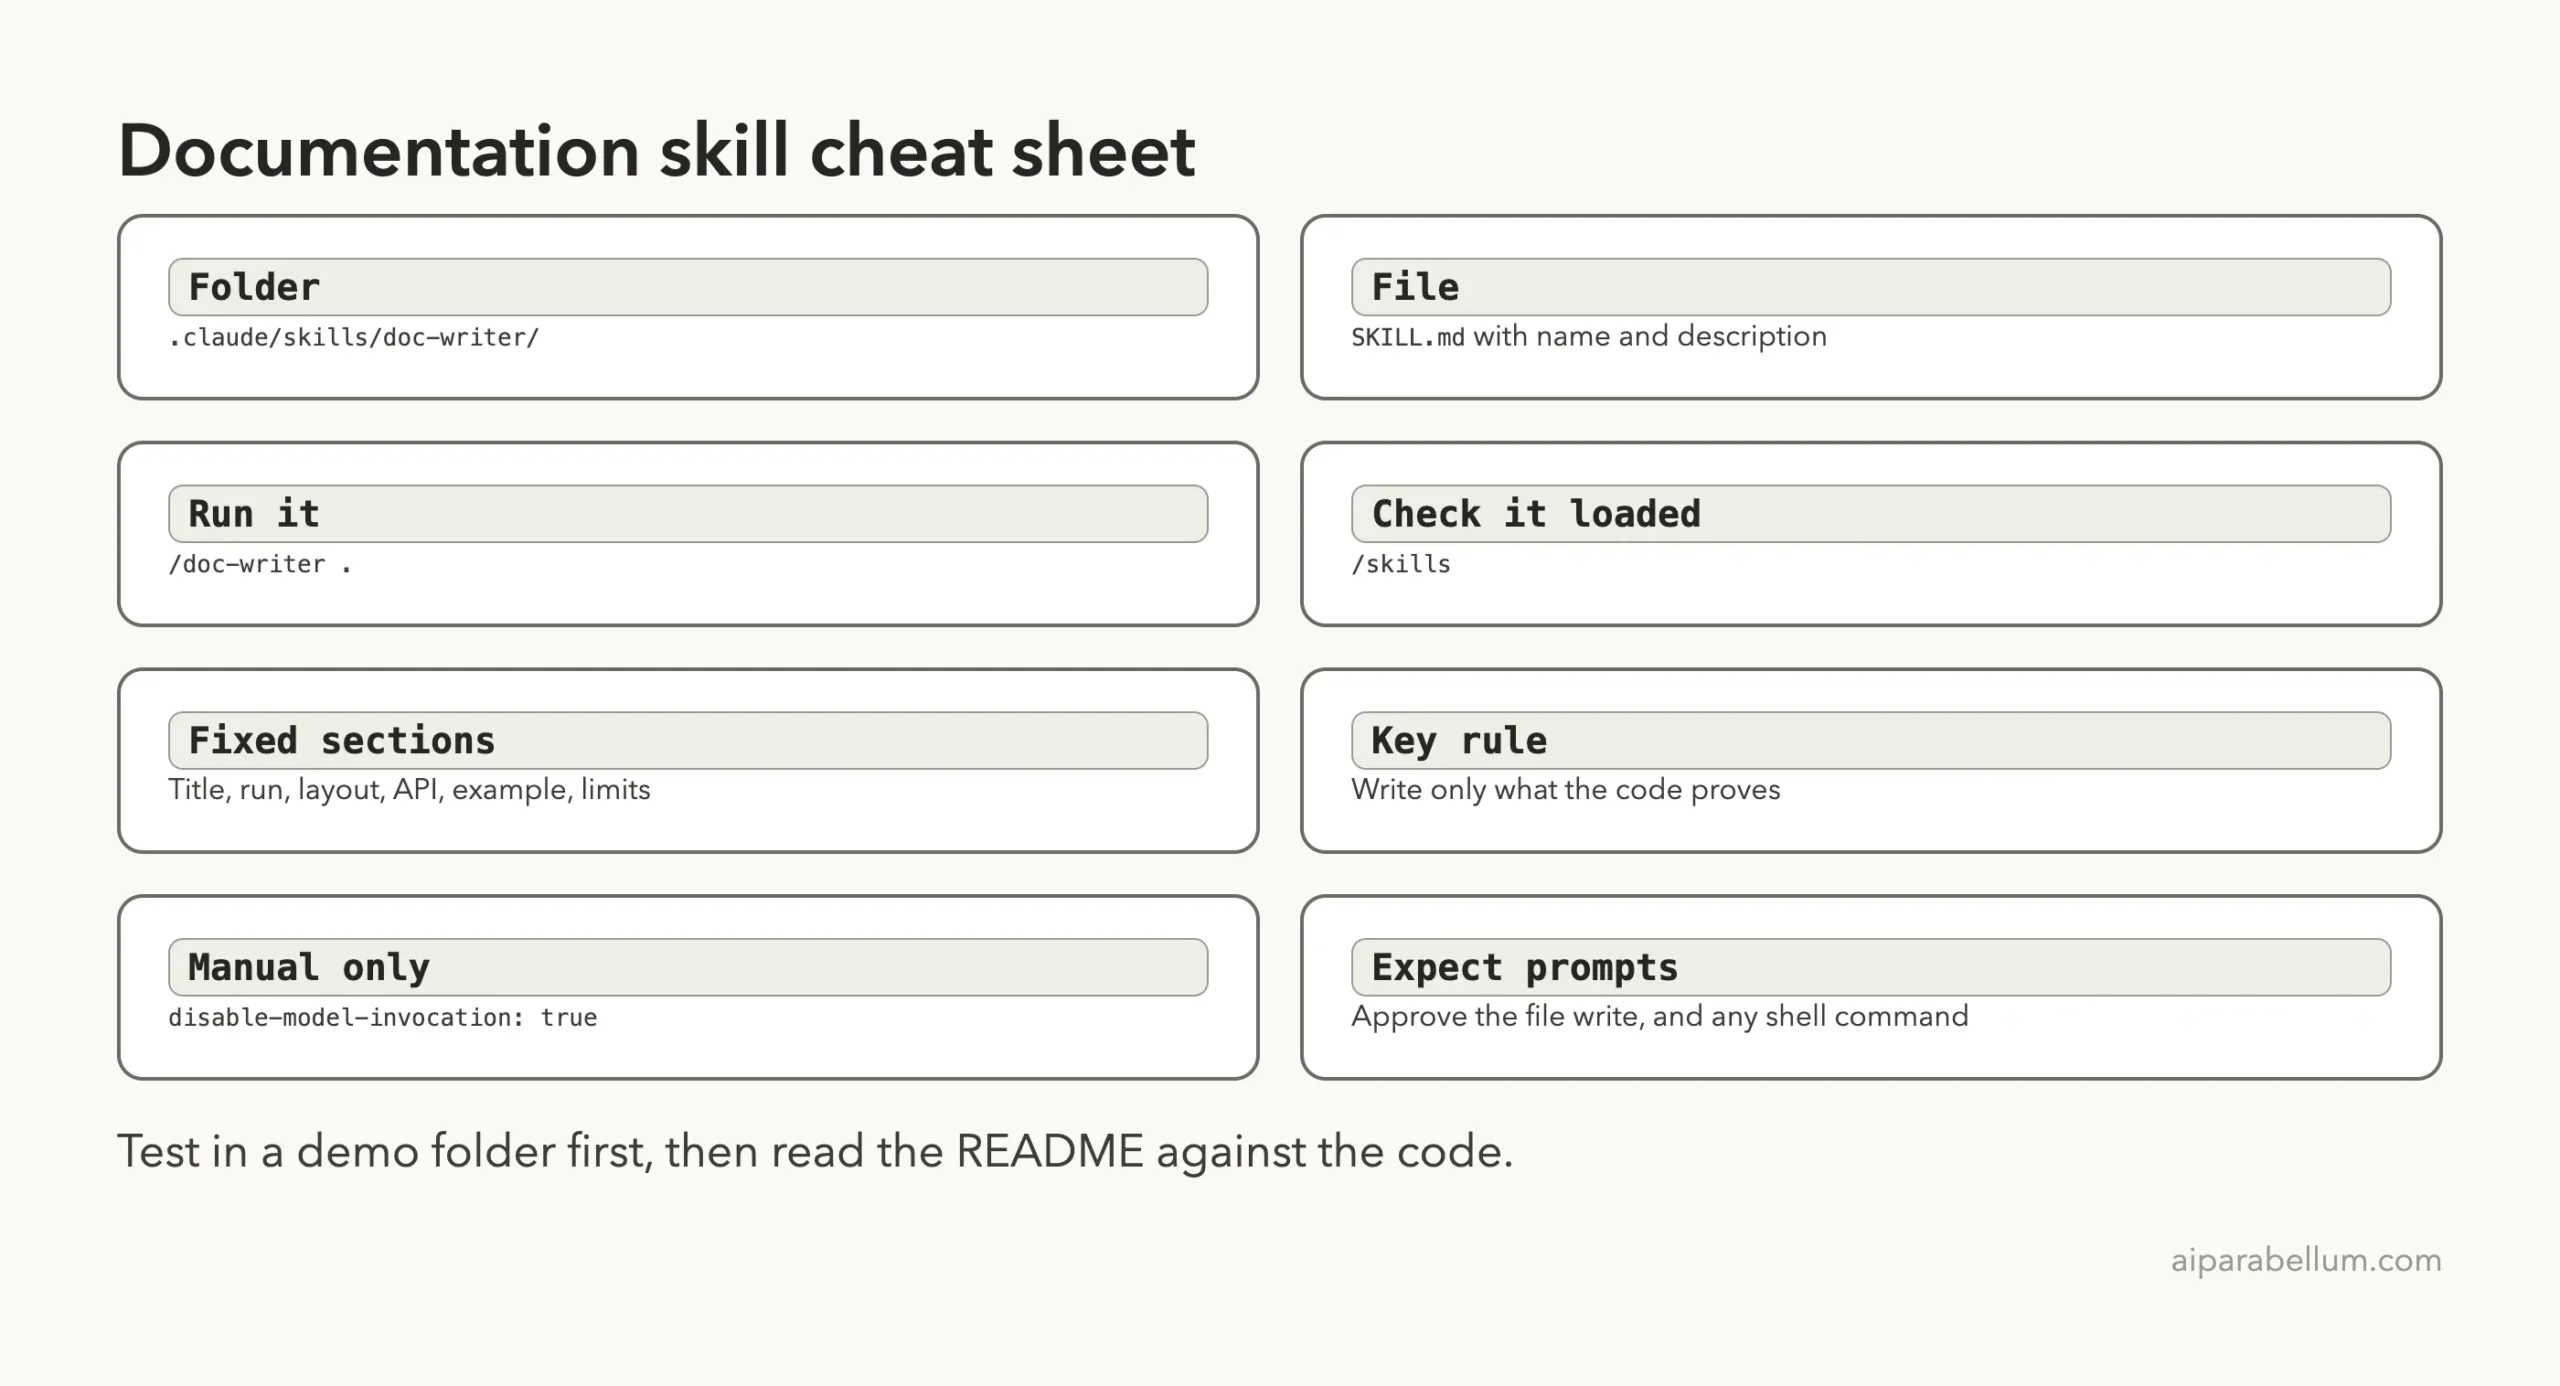
Cheat Sheet
Frequently Asked Questions
Do I need a plugin to write documentation with a skill?
No. We saved one file in .claude/skills/doc-writer/ inside a project, and it showed up in /skills right away.
Will the skill edit my source code?
In our run it wrote only README.md, and its reply said it did not edit any other file. That behavior comes from the instructions, so it is guidance, not a lock. Check your files after the first run.
Why did Claude ask for permission if I listed read-only tools?
Because allowed-tools pre-approves the listed tools but does not forbid others. Claude chose a shell command to read the files, so the normal permission prompt appeared.
Is the skill better than asking for a README directly?
It gave us a fixed layout and a list of doubts. The plain request gave us a longer README with extra helpful notes. Pick the skill for consistency across projects.
Can it update an existing README?
Our description says “write or update”, but we only tested writing a new file in an empty folder. We did not test an update, so try it on a copy first.
Conclusion
A claude code documentation skill took a few minutes to build and gave us a short, accurate README with a fixed layout and an honest list of doubts. A plain request produced a longer README that was just as correct on the numbers we checked, but it stated a Python version the code never mentions. Use a skill when you want the same shape every time, keep the “write only what the code proves” rule, and expect a couple of approval prompts on the first run. Copy the file above into a demo folder and adapt the sections to your own projects. For more guides, browse our Claude hub.
Previous in the series: Part 12: Claude Code Skill for Code Review: Build and Test One
Next in the series: Part 14: Claude Code PowerPoint Skill: Make a Deck From the Terminal.